|
|
|
|
|

Christmas Projects
|
Projects on this page have been designed and created by Karen Mortensen. |
|
|
 |
 |
 |
 |
 |
 |
 |
 |
 |
 |
 |
|
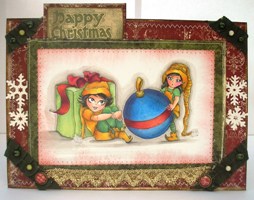
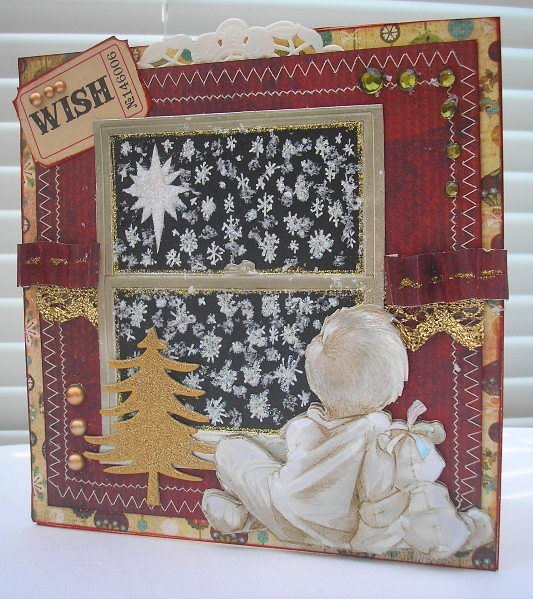
Designed by Karen Mortensen
Products used for this project:
Instructions
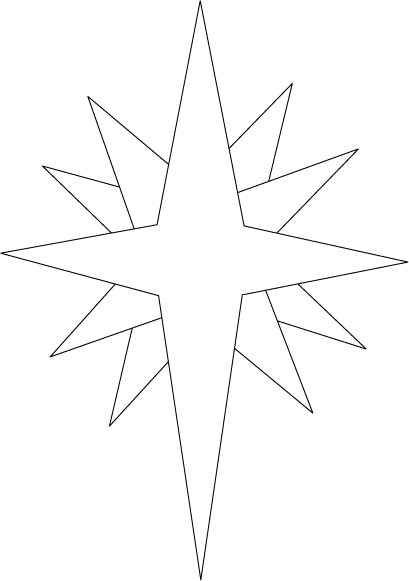
The new Charlie's Ark range of products are so easy to use. I used one of the decoupage sheets here. Cut a 6x6 card from a sheet of plain cardstock. Ink the edges of a sheet of Basic Grey Jovial paper a little smaller than the front of your card. Cut another piece of coordinating Jovial paper and again ink edges. Sew the smaller piece onto the larger - or sew the borders on the smaller piece then stick it onto the larger piece. I did the latter and added a piece of paper doily between the two panels so it is poking up at the top. Wrap a piece of Gold lace around the smaller panel (see picture) and stick it onto the front of the card. Cut a piece of black cardstock and stick it behind the Charlie's Ark window frame. With a glue pen draw around the inside of the frame and add Gold Glamour Dust on the edges. Draw snowflakes on the black background with a white pen and decorate some with Polar White Flower Soft. Print out a star (below), cut it out, and decorate with white glitter or Stickles.
Take two lengths of leftover paper from cutting out the smaller panel. Fold them concertina style. Open them up and glue stitch like lines on the middle then sprinkle with Glamour duts. When dry carefully fold up again and add one piece either side of the window. Tuck a Tim Holtz Ticket in one corner of the window and top with a few pearls. I inked the edges of the ticket with red distress ink first. Add crystals and pearls as pictured. Add one golden Christmas tree from K&Co Evergreen Chipboard Shapes. Finally add Charlie and his friend and add to the front, layered with foam pads or silicon glue. The Decoupage sheet is die-cut so no cutting required.
|
|||||
|
|
|||||
|
|||||
|
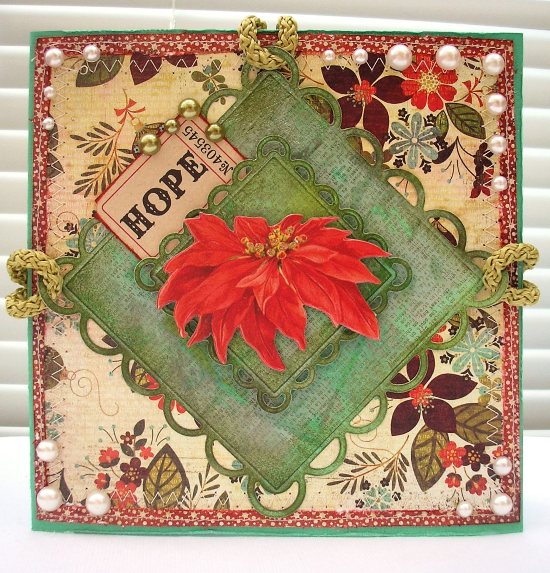
Designed by Karen Mortensen
Products used for this project:
Special tools used: Instructions
Cut and fold a piece of cardstock into a card sized 6" x 6"
Cut two pieces of Basic Grey Jovial paper, one slightly smaller than the front of the card, and the other slightly smaller than the first piece. Stitch together. I also sewed a straight border around the larger piece. Stick to front of card.
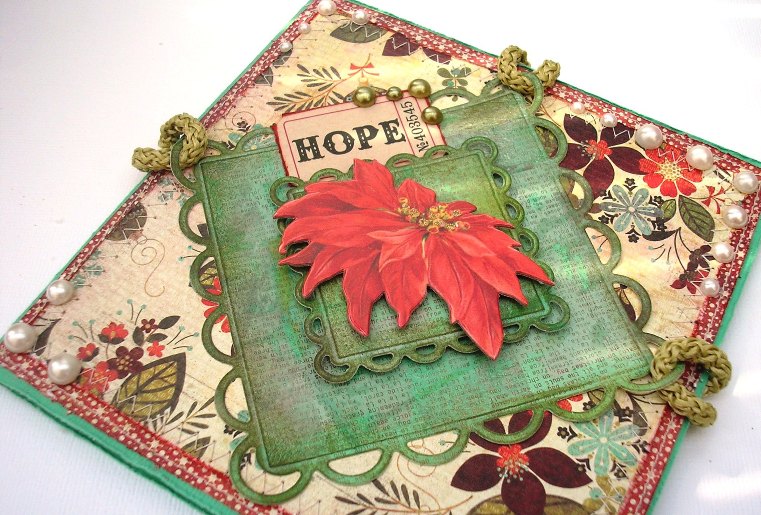
Cut and emboss two Nestabilites shapes and ink edges with green distress ink. Stick the large one on first, leaving the three loops unstuck as shown, then thread braid or ribbon through these three loops.
Attach the smaller shape on top using foam pads.
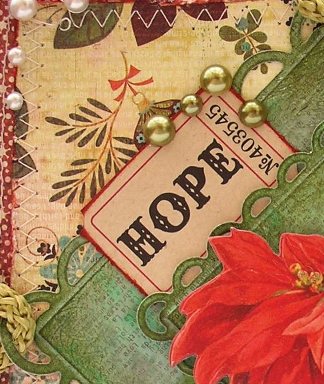
Add a Tim Holtz Ticket (Ink edges first) tucked between the two layers. Add a few pearls.
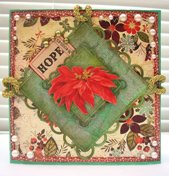
Add pearls to all the corners and a chipboard Poinsettia to the middle.
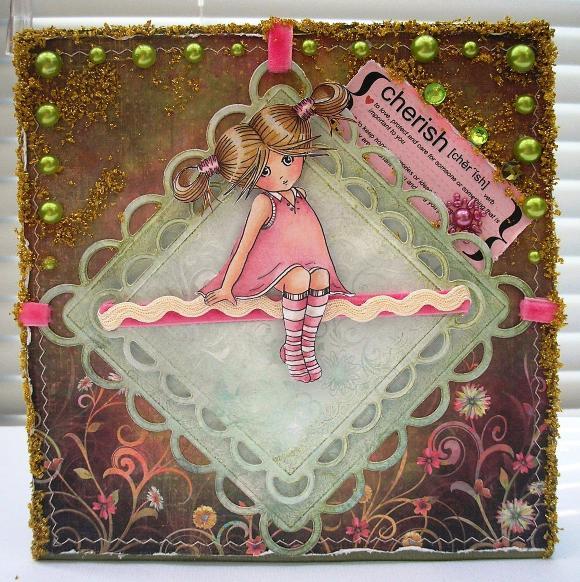
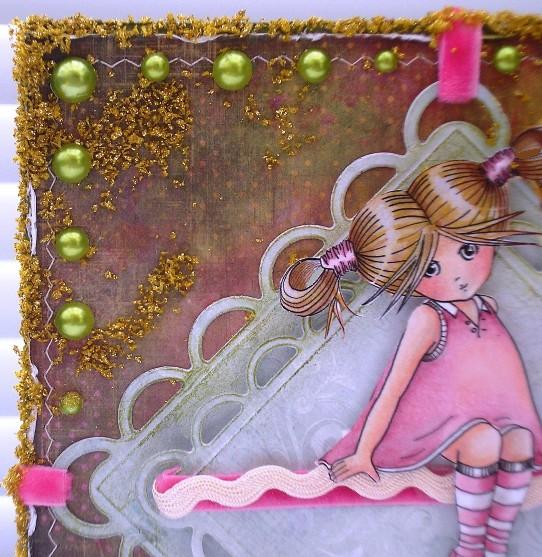
These Nestabilites are wonderful for all your card creations. Here is another example using this particular Nestabilites set.:
This card uses the Delectable Annie sitting pretty stamp and Prima Fairy Flora pad. The sentiment is a Charmed Perfectly Defined download (FREEBIE). Again I stitched a border around the card and roughed up the edges with my Tim Holtz paper distresser. Prima pearls and crystals. Velvet ribbon is Dovecraft value ribbon.
I used Flower Soft Gold on this card. It's totally scrumptious and gives a rich luxurious feel.
|
|||||
|
|||||
|
Designed by Karen Mortensen
Products used for this project:
Special tools used:
Cut and fold a piece of cardstock into a card sized 6" x 6"
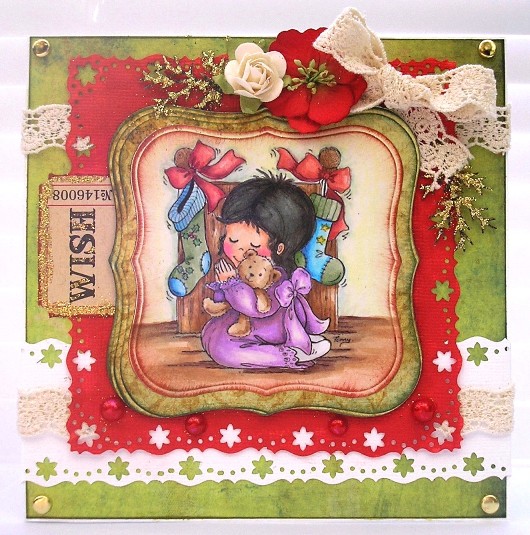
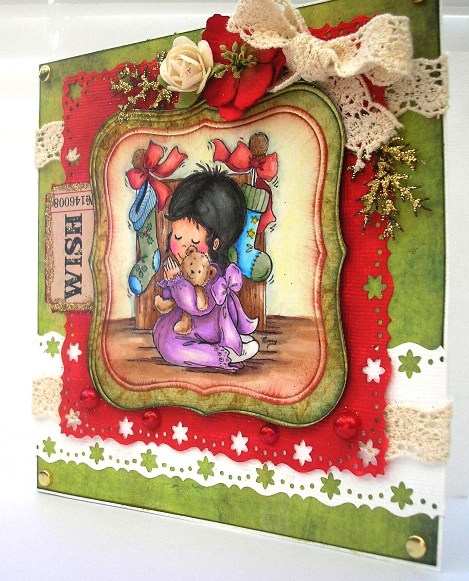
Cover the front with a piece of green Fancy Pants paper from the Happy Holiday pad and ink edges with green Distress ink. Add a gold brad to each corner.
Cut a piece of white cardstock 6" x 2" and punch each edge with a Martha Stewart Poinsettia Flourish edge punch. Stick to the card as pictured. Adhere a length of lace on top of the strip. Adhere another piece of lace at the top of the card.
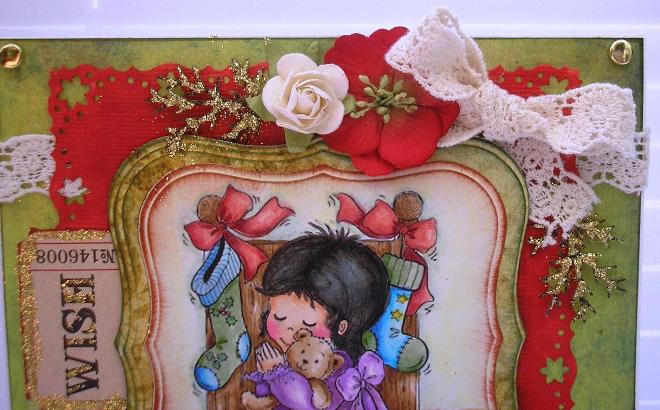
Cut a 5" square piece of red cardstock and punch around the borders with a Martha Stewart Poinsettia Flourish PATP set (both edger and corner punch). Adhere to the front of the card.
Stamp the "I Wish" image and colour in. Cut it out using a Nestabilites die. Ink edges with red distress ink. Layer on top of a a larger Nestabilites shape inked with green distress ink. Stick on the front of the card.
Create a little arrangement on the top of the card. I tied a lace bow with a red Prima flowers and a white Prima rose. The branches were cut with a Martha Stewart punch and glittered.
Finish with a few red pearls at the bottom. I didn't have the exact red I wanted so coloured some pearls I had the right colour using my marker pens..
|
|||||
|
|||||
|
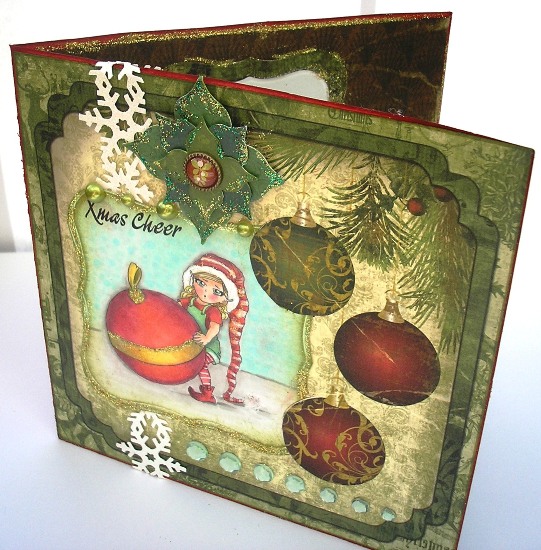
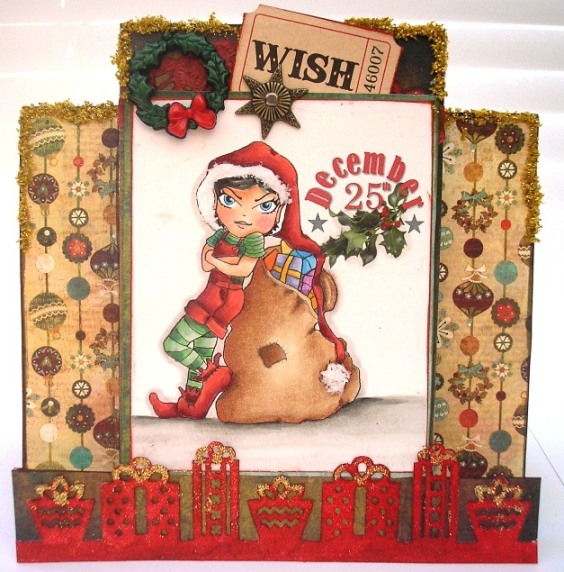
Designed by Karen Mortensen
Products used for this project: "Guarding Santa's Sack" image plus sentiment. Both from our Santa's Little Helpers Bundle Plain cardstock Basic Grey Jovial Paper K & Company Evergreen Layered Accent (large Snowflake) and Metal Snowflake brad. Tim Holtz Distress Ink Gold Glamour Dust Glitter
Tools: Martha Stewart Gift Deep Edge Punch Instructions
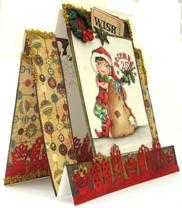
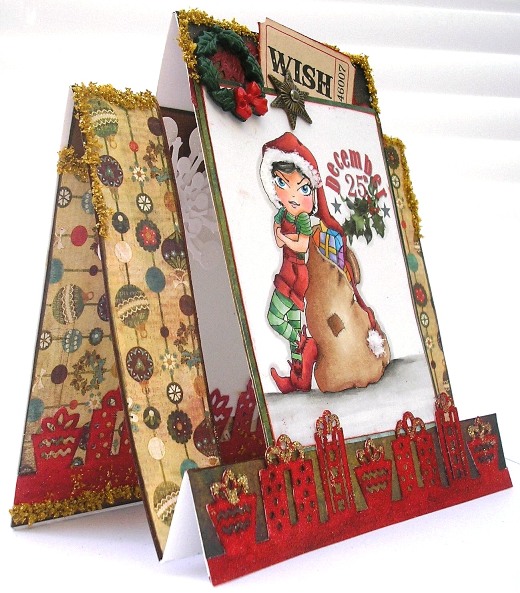
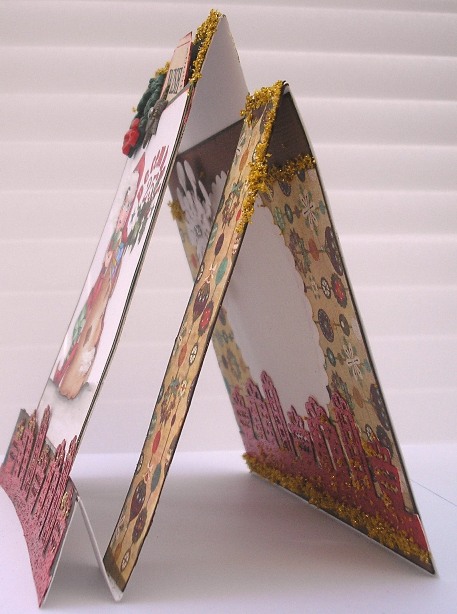
A Fun card with a funky shape.
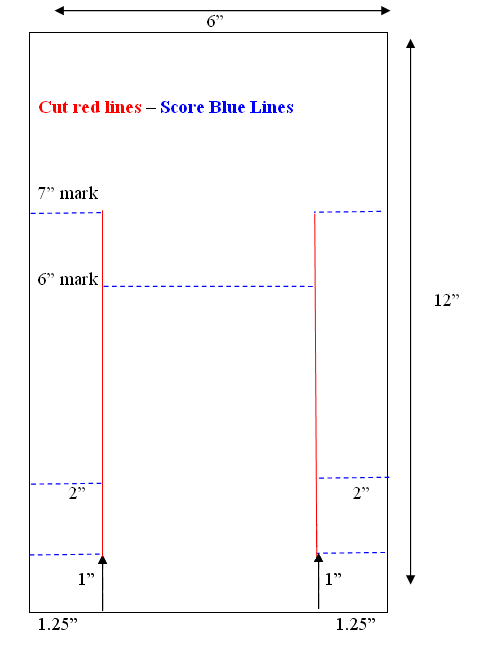
Cut a piece of plain cardstock into size 6" x 12". Score and cut as instructed in the next picture. The line cut line starts at 1" and ends at 7":
Look at the pictures of the finished card for guidance on how to fold.
Cover the two narrow side strips in Basic Grey Jovial paper (ink edges with Distress ink first).
Cover the middle panel and the front panel in plain Jovial paper.
Punch a strip of gifts using a Martha Stewart Deep edge punch and stick to the front of the card.
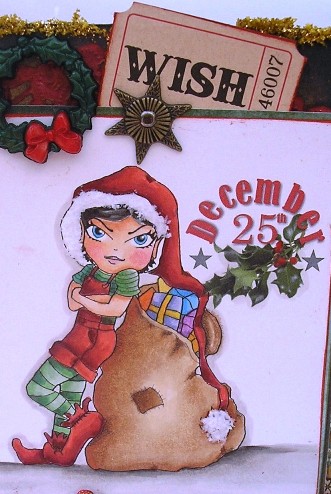
Merge two images from our Santa's Little Helpers collection (Image and sentiment) and print them out. Colour in the image or use the ready coloured image in the bundle. I made mine 8cm tall.
Ink edges with red then mat the image onto green paper. Stick onto front. I coloured a little piece of doily red and stuck it behind the image.
Pop a Tim Holtz ticket behind the image (ink edges first). Add an K&Co Evergreen metal snowflake brad and a Dress it Up Wreath button. Decorate edges as shown with Flower Soft Gold and the bows on the punched gifts with Gold Glamour Dust.
Raise the front and decorate the inside as pictured:
Snowflake is a K & Company Evergreen Layered Accent. Circle has been cut with a Nestability.
|
|||||
|
|||||
|
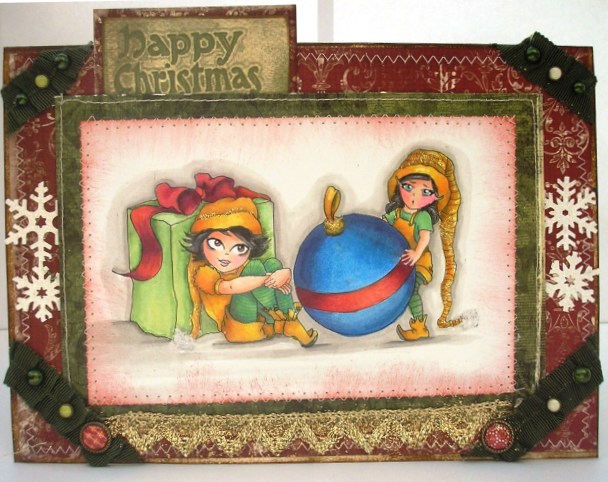
Designed by Karen Mortensen
Products used for this project:
Special Tools used: Martha Stewart Deep Edge Punch Snowflakes
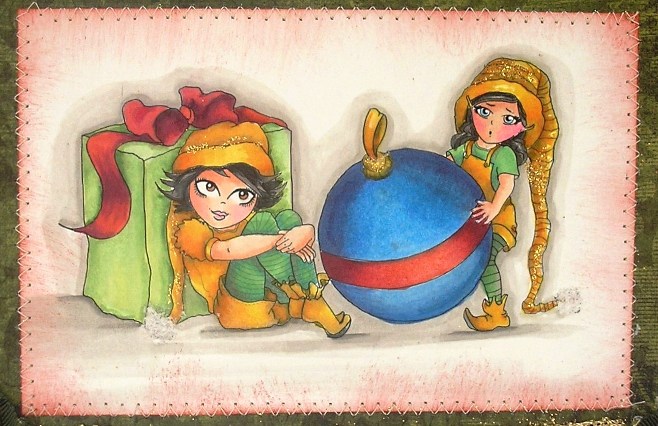
Instructions This is a larger card and it illustrates the beauty of our downloads. I have used two images here and made theme exactly the size I wanted them to be.
Make a card sized 8.5" x 5.5". Ink edges on the front with dark brown distress ink.
Cover the front with Bo Bunny CHEER paper - sew the edges of the paper first with a zig zag stitch. Before you cut it turn it over and cut out the words "Happy Christmas" from the other side, this will be our sentiment.
Print your images out and colour in your images. Add a little fine golden glitter here and there as pictured. Add some Flower Soft Polar White to the baubles on the hats. Ink edges with red ink; brush it on lightly. My images measure 2.7" tall and 2.25" tall. The white centrepiece measures 3.8" x 6". Mat on Bo Bunny Noel JOY paper by first gluing the middle (NOT the sides) then sewing it together using a zig zag stitch. Don't glue the edges or your needle will get mucky. Stitch around the outside of the JOY paper with a straight stitch.
Punch two snowflake borders and stick them on the middle of the card. I used a glittery white cardstock but you can just add a little glitter to it.
Stick the centrepiece to the card.
Mat your "Happy Christmas" onto a scrap of JOY paper and tuck it behind the centrepiece.
Add a piece of gold lace below the centrepiece.
Add the lovely ruffled ribbon from the Noel Holly Berry Wrap pack around each corner and decorate with Basic Grey Jovial Glazed brads.
|
|||||
|
|||||
|
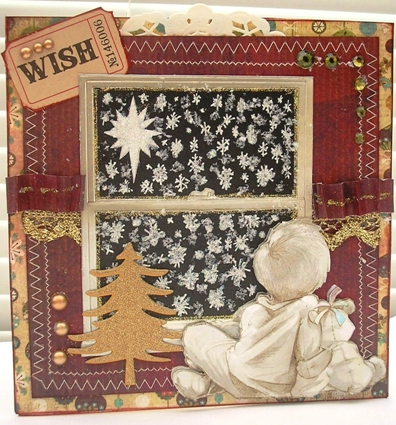
Designed by Karen Mortensen
Products used for this project:
Special Tools used:
Instructions
Cut and fold a piece of cardstock into a card sized 6" x 6"
Cut out one of the card toppers from the Bo Bunny Noel Cut-Out sheet. Ink edges with green distress ink then cut around the baubles where it is shown to overlap the centrepiece (see picture). Stick to the front of the card making sure the cut areas are NOT stuck down..
Punch a Snowflake border using a Martha Stewart Deep Edge punch and stick vertically on the card (see picture). My cardstock is glittered but you can just add a little fine glitter to it.
Print an image from our Santa's Little Helpers bundle. Mine measures 5.5cm in height. Colour her in then cut our around her using a Nestabilites die. Emboss shape around edges if poss. Stick onto card easing it under the cut-out baubles on the main paper. Stick the edges of the baubles down now.
Add a K&Co Poinsettia Layered Accent. I wanted mine a deeper green so coloured it with a marker pen. Add a Basic Grey Jovial Glazed brad to the centre then glitter lightly on the leaves.
Glitter edges of the shape and on the image. Add a little Flower Soft Polar White to the bauble on the hat.
Add pearls and crystals.
For the inside of the card cut a piece of Noel paper JOY as pictured. We are using the heavily patterned side of the paper here. Stick onto the card.
Add two Nestabilites cut shapes to house the sentiment later.
Glitter edges, Shapes and baubles with gold.
|
|||||
|
|
|||||
|
|||||
|
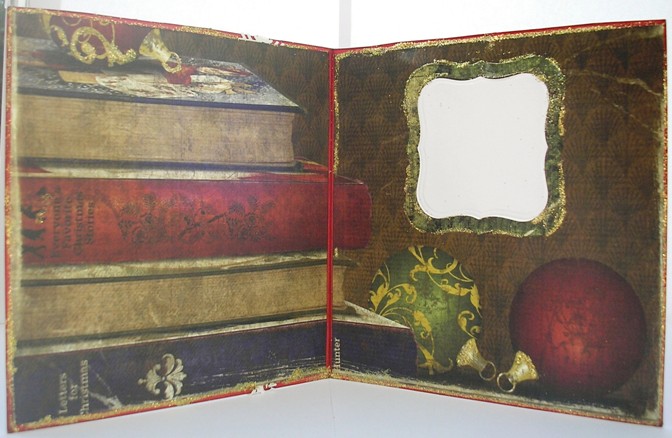
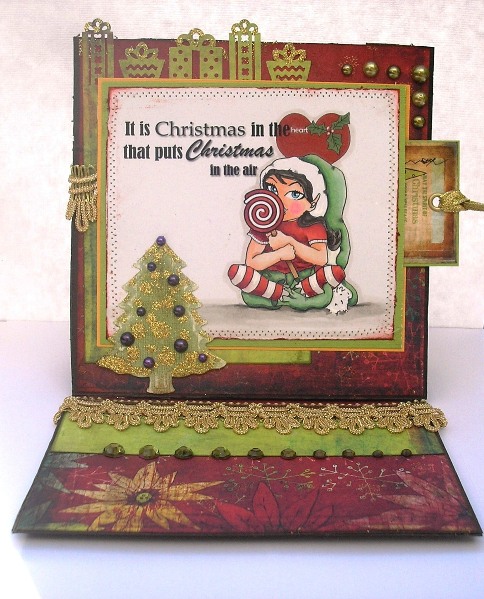
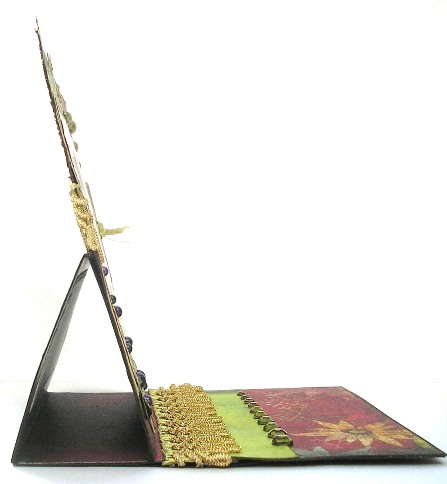
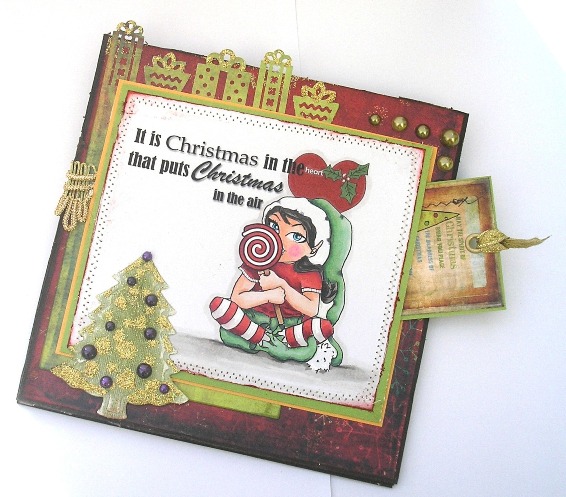
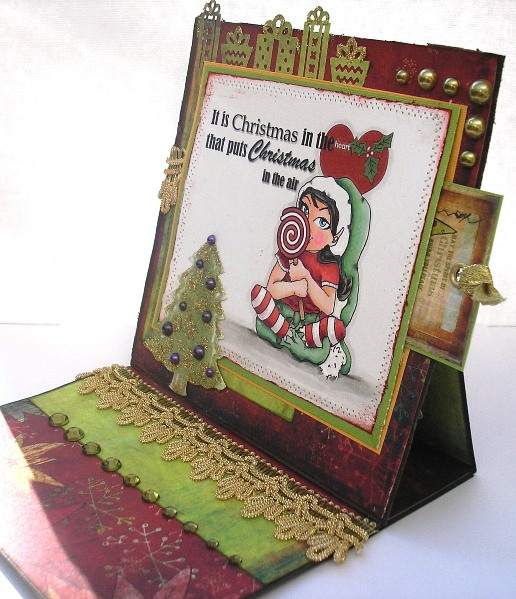
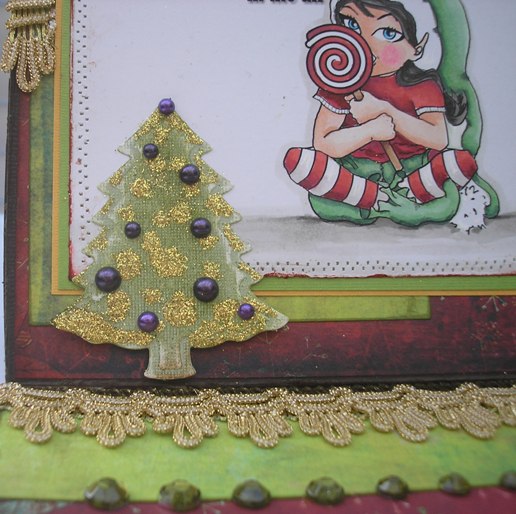
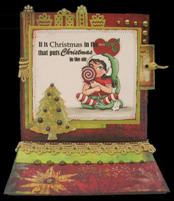
"Christmas in the Heart" Easel Card Designed by Karen Mortensen
Products used for this project:
Special Tools Instructions
Easel cards are fabulous. easy to make and very effective, they make a very impressive Christmas card. You can see how to make it in detail here on a previous project.
Card Front: Mat a 6" x 6" piece of plain dark brown cardstock with Fancy pants Happy Holiday patterned paper. Leave a bit of a margin to show the brown cardstock on the edges. This is the front of the card, Cut a piece of green paper (I used paper form the Fancy Pants Happy Holiday pad) 5.75" x 3.75". Punch the shorter length top with a Martha Stewart Gift Deep Edge punch. Stick it onto the front of the card as shown in the pictures. I am using two of the digi-stamp download images from our Santa's Little Helpers collection. With the sentiment it measures 8.5cm in height. Print it out and colour the Elf (there is a coloured version in the bundle if you prefer). Cut it out to a size 105mm x 123mm. Run the edges through your sewing machine but without any thread it in so we only get the holes. Rough up the edges a little then ink edges with red distress ink. Mat onto green cardstock. Make a tag by cutting a piece out of the Fancy Pants Happy Holiday pad, there is a sheet filled with sentiments and journalling pieces, as shown on the front of the pad. Mat it on green cardstock. Punch a hole at the top, insert an eyelet and thread gold ribbon through the top. The tag measures 73mm x 55mm (sorry for mixing metric and Imperial measures). Cut a piece of cardstock measuring 5.25" x 4.5". Cut another piece of cardstock a little larger than the tag you made. Sew it on as shown here, this is the pocket for your tag:
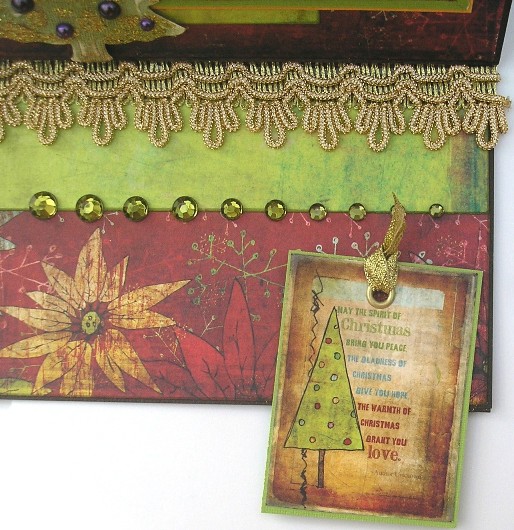
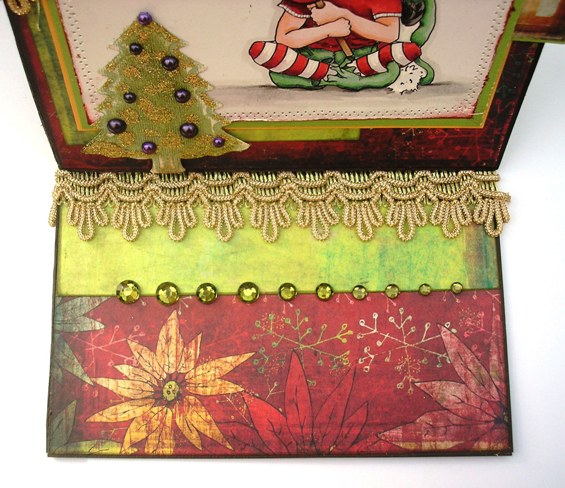
Turn it so that the opening is to the right and mat the centrepiece with the images on it. Stick on the front of the card as shown. Add a little gold braid on the card front, as well as gold pearls and glitter on the bows of the gift border. Make a little Christmas tree and stick it to the front. I used a Nestabilites dies. It is embossed also and I sanded down the edges to show the embossing. Add gold glitter and deep purple pearls to the tree.
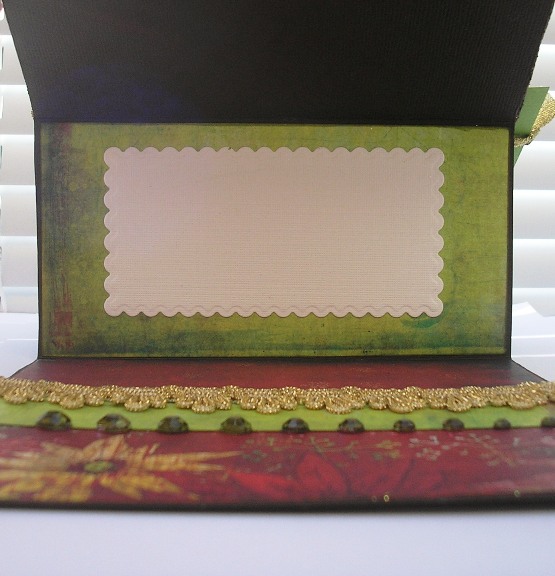
Now on to the frame: See how to make the frame HERE. Cover the frame in the same paper as shown in the pictures, see pictures for guidance. I inked all edges in green distress ink. Add Gold braid and crystals. The Bo Bunny Noel braid is totally delicious. The braid will act as a stopper for the front of the card. This time I decided to put my journalling (for you to write on) inside the front as you lift it, and leaving the front just as decoration. Again see pictures for guidance, I have included lots to make it easier to see. Stick your card front to the frame (again see earlier card example for details on how to do this).
Side of card when open.
Card closed
Gold braid acts as a stopper for the card front.
Place to write your greeting. This is shown when the card front is lifted.
|
|||||
|
|||||
|
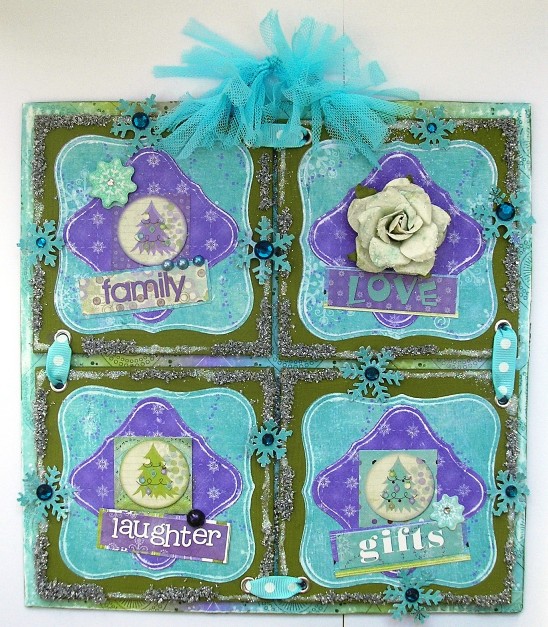
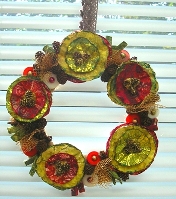
Designed by Karen Mortensen
Products used:
Tools:
Instructions
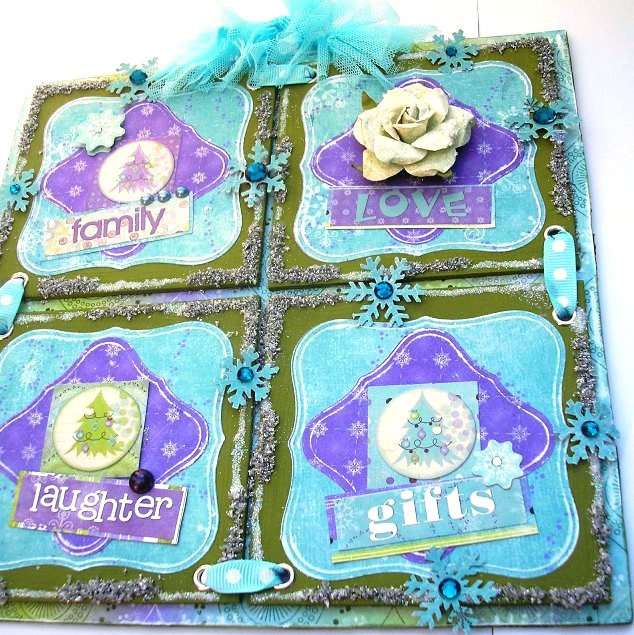
Cover the sheet of cardboard on the front with the BUNDLED paper. Ink edges. Punch two holes at the top and insert some florist wire to make a loop for hanging. Paint the four chipboard squares in green paint. When dry punch holes for the ribbon and insert silver eyelets (see pictures for guidance). I used my Crop-a-dile to punch and set the eyelets. Lay them on the front where you want them to go and mark through each eyelet on the board below. Punch corresponding holes in the board below. Glue the squares to the top then thread the ribbon through the holes you made, taking them to the back of the board. Punch or cut two panels for each topper in papers STRIPE and BRRR. I used Nestabilites dies and embossed then sanded the edges. Add Winter Joy stickers matted on scraps of paper left over. Add pearls, dimensional stickers and a large Prima rose. Glue Silver Flower Soft and fine crystal glitter on the edges as shown. Cut a snowflake border from scraps of the Winter Joy paper, using a Martha Stewart Deep Edge punch, then separate the snowflakes and stick them on as shown. Top each with a crystal. Wrap the blue Bo Bunny wrap around the loop at the top.
|
|||||
|
|||||
|
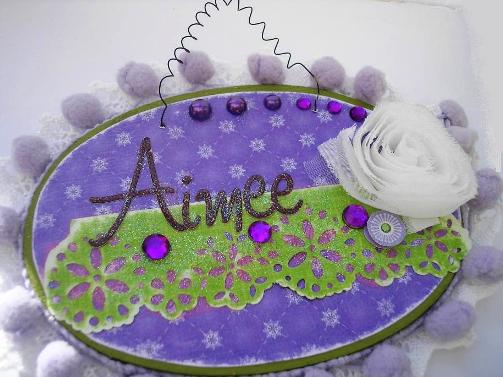
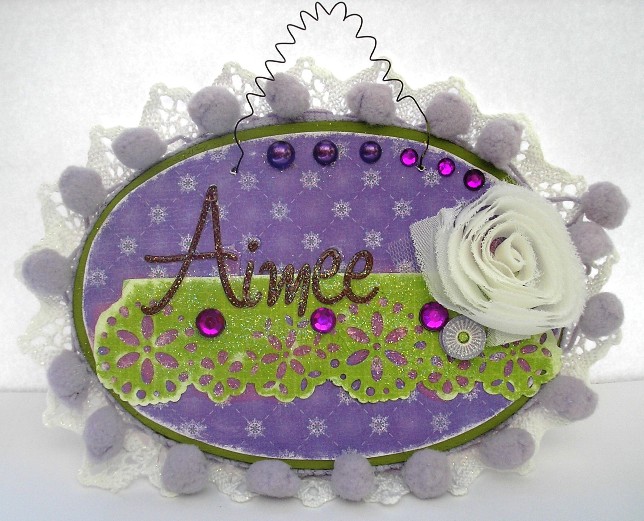
Designed by Karen Mortensen
Products used: Bo Bunny Winter Joy Papers Pom Pom ribbon from the Winter Joy Wrap pack Bo Bunny Winter Joy White rose Trim White Sparkle Lace
Special Tool: Martha Stewart Doily Lace Deep Edge Punch Basic Grey Precision File set (or use a little sandpaper or a nail file)
Instructions
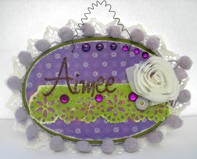
These are so easy to make and the children love them as name plates for the doors or walls.
Paint the front and side of the plaque with a green Paint Dabber. Leave to dry.
Add the white lace at the bottom all the way round.
Add the Purple Pom Poms on the edge all the way around.
Cut an oval slightly smaller than the front of the plaque with Bo Bunny Winter Joy paper. Very lightly sand the edges to show a little white. Stick onto front. Remove the wire first and put it back on afterwards.
Punch a small piece of green Winter Joy paper with a Martha Stewart Deep Edge Doily punch. Lightly sand edges and stick it to the front.
Cover the green piece with Crackle Glaze. Add the recipient name whilst the crckale glaze is wet then go over them with Glossy Accents. Very lightly sprinkly with ultra fine crystal glitter (I used Glamour Dust Glitter).
Finish off with pearls and crystals plus a white fabric rose from the Winter Joy Rose trim pack. I also added a little embellishment form the Winter Joy icandy Dimensional stickers pack.
|
|||||
|
|||||
|
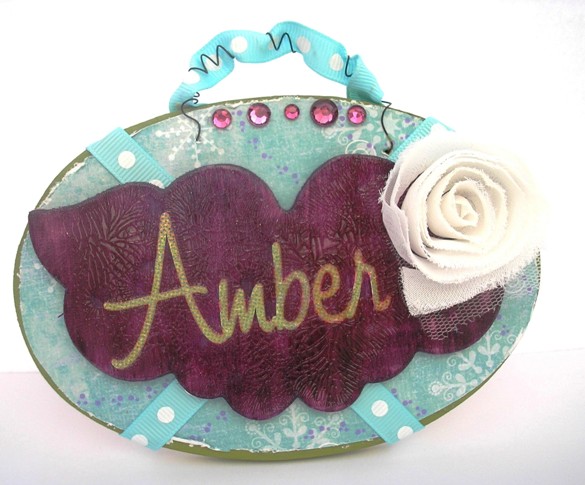
Designed by Karen Mortensen
Products used: Bo Bunny Winter Joy Papers Bo Bunny Winter Joy White rose Trim
Special Tool:
A variation on the previous design.
Paint the front and side of the plaque with a green Paint Dabber. Leave to dry.
Cut an oval slightly smaller than the front of the plaque with Bo Bunny Winter Joy paper. Distress the edges a little with a Tim Holtz Paper Distresser, or just rough it up with your finger nail. Stick onto front. Remove the wire first and put it back on afterwards.
Add the ribbon in a bog cross on the front.
Wrap ribbon around the wire at the top.
Colour the angle wings. I just coloured it with one of my purple marker pens. Add the recipients name. Cover the wings and name in Crackle Glaze.
Add the white rose whilst the glaze is wet.
Add crystals to the top.
|
All projects copyright ® Charmed Cards & Crafts.


.jpg)