|

|
|
|
|
|
|
Waterfall Card Class by Karen Mortensen This class uses our July'17 kit comprising the Graphic 45's "Master Detective" collection.
About a decade ago I created a class to show how to make Waterfall cards. This is an updated class showing a larger waterfall, and using our July'17 Master Detective kit, which I absolutely loved working with. You can see the original class HERE. I have used the detective theme and provided clues inside to the recipient. The card could be used to, for example, give clues to a day trip or other special event, or to the whereabouts of a hidden present. A really fun card.
|
|
Class supply list:
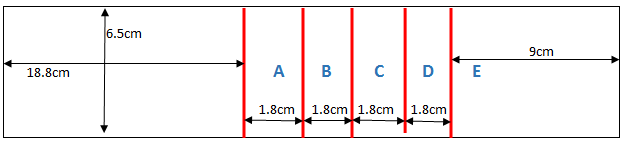
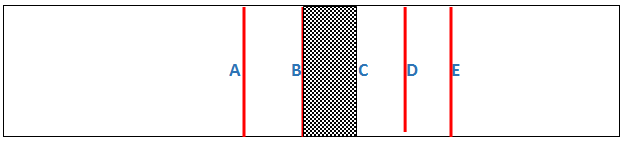
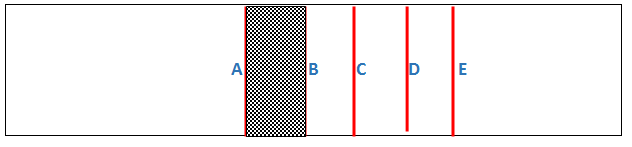
Papers used from the kit: Plain Cardstock: Raven Patterned Paper: Master Detective (cut out figures on front, Master Detective sign), Whodunnit? (waterfall and border strips), Sinister Secrets (background on front), It's Elementary (panel holding the waterfall and inside pocket). Clue panels from Charmed Cards & Crafts sentiment sheet. Embellishments used from the kit: Apricot ribbon, Black pearls, Feathers, Metal Key, Black web ribbon. Step 1 Prepare the water fall first. Cut out the following cards from the whodunnit? paper: Inspector Lestrade, Sherlock Holmes, Dr John Watson, Mrs Hudson, Professor Moriarty. Step 2 Cut a strip of the Raven cardstockinto size 12" x 2.6" (30cm x 6.5cm). This isn't long enough so we need to append a piece at the end extending it to 35cm (14"). So cut another piece measuring 7cm (2.8") long and attach it 2cm in with strong double-sided tape. Score the strip to make fold-lines as indicated below:
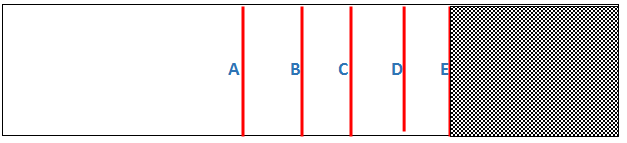
Now we need to position the cards on the strip. Glue "Professor Moriarty" onto the strip from fold E as shown below by the shaded area. Use adhesive or strong double-sided tape. Next add Mrs Hudson, you are sticking only the top of each of the remaining cards on the shaded areas:
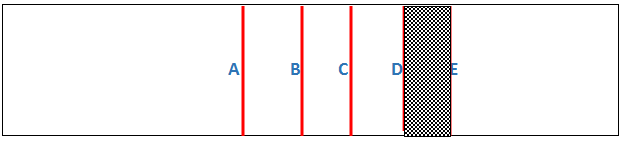
Dr John Watson is next:
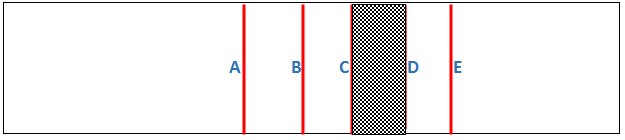
Mr Sherlock Holmes himself is next:
Finally turn Inspector Letrade around so that the "Master Detective" logo is uppermost and stick this on here.
You now how this:
For extra strength cover the end where you added an extra piece with patterned paper 16.25cm (6.5") up (patterned paper measuring 6.5" x 2.6" - 16.25cm x 6.5cm). Note this is on the reverse side to where you added the cards as we are folding the strip. Ink edges with black ink.
Fold the strip. Determine where you want the ribbon and insert an eyelet to hold it:
I have used a large A5 card measuring 8.25" x 5.8". Cover the front of the card with Sinister Secret paper and ink edges with black ink. Cut out the "Master Detective" sign from "Master Detective" paper. Position at the top allowing space for your waterfall. Look at pictures for guidance.
Back of card showing the back of the "Master Detective" sign:
Cut a 3cm wide strip of "Raven" cardstock the length of the width of your card. Cover it with the spider side of the It's Elementary paper.
Attach the waterfall strip by the first card (Professor Moriarty) to the middle of the spider strip as below (with double-sided tape). IMPORTANT: This is the only place that you are attaching the waterfall strip, do not glue anything else down.
Fold the long strip. Glue each end of the spider strip and stick onto card. Glue only the very ends, do NOT put any adhesive in the middle! The waterfall needs to be able to move freely. I glued approx 1" in either side. You can attach an eyelet either side for added strength (not done here).
Cut out Sherlock Holmes and Dr Watson from the signature paper and stick onto front as shown. I added a little Glossy Accent to Sherlock's magnifying glass:
You can see here how it works:
Now for the inside of the card: I covered the inside with a light brown cardstock but that is optional. Make the pocket. Cut a piece of the Raven cardstock into size 10cm x 14cm. Cut the corner as shown in picture. Add the Spider paper. At this point I only had bits of this paper left so I pieced it together using a piece of the Apricot ribbon at the point where the pieces met. Ink edges of the border piece with black ink then add the border strip both here on the pocket and on the top of the card as depicted. Add the words "Guess What" from the alphabet sheet in the kit. Stick pocket on with double-sided tape on the bottom and two sides leaving enough space for the tags to be inserted.
Make three tags on Raven cardstock and remnants of "Master Detective" paper. My tags measure: 2.5" x 4.25" (two of) and one 2.6" x 4.25". Add the clue numbers from the sentiment sheet in the kit.
Add your clues to the back and pop into the pocket:
|
WE HOPE YOU ENJOYED THE CLASS.
© Charmed Cards & Crafts 2017.. All rights reserved.
-.JPG)
.JPG)
.JPG)
.JPG)
.JPG)
.JPG)
.JPG)
.JPG)
.JPG)
.JPG)
.JPG)
.JPG)
.JPG)
.JPG)
.JPG)
.JPG)
.JPG)
.JPG)
.JPG)
.JPG)
.JPG)
.JPG)
.JPG)