|
|
|
|
|
|
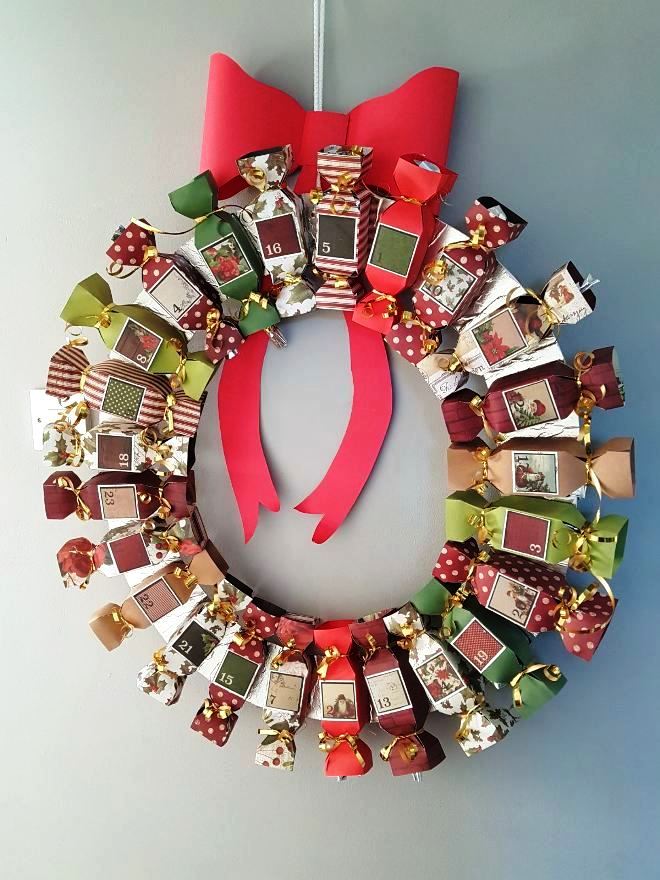
CRAFT PROJECTS: Christmas Advent Wreath
by Louise Singleton for Charmed Cards & Crafts
Showcasing "Letters To Santa" collection by Kaisercraft
|
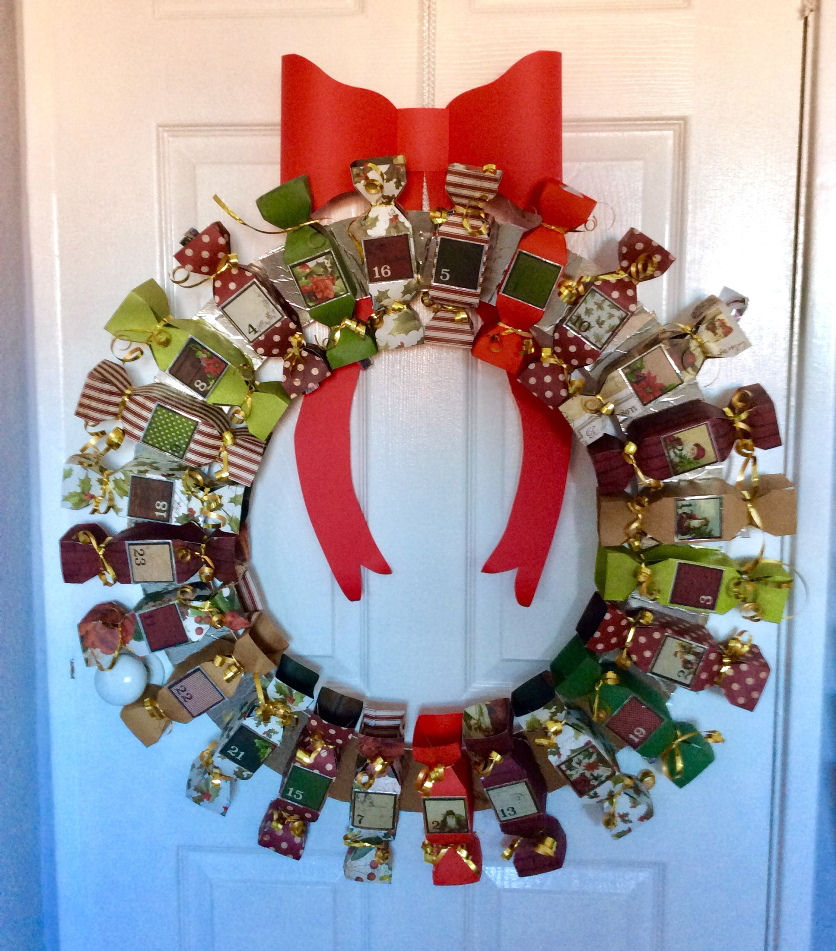
Introduction I was lucky enough to get married this summer and it was truly amazing but a wedding does tend to pull on the purse strings so this Christmas I decided to have a handmade Christmas, and you know what? I think it will actually make the act of giving and of receiving even more magical. When I was sent the Letters to Santa goodies to play with it couldn’t have come at a better time but, what do I make? When I am stumped I looked through my materials and see if inspiration comes – it sure did! When I saw the "Believe in Santa" 12x12 paper with the 24 numbers of advent on my problems were solved, let’s make an advent calendar! This calendar is huge! It is made up of 24 box style Christmas crackers which can hold decent sized gifts (some of mine contain pairs of socks!) it also folds flat so it can be used time and time again. Materials
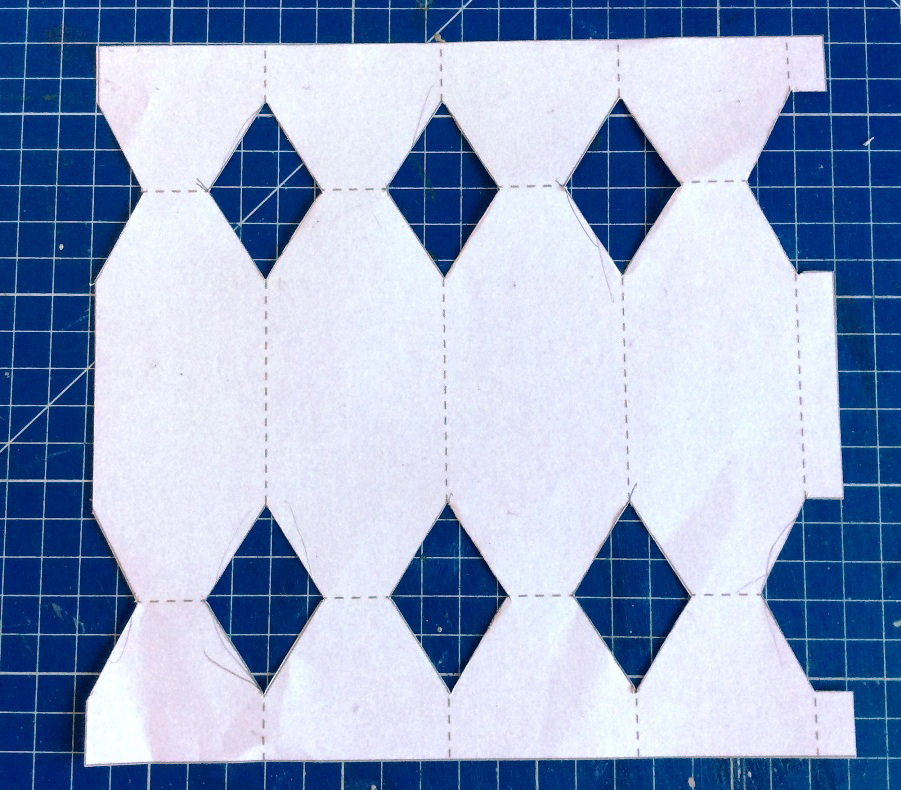
Instructions 1. Your first job is to get your cracker template. The one I have used was found on Google images when I put in an image search for Christmas cracker template and it was one of the first results that appeared. I can’t put that template on here for copyright reasons but it is free to use if you search for it as I did, it looks like this….
When you find the image save it to your computer and insert it into a word document. For me I didn’t need to resize it, it printed out at just the right size for me to be able to fit the number square onto one of the sides 196mm x 191mm 9including tabs. Of course, you can make your crackers any size you want but if you want to use the numbers from the ‘Believe in Santa’ paper you will need to check the number square fits and resize the template if needed.
2. This is the most time-consuming part, but it is worth it. After cutting out your template draw around it onto your choice of Letters to Santa paper, cut it out with a craft knife and score along the fold lines. Repeat 24 times. TOP TIP: You will only get one full template cut from one sheet of 12x12 paper but if you use the space carefully and position your template on the corner you will be left with an ‘L’ shape of excess paper. These ‘L’ shapes can be taped together, and you can then make more crackers from them, just make sure you position the fold line of the template over your taped seam and nobody will ever know!
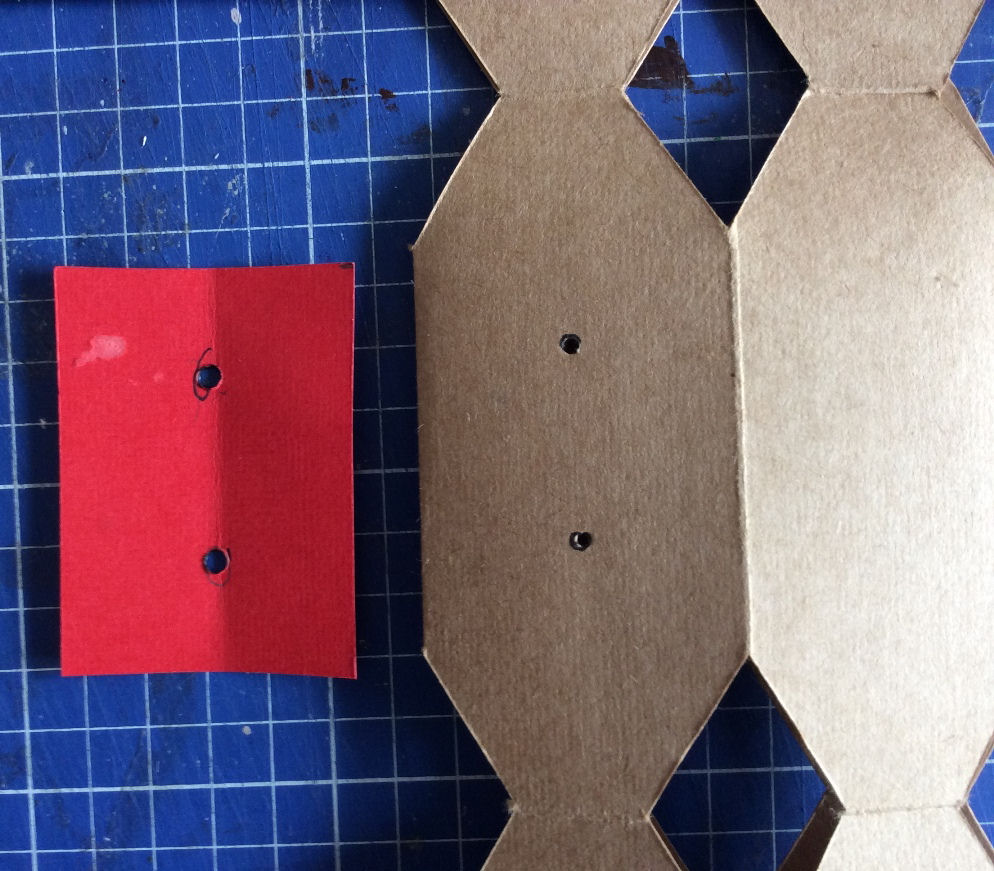
3. You now have 24 crackers ready to assemble but before you do you need to decide how the cracker will be attached to the wreath base. You could keep it simple and glue them on but I was worried that they wouldn’t hold much weight once the gift was inside, so I decided to use split pins. If you want to use split pins as I did you will need to punch small holes in the crackers at this stage before you assemble them. I recommend making a small guide to make sure all your holes are punched in the same place and you can use it later on to mark the hole points on your wreath base. It doesn’t really matter which of the four sides you punch your holes onto, but I would recommend punching the holes onto an end section so that when your wreath is assembled the join line on the cracker will be touching the base and not visible.
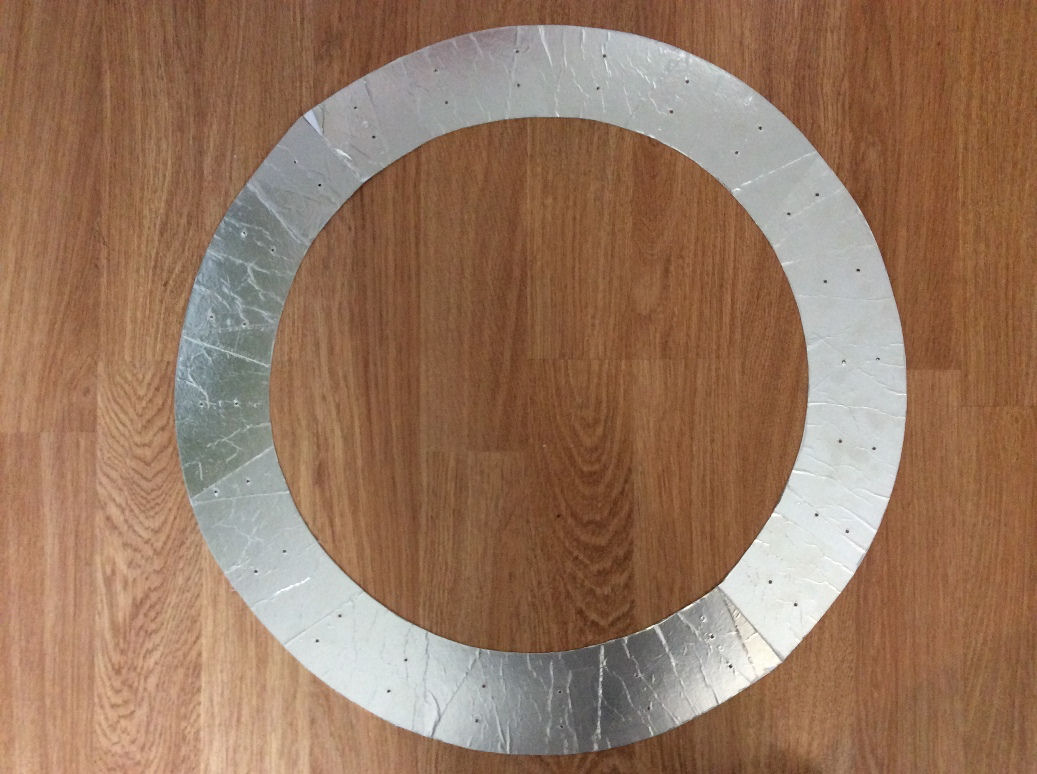
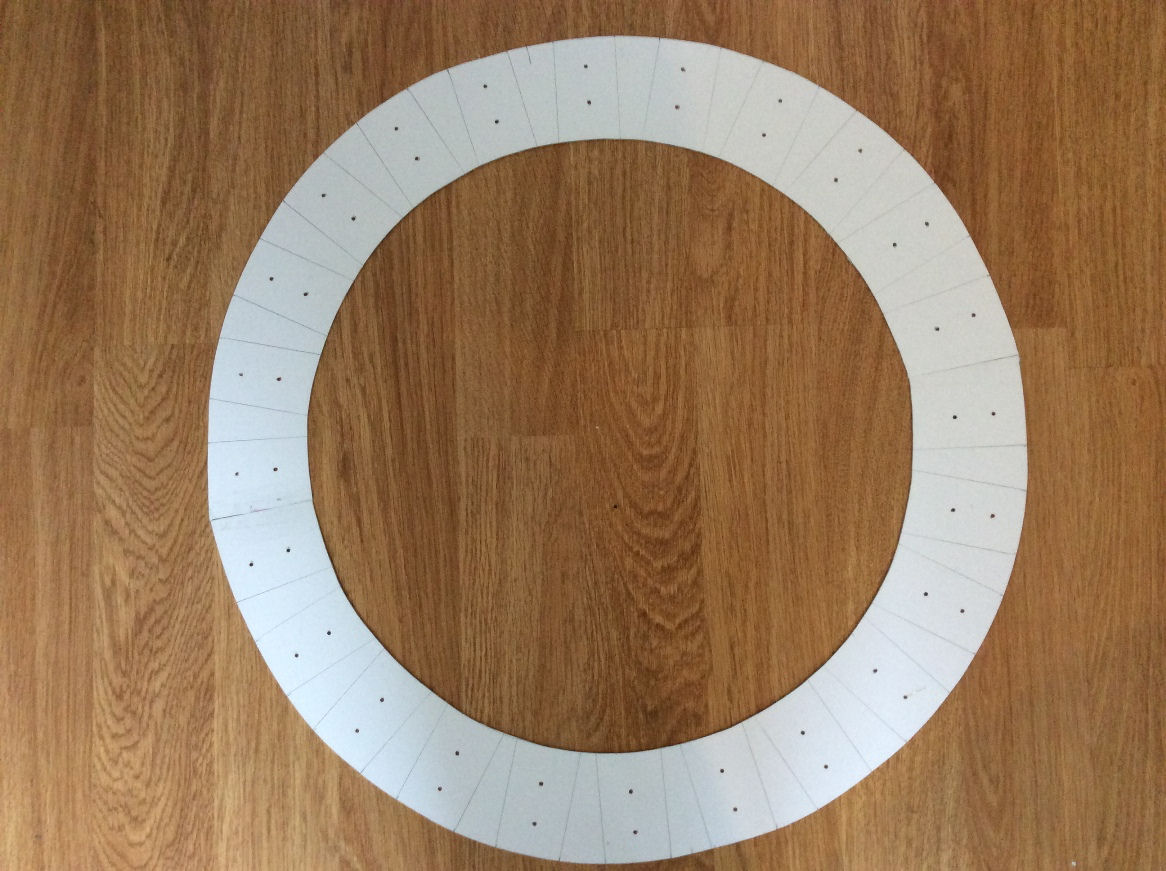
4. Now assemble your crackers using pva on the joining tabs and weigh down with something heavy whilst the glue dries (they should lay flat). When they are dry attach the numbers with glue or double-sided tape. Now tie one end of each cracker with your choice of ribbon – I used gold curling ribbon, this part is really a two-person job as it’s quite fiddly. 5. Time to make your base. I used mount board because it is good and strong -it needs to be strong! You could even use chip board or mdf if you are handy with a jigsaw. The most important part here is getting your wreath ring the right size. If you arrange your crackers on the floor in a ring shape you can simply measure how big you need your ring base to be min measures 47cm inner diameter and 64cm outer diameter. If you are good at maths you can be more precise and work out the circumference by measuring the width of the cracker end and multiplying by 24 to find the inner circle measurement but I’m afraid I’m not good at that so my husband took over at that stage! I decided to make my ring the width of the inner cracker so that it wouldn’t be too visible, but you could make yours as wide as the full cracker if you wanted to. Time to stop waffling. When you have decided on your measurements draw HALF of your ring onto your board using a length of string tied to a pencil at one end and a pin at the other end (I sliced a piece from a cork to place under the board where the pin needed to go). Now cut it out with a craft knife, draw around your half ring on your remaining board then cut out again. Tape the two halves together with extra strong tape suck as Duct tape. Decorate the right side however you like with paint or paper – I used sticky backed silver paper.
6. On the back mark out the position you want to attach the crackers, mark the hole points using the template you made earlier then punch, poke or drill (if using wood)the holes for the split pins.
7. Attach a long loop of ribbon, cord or thin rope for hanging the wreath (the wreath should hang with the fold line horizontal DN NOT attach the rope on the fold line) 8. Now, using the split pins attach the crackers to the base with the open ends facing outwards. This picture shows how your wreath will fold up when no ends are tied.
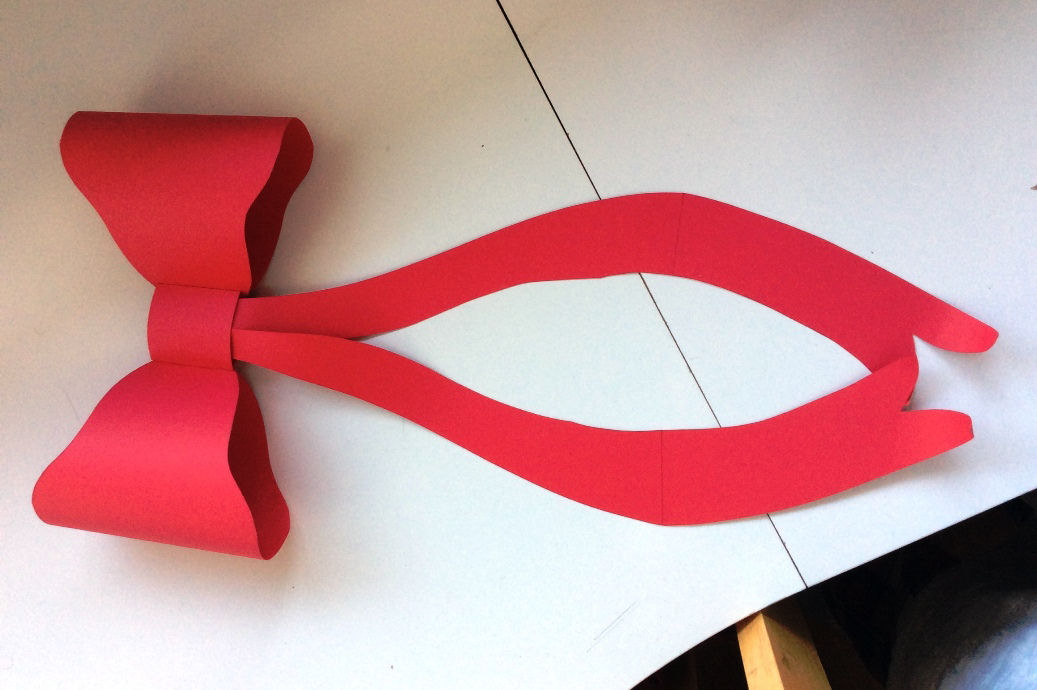
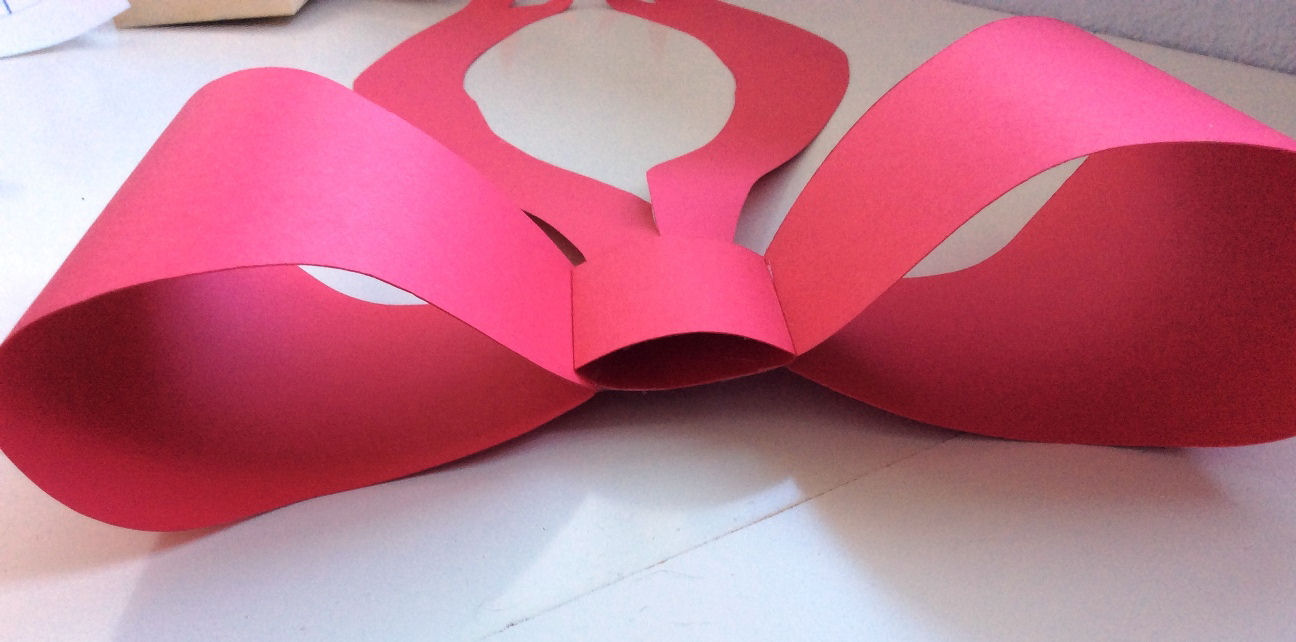
Finally make a large paper bow which will slot over the hanging loop.
Finally, fill your crackers with gifts and terrible jokes, tie all the ends closed and give to the lucky recipient. Merry Christmas!
|
All projects copyright ® Charmed Cards & Crafts. All rights reserved.