|
|
|
|
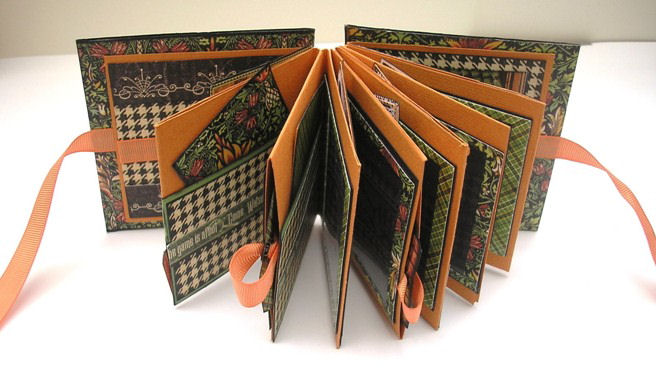
| Box and Mini Album Class by Karen Mortensen The box and mini album (maze book) uses our July'17 kit comprising Graphic 45's "Master Detective" collection.
The Mini Album fits snugly into the box.
|
|
THE BOX
|
THE MINI ALBUM
|
| Class supply list:
I found a fantastic video tutorial by Jim, The Gentleman Crafter, and followed that to construct my box, I later modified it to create a lid as you will see:
So following the above video tutorial these are my steps for the box:
Mark an 1/2" border on the sides of the "Get a Glue" paper.
Cut five pieces of chipboard, each measuring 3.5 x 3.5".
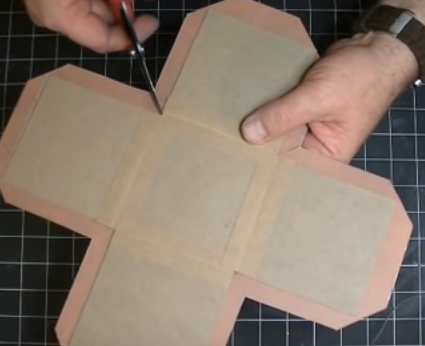
Stick double-sided tape on the squares and glue them to reverse side of the paper (the back that you do not want seen). Start from the middle of the bottom border and stick them on one by one, leaving an 1/8" gap between them:
Mark 1/2" around the pieces and cut it out:
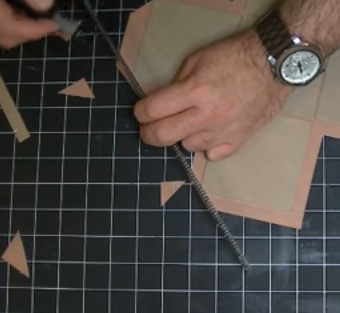
Cut the corners leaving an 1/8" gap - line a ruler up against two corners at the same time and cut, as Jim shows you here:
Create four 3.5" structure strips which are strips of heavy weight cardstock 1" wide, folded in the middle and with double-sided tape on each side.
Stick the V of each strip down in the gap between the chipboard pieces with the sticky side down and open it up so the sides stick to the chipboard pieces:
Cut each middle corner - from corner of paper to corner of the chipboard, as shown here by Jim:
NOTE: IN HINDSIGHT I WOULD HAVE LIKED TO HAVE DECORATED THE INSIDE AT THIS STAGE, AND NOT WAITED UNTIL THE BOX WAS FINISHED. If you wish to do so then do it now. Add double-sided tape to the tips and fold the tops:
then stick them down. Now add double-sided tape on all the other flaps. Stick down the sides of TWO OPPOSITE only, do not stick down all four flaps. You can see here the red double-sided sticky tape where the flaps have NOT been stuck down. We need these to go outside the box:
Stick the other two sides down on the OUTSIDE of the box.
Decorate the inside of the box. I used square pieces of the green cardstock from the kit:
Now make the lid exactly as you made the box, using one main piece of chipboard measuring 3.75" x 3.75" and four sides 1" x 3.75" We want an acetate window in the lid so create that first. Mark 1/2" in on all sides of the top:
Cut out the shaded area in the middle.
Use the green cardstock in your kit and construct the lid as you did the box. The only difference here is the acetate window in the middle:
Cut the hole as follows:
double-sided tape then fold back:
On the reverse it now look like this:
Add double-sided tape to all four flaps:
Cut a piece of acetate from your kit and stick it onto the double-sided tape:
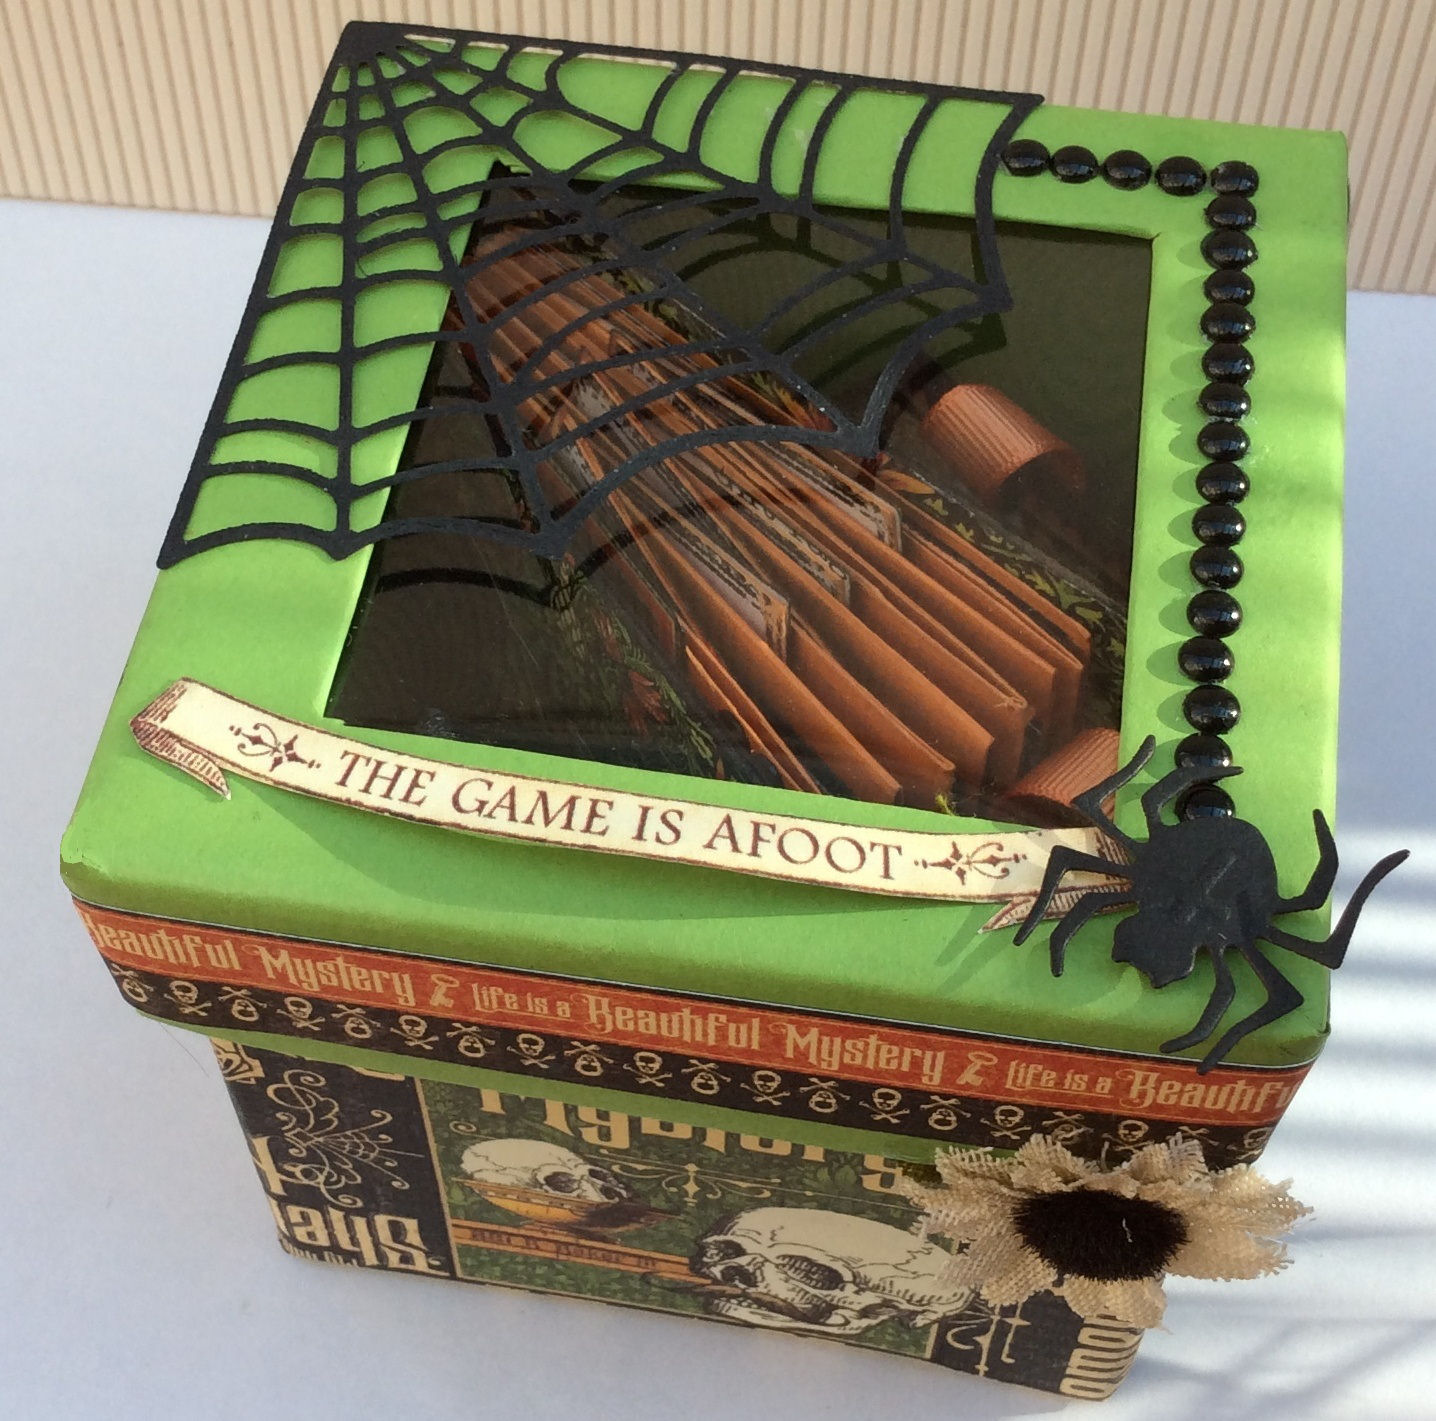
Now decorate the box as you wish.
Everything used on the box is in the kit. I used glossy accents on the skulls and the spider on top (optional).
I created a class on the maze book when we first started doing craft classes over a decade ago, and you can see that HERE. I have reiterated the steps here with appropriate modifications:
Step 1
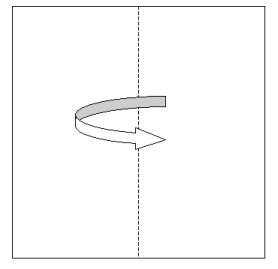
Take the 12" x 12" sheet of Apricot cardstock from the kit. Fold the paper in the middle as shown. Using a bone folder will give a cleaner, sharper edge.
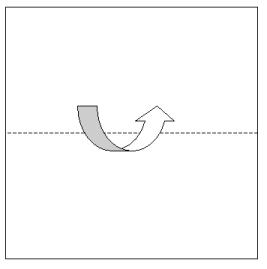
Step 2 Open up the paper and fold the other way as shown.
You now have four squares
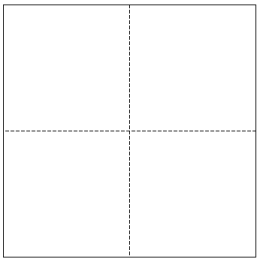
Step 3 Open up your paper, lay it flat and fold again so that you have 8 squares
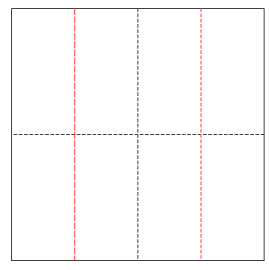
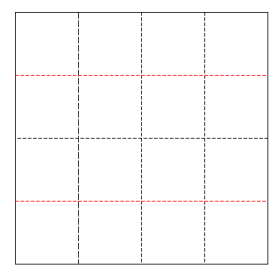
Step 4 Open up your paper, lay it flat and fold again so that you have 16 small squares.
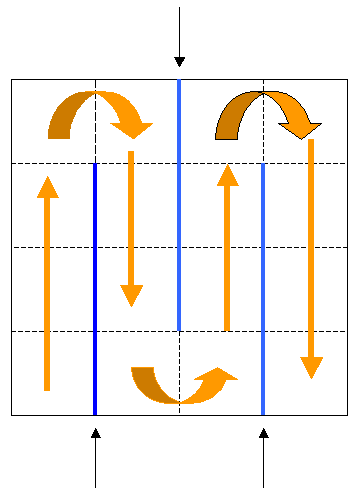
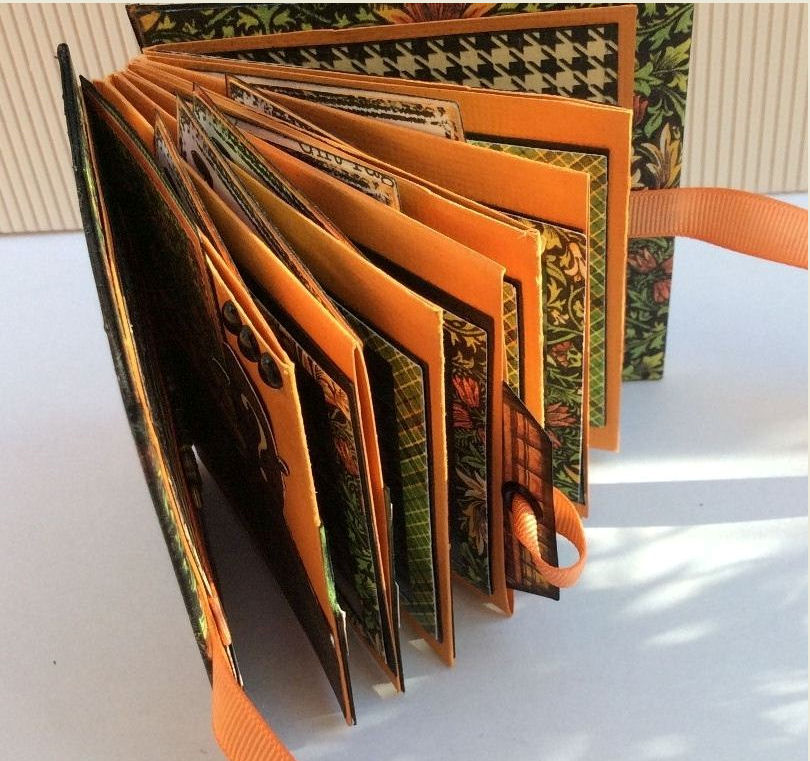
Step 5 Lay your paper flat then cut it along the thick blue lines following the direction of the black arrows. Now fold the squares up concertina style as shown by the orange arrows. Experiment a little with how you fold, the folded book should have little pockets at the top and side on some of the folds. It is entirely up to you how you fold your book but you will be amazed at how much of a difference the folding makes to the finished result.
Stick a couple of pages together to create pockets, by using double-sided tape on the edges. At this point you can also completely stick pages together if you want fewer pages.
Step 6 Cut two pieces of chipboard/book-board a little larger than your book pages. You can also use two coasters. Cover with Master Detective "Beautiful Mystery" and ink edges with brown ink. Glue a length of ribbon from your kit to the inside of the covers as shown. Make sure you leave a gap in the middle to accommodate your book being opened and closed. Try with the book inside the cover just to make sure.
Step 7 Before gluing the book onto the covers decorate the pages. I have used a Kaisercraft Photo Frame die and cut frames for all pages, then used the acetate from the kit to make windows, using the Raven cardstock in the kit as backing. I used double-sided tape on three sides then left the top unstuck for easy insertion of photos. These will go on alternative pages. On the opposite sides are little pockets to insert notes. so layer Master Detective "Dastardly Deeds" (reverse side) onto green cardstock and ink edges. Add a border from the "Whodunnit" paper to each pocket. I have six frames and six pockets:
The cut-out from the frame is used as a little note explaining what the picture is about. Ink edges with dark brown ink. In the kit there is a print out of six little panels, just cut them out and stick them onto the cut-outs. I inked the edges of the notes with Marigold Distress ink prior to sticking onto the cut-outs.
Now stick the frames and the pockets on alternative pages. I added postage stamps here and there from the "whodunnit" paper. I also made tags to pop into the side or top pockets. When you have finished decorating your pages glue your book to inside the covers.
The pockets have tags and journaling that can be pulled out.
Decorate the back pages of the album:
The inside front pages, using papers and embellishments fromm the kit:
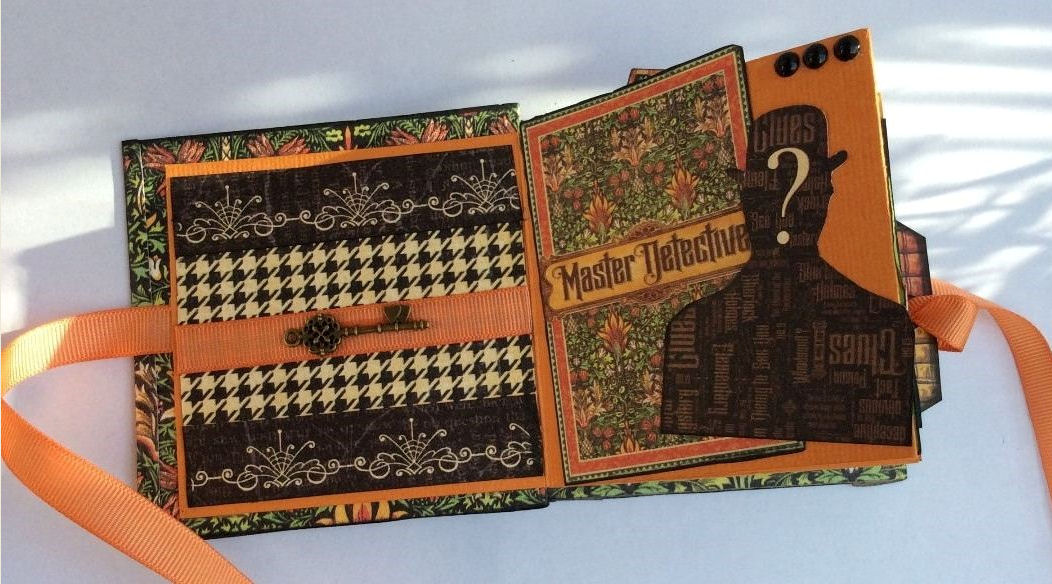
and the front of the album:
Here I cut out Sherlock Holmes from one of the papers, and used him alongside one of the metal corners and skull charm from the kit. All the flames on the papers have been Glossy Accent'ed as has Mr Holmes's magnifying glass.
|
WE HOPE YOU ENJOYED THE CLASS.
© Charmed Cards & Crafts 2017 and Jim Gentleman Crafter. All rights reserved.

.JPG)
-.JPG)
.JPG)
.JPG)
.JPG)
.JPG)
.JPG)
.JPG)
.JPG)
.JPG)
.JPG)
.JPG)
.JPG)
.JPG)
.JPG)
.JPG)
.JPG)
.JPG)
.JPG)
.JPG)
.JPG)
.JPG)
.JPG)
.JPG)
.JPG)
.JPG)
.JPG)
.JPG)
.JPG)
.JPG)
.JPG)

.JPG)
.JPG)
.JPG)
.JPG)
.JPG)
.JPG)
.JPG)
.JPG)
.JPG)
.JPG)
.JPG)
.JPG)
.JPG)
.JPG)