|
|
|
|
|

Mixed Christmas Projects

|
Projects on this page have been designed and created by Karen Mortensen. |
 |
|
|
 |
 |
 |
 |
 |
 |
 |
 |
 |
 |
 |
  |
|
||
|
Designed by Karen Mortensen
|
|||||
Products used for this project:
Special tools: Nestabilities die (Large Square)
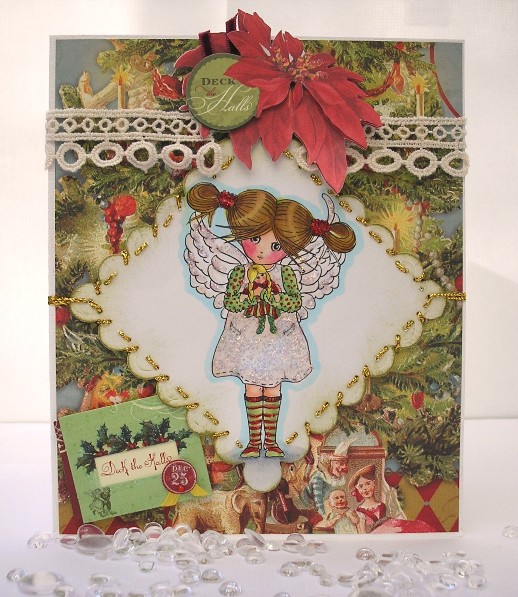
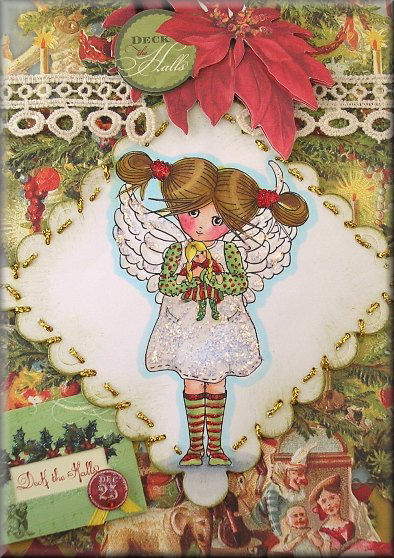
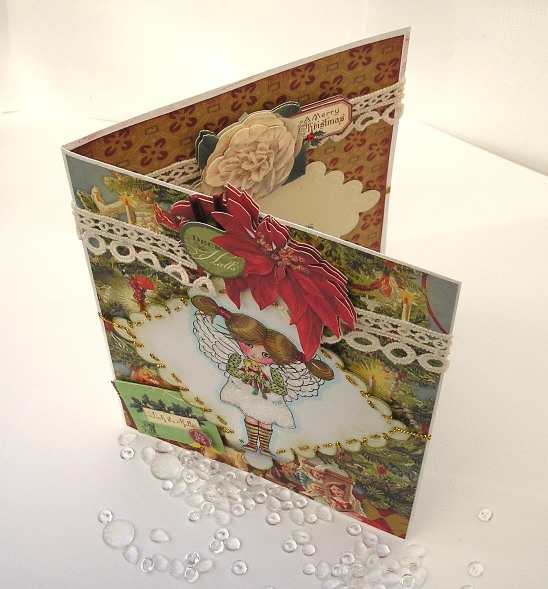
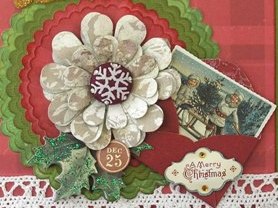
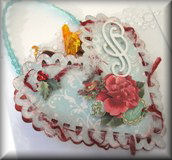
Instructions The Evergreen collection by K & Company contain some gorgeous products. I used one of the papers from the Speciality pad for both the front and the inside of my card (the paper is double-sided and one sheet will easily do the job). Stamp and colour the Angel Annie image. Glitter with Stickles glitter glue for a little sparkle, I used Icicle, Red and Green Stickles. Cut out around the image using a square Nestabilities die but turn it so that you get a diamond shape - if you haven't got Nestabilites then just cut a scalloped square. Ink edges with green distress ink. Prick all around the edges of the image then sew using a gold thread. Leave the thread hanging loose either side (see picture for guidance), we will want to carry the thread around the sides of the card later. Put foam tape all around the edges so that when we stick it on the card it will be elevated. Put the centrepiece aside for later. Cut the main panel for the front of the card using the Christmas tree paper from the Speciality Pad. I cut mine to size 18cm x 14.8cm so this is a nice big card. Cut a piece of plain white cardstock to make the base card, make it marginally bigger in size than the panel x 2. Mine is approx size: 30.5cm x 18.4cm then folded on the longest length. Stick the tree panel onto the front of the card. Remove the backing tape from the Stamped centrepiece you put aside earlier and put it on the front of the card. Take the gold thread either side and take it right around the card so that the back has the thread going right across it and into the inside of the card on both sides. Stick it down inside the card. Don't worry about it showing as we will cover the edges in a mo. Cut two panels to fit inside the card from the reverse of the tree paper, ink edges with Red Distress ink then stick them to the inside of the card (see pictures for guidance). Cut and emboss another square using the Nestabilites die (or similar) and stick it to the inside of the card. Add a rub-on sentiment. Take your Prima lace and starting from the top of the diamond on the front take it right around the card finishing on the other side of the diamond panel on the front of the card - more or less where you started. Add Evergreen Grand Adhesions on the front and inside of the card (see picture for guidance) Add an Evergreen Memory Pocket to the front of the card.
|
|||||
|
|||||
|
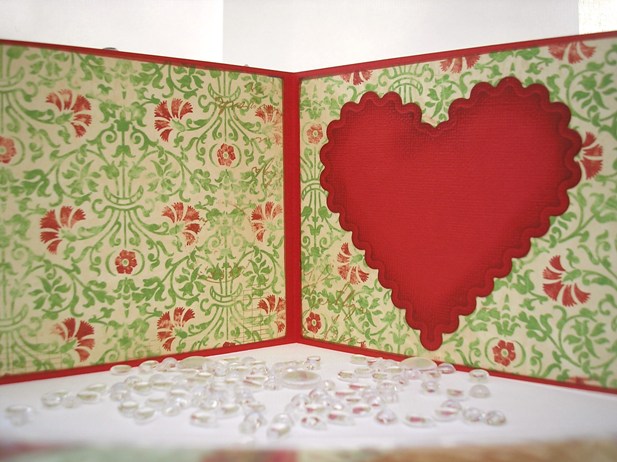
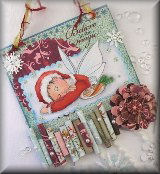
Annie Waiting for Christmas Card Designed by Karen Mortensen
|
|||||
| Products used for this project:
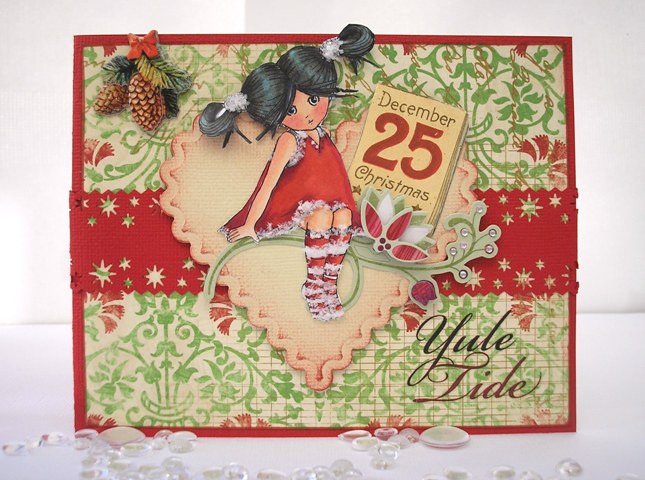
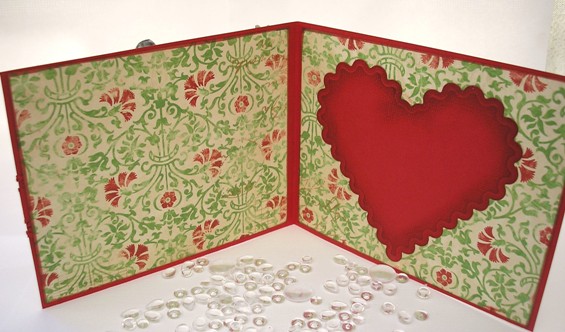
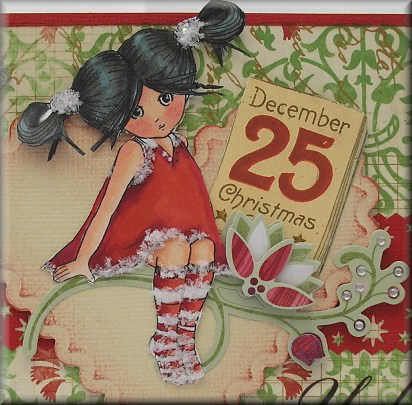
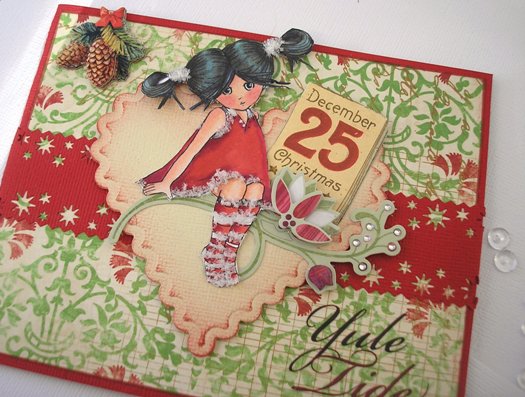
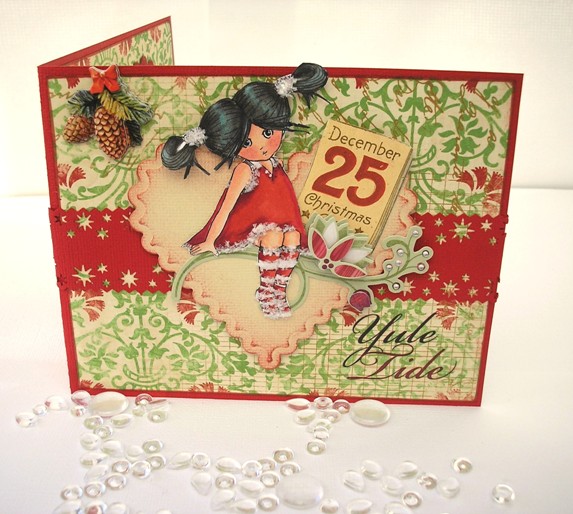
Special tools: Instructions Stamp and colour in the Annie Sitting Pretty image. Use Flowersoft Polar White to make white fluffy trims, I added it on Annie's hair bands, her socks and her dress. Cut Annie out completely. You may find it easier to cut out first before adding the Polar White trim. Make a base card using red cardstock. Cut into size 12" x 4.75" to fold into a card size 6" x 4.75". Cut three panels of the Mistletoe paper to size 5.8" x 4.55. Ink edges lightly with red ink. Stick one of the panels to the front of the card so that you have a margin all around showing the red card. Taking a piece of the red cardstock 1.5" wide and punch a star edge on both sides. Save the stars you punch out, they make smashing embellishments for other projects. Glue the star border to the middle of the card taking it around the corner inside the card. Glue the other two panels you made earlier inside the card (see picture for guidance). Using cream cardstock cut a large heart shape for the front of the card, I used a Heart Nestabilities die and embossed it too. Using a piece of the red cardstock do the same to make a heart for the inside of the card and stick it on - you can add a sentiment later of you wish. Ink edges of both hearts with red Distress ink. TOP TIP: Best way to do this is to use a dry brush and gently brush the ink on using a sweeping movements. Experiment on a scrap bit of cardstock until you are happy with the result. Elevate on foam pads or tape and stick your heart onto the front of the card (see picture of guidance). Add a Basic Grey Pops sticker and sit Annie on it. Cut out a "December 25 Christmas" from the Bo Bunny St Nick Cut-out sheet and stick it to the card (see picture for guidance). Add a Pine cone decoration from the K&Co Evergreen Chipboard shapes pack and a Imaginsce Yule Tide rub-on in the opposite corner.
|
|||||
|
|||||
|
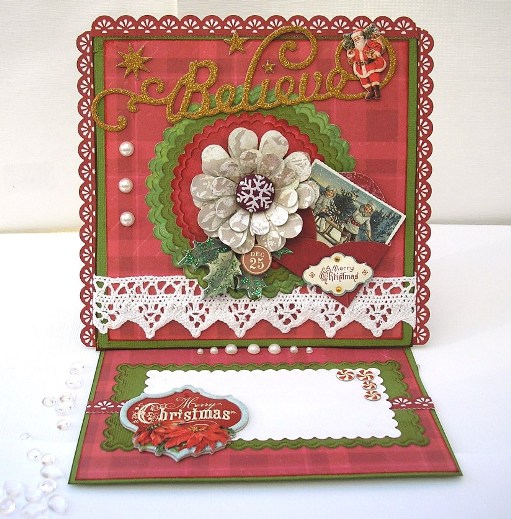
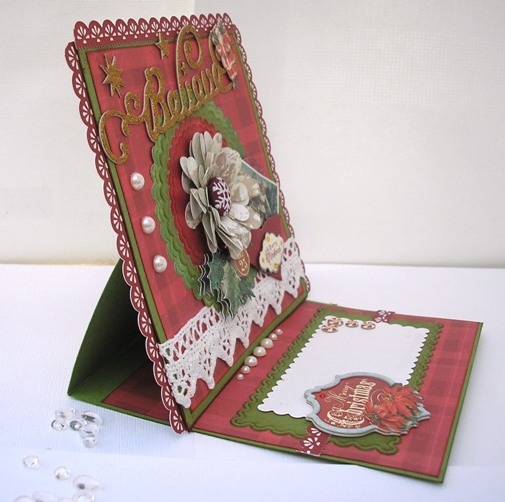
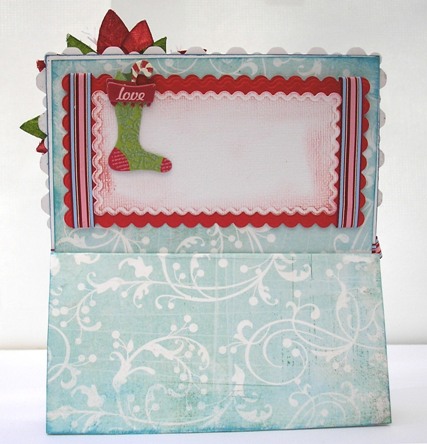
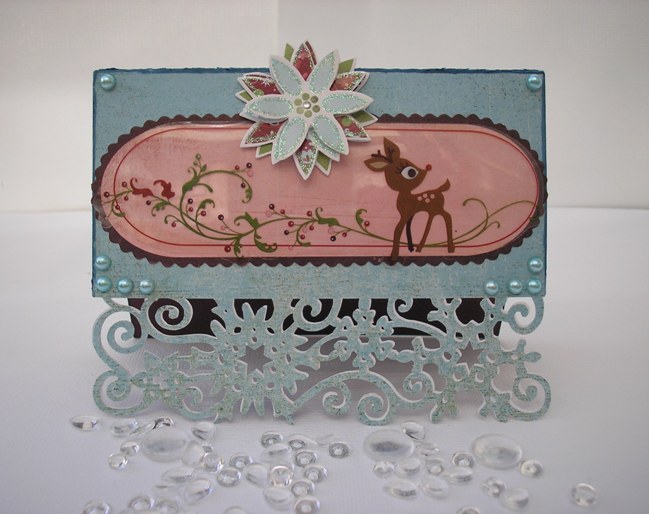
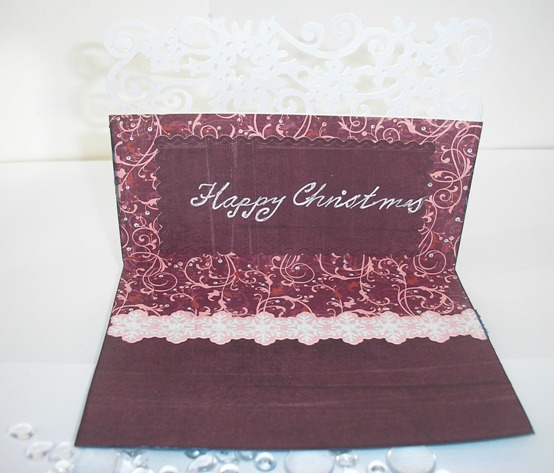
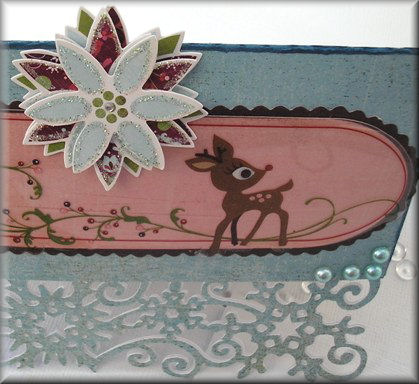
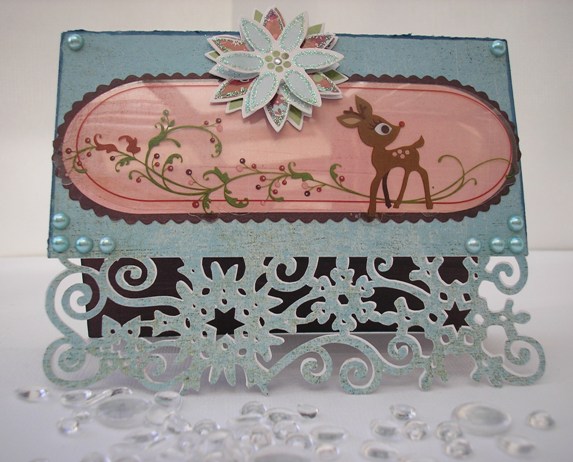
Designed by Karen Mortensen
Card Open
Card Closed
Side View - Notice how the pearls act as a stopper for the main card.
|
|||||
| Products used for this project:
Special tools used:
Instructions
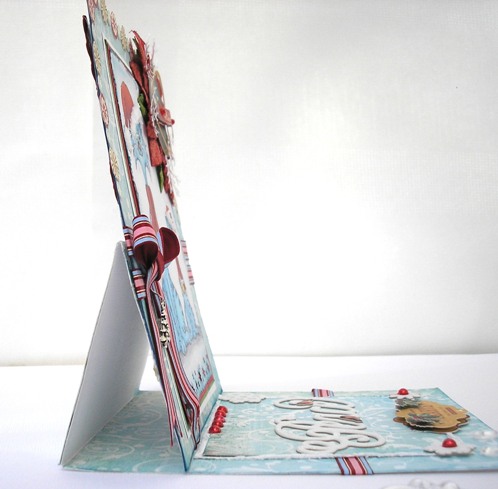
If you have never made an easel card before then I must warn you that they are highly addictive. Very simple to make they make a very attractive card.
The basic is of the card is 3/4 of a 12" x 12" sheet of cardstock. You use one quarter for the front of the card and the other 2/4 (1/2 of the sheet) is used for the frame.
Decorate the card front first so take the 1/4 (measuring 6" x 6") and add a panel cut from Evergreen paper - leave a margin around the edge to show the green card. Ink the edges of the Evergreen panel before sticking it on.
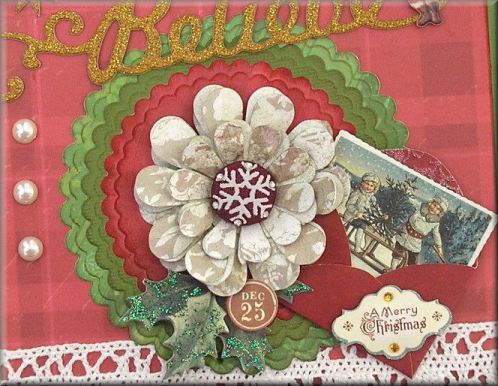
Cut three scalloped circles in various sizes - I used Nestabilites dies and embossed for extra effect. Ink edges and glue the circles on top of each other. Add to the centre of the card.
Add the lace to the bottom of the card taking it around the edges to make it neat.
Add K&Co adhesive borders to three sides of the card (top and both sides).
Cover the back of the card with the same Evergreen paper you used for the front.
Add a Evergreen Grand Adhesion and a Memory pocket by the flower - I also added some green Stickles to the holly on the Grand Adhesion:
Add an Evergreen Chipboard word "Believe" and stars
Add three pearls to the side of the card.
This is your main card completed. Now on to the rest of the card.
Go back to the 1/2 sheet you cut form the 12" x 12" paper, this now measures 12" x 6". Make two folds in the top half, like this:
You can see where the folds are as I have the main card panel here too. So a fold 3" down and another 6" down. Look at the pictures of the card to see how these are when folded.
On the BACK of the top fold add double-sided tape, cover it completely as it needs to be strong to take the weight of your card. Stick the BOTTOM half of your decorated card to this area so that when it folds the front will show.
Decorate the unfolded piece (the last 6" x 6" panel). This is how I decorated mine:
It may seem difficult but experiment and you will soon get the hang of this very simple card.
|
|||||
|
|||||
|
Designed by Karen Mortensen
|
|||||
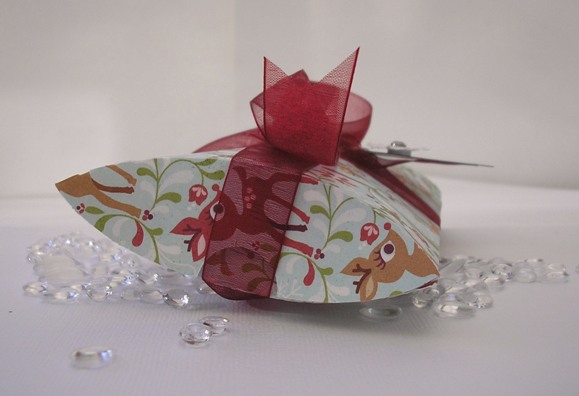
| Products used for this project:
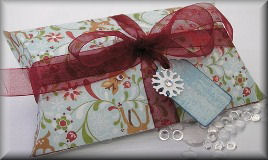
I love these little gift boxes and think they look much much better than an awkwardly wrapped pressie. You can also coordinate card and box for a perfect sophisticated presentation. Click here for the template (Not to scale)
|
|||||
|
|||||
|
Designed by Karen Mortensen
|
|||||
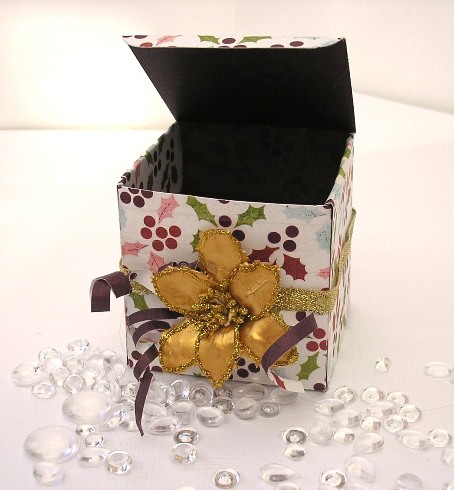
| Products used for this project:
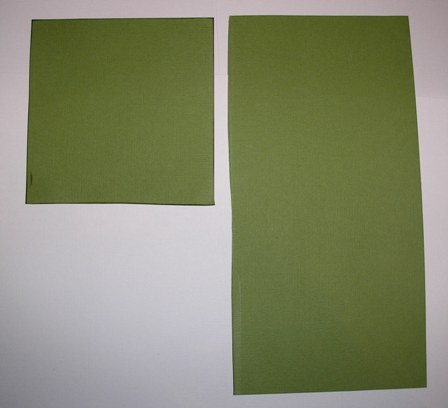
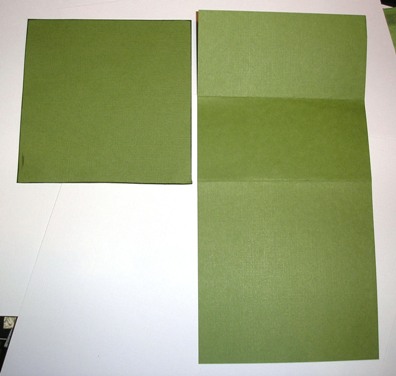
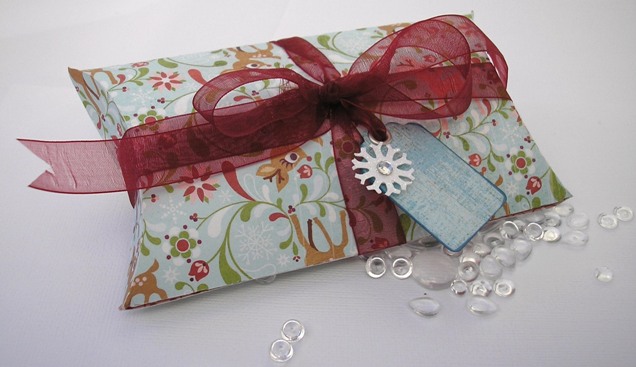
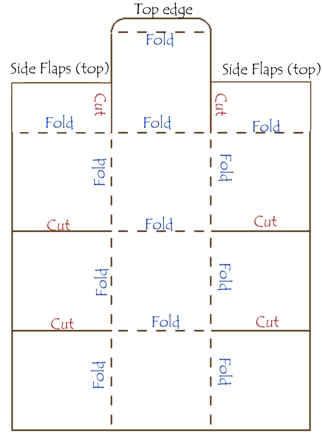
Another super little box, perfect for special little presents. Use a double-sided paper for an instantly lined box. Click here for the template (Not to scale); and here is how to cut and fold:
Decorate the box with gold ribbon, paper swirls and a gorgeous Prima Poinsettia.
|
|||||
|
|||||
|
Designed by Karen Mortensen
|
|||||
| Products used for this project:
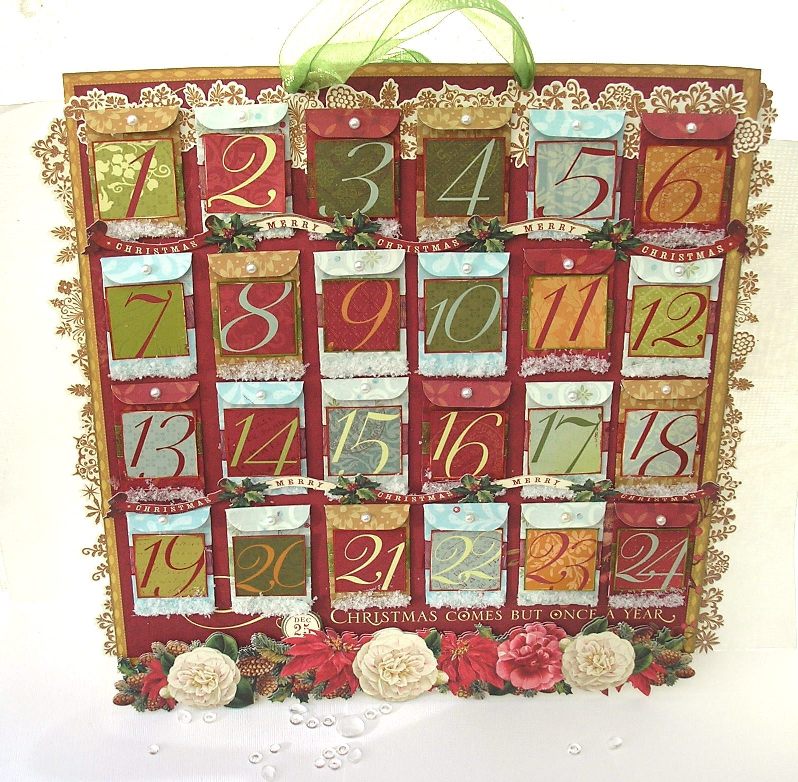
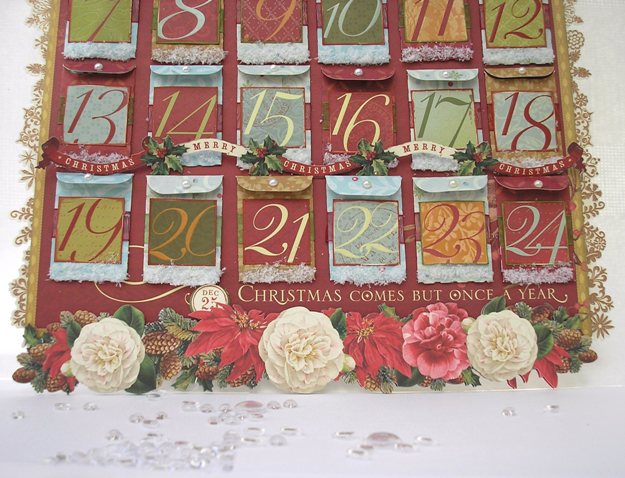
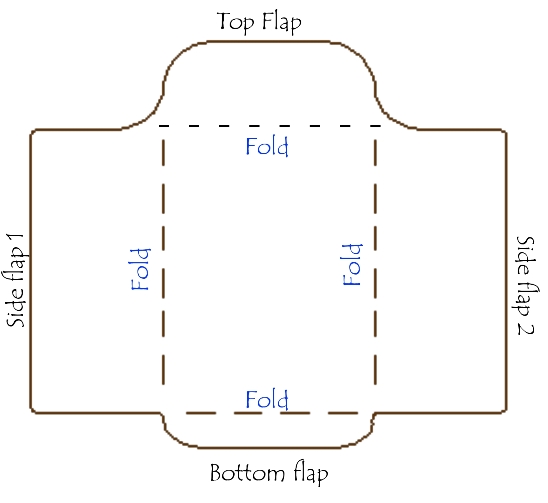
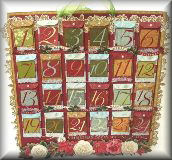
Instructions A very beautiful but incredibly economical advent calendar. Cover a 12" x 12" piece of cardboard in a sheet of 12" 12" Evergreen paper from the speciality pad. I used one that had the writing you see already on it: "Christmas comes but once a year". This paper is perfect for the calendar as it already has a golden border. Punch two holes at the top of the calendar and add two large eyelets (I used my crop-a-dile for this job). Add ribbon to hang the calendar up with. Add K&Co's Adhesive borders as you can see on the pictures. The flowers at the bottom of the calendar are also part of one of these fabulous borders. Add the golden border to the top where the envelopes go and to the sides (see picture for guidance). The Evergreen Speciality pad also has a sheet filled with numbers and icons. Cut all the numbers out. Ink the edges if you like. Using various papers from the Evergreen pad make 24 envelopes, click here for the template (not to scale). Mine are 2.5" when folded and closed. Here is how you fold them:
Fold the sides in first and stick them together, then the bottom flap up and stick. Fold the top flap down (fold, not stick). Glue your number to the front of the envelope. Alternate the colours so lay them out and plan them before gluing them on. Add some Flowersoft Polar White to the bottom of all the envelopes to emulate snow. Stick all your envelopes onto your calendar. Again lay them out first before sticking them securely down. Add a pearl to each one. Add two undulation Evergreen borders between the envelopes. Finish with a little Evergreen Grand Adhesion "25th December"
|
|||||
|
|||||
|
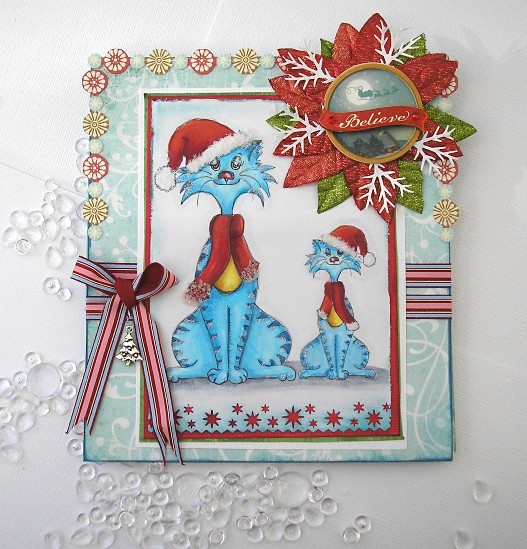
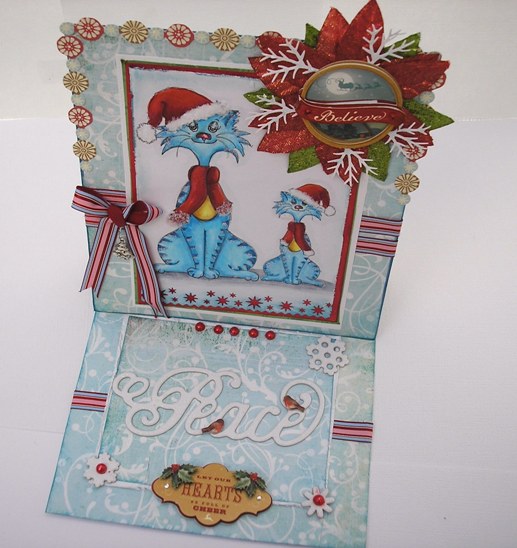
Designed by Karen Mortensen
|
|||||
| Products used for this project:
Special Tools used: Instructions
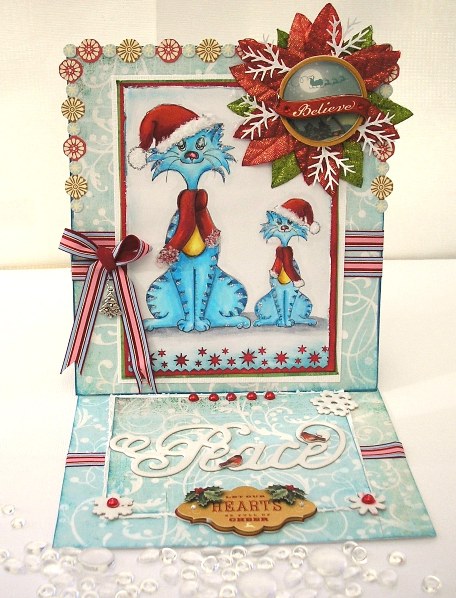
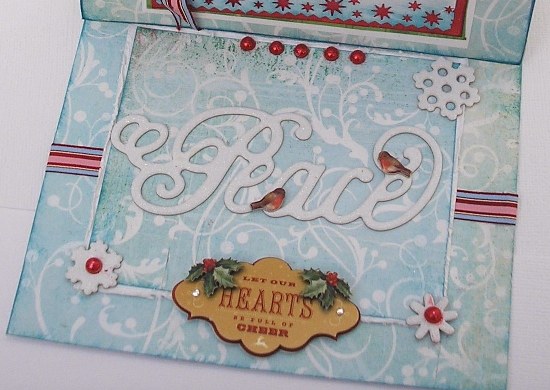
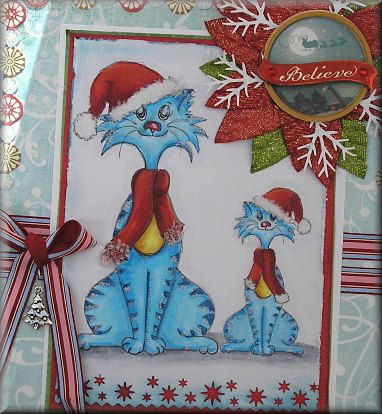
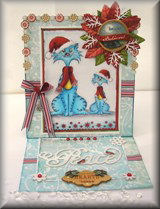
Another easel card, told you I liked them :-) You can see how to make it here on my earlier card. This time I have made the main card part taller (6.5" x 6"), but the frame remains the same size as before. Card Front: I am using one of the digi-stamp download images from our Charming Christmas collection - the Christmas Cat. I have used him twice here with one image smaller than the other. The first one is 4.5" tall whilst the second is 2.5" tall. I have also rotated the smallest cat so it's a mirror image. Sit the two cats side by side and print them out on heavyweight paper. Colour them in then add a little crystal or Icicle Stickles to them here and there. Add Flowersoft Polar White to the hats and scarves. Cut out a rectangle around the cats and punch one border (I used a Martha Stewart Star punch). Distress the edges by first inking then roughing them a little. I used a Tim Holtz Paper Distresser but you could just use your fingernails. Mat on red cardstock, then on green cardstock and finally on white cardstock. Cover the front and back of the card in Basic Grey Eskimo Kisses - I used the reverse of the Rooftop paper. Ink edges with blue Distress ink. Add two strips of Imaginisce Polar EXpressions Ribbon to the middle. Stick your cats to the middle of the card. Add a K&Company Evergreen Adhesive Border to the top of the card (see pictures for guidance) Make an embellishment using three poinsettia parts from Imaginsce Polar Expressions collection and topping with punched pine leaves and a K&Co Evergreen Grand Adhesion Stick securely to the top right-hand corner of the card. Add a bow and a little charm. Now on to the frame: Cover the frame in the same Eskimo Kisses paper as shown in the pictures.. Stick your card front to the frame (see previous card example for details on how to do this). This time I am adding the area where I write my greeting to the back of the card and leaving the front just as decoration. So decorate the front panel by matting another piece of Rooftop (reverse) paper onto white cardstock and sticking it down on top of another piece of the Polar Expressions ribbon. Add K&Co Evergreen Chipboard Word "Peace" and snowflakes from the same pack. The Mat will act as a stopper to the main card but to be sure I also added some pearls. I didn't have any in a Christmas red so coloured in some white pearls with a red marker pen. Add an Evergreen Grand Adhesion to the front "Let our Hearts be full of Cheer". Make a panels for the back of your card where you can write your greeting - you can see the picture of that here.. I matted a white panel onto red cardstock and embellished with more ribbon and a K&Co Evergreen Chipboard stocking. The panels were cut using Nestabilities and embossed for effect. Stick it on securely with double-sided tape.
|
|||||
|
|||||
|
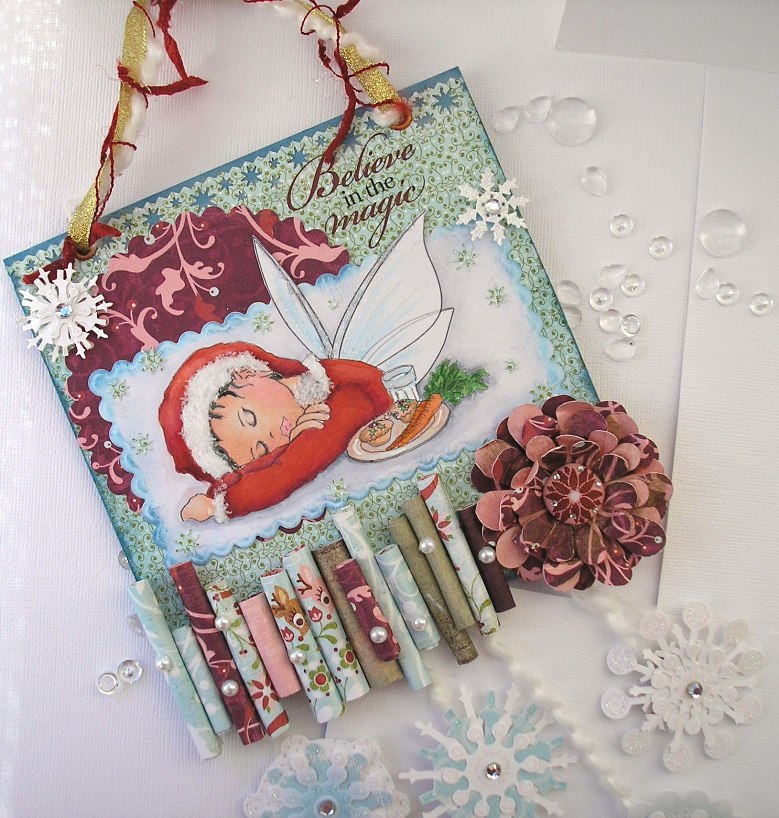
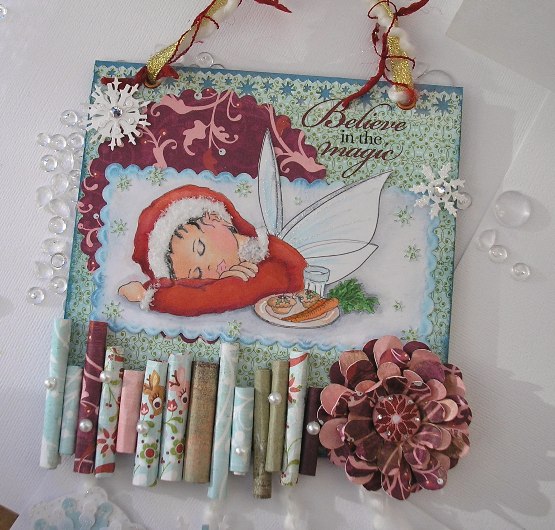
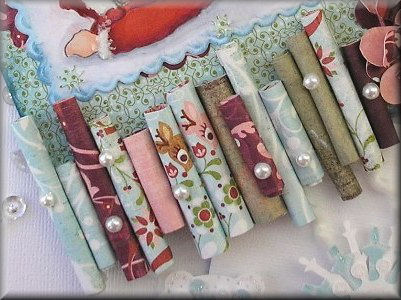
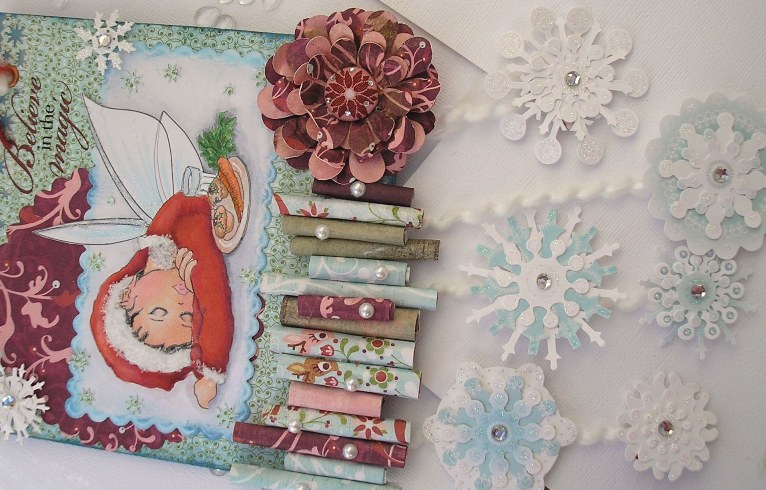
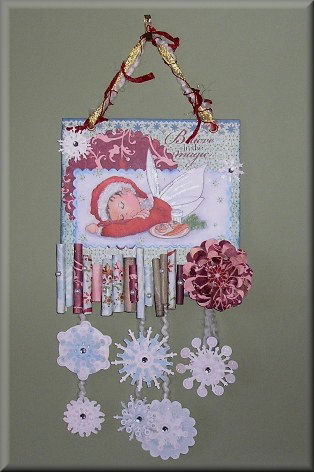
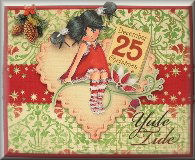
Waiting for Santa Wall Hanging Designed by Karen Mortensen
Click to enlarge
|
|||||
| Products used for this project:
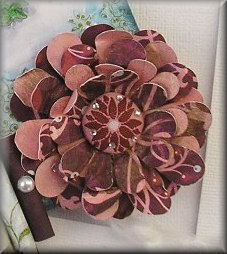
Special Tools Instructions A lovely Christmas decoration that you will treasure for years to come. Punch a starry border on a sheet of paper from the basic Grey Eskimo Kisses 6x6 Paper Pad, save the stars, we will used those later. Ink edges with blue distress ink. Stick it on a 6" x 6" piece of chipboard. Punch two holes at the top and insert two large eyelets - I used my Crop-a-dile for the job. Insert ribbon and fibre through the eyelets to hang the plaque up with. I've used another digi-stamp from the Charming Christmas collection here and coloured her in Christmas colours. Add some stickles (crystal, Icicle or similar) to the wings and Polar Soft on the hat and trimming on her top. Cut out the image in a rectangle. I used a scalloped Nestabilities die. Ink edges. Add some of the stars you punched out earlier. Cut a scalloped circle in a coordinating paper and stick it to the top left-hand corner of the frame - I used Starry Night from the Eskimo Kisses range. Add a rub-on next to it in the other corner. I used a Imaginisce Polar Expressions rub-on "Believe in the Magic". Stick on your main image frame. so that it overlaps the circle (see pictures). Make a flower using the Starry Night paper. You can find instructions on a previous project here. Stick it on the frame as shown in the pictures above. Make sure it is securely attached.
Using leftover paper roll up several pieces of Eskimo Kisses paper pieces and secure them with tape. Create enough to make a border next to the flower. Top with pearls.
Using K&Company 3-D snowflakes attach some to white fibre and hang from the back of the frame. Add a couple of small snowflakes to the frame too.
|
|||||
|
|||||
|
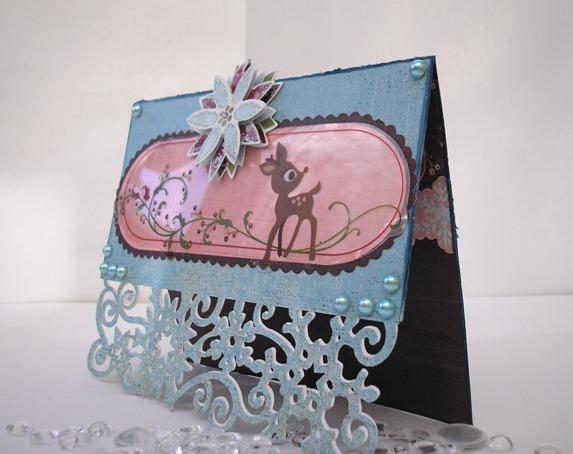
Designed by Karen Mortensen
|
|||||
| Products used for the project:
Special Tools used:
Instructions This card is cut on the Silhouette but you could also cut a lovely border using one of the Martha Stewart punches. Cut it twice and glue together for extra strength. I decorated the inside of the card with a contracting paper (Basic grey Eskimo Kisses) which looks lovely against the pale blue paper on the front and back.. A newish addition to the Basic Grey are the "Take Note" products. These are not just for scrapbooking, indeed I have used all three on other projects on this page. I used one here and it makes a gorgeous centrepiece with its lovely transparency overlay. I topped it with a Basic Grey Eskimo Kisses "Pops" sticker and a few pearls. I didn't have any blue pearls the right colours so coloured plain colours the colours I wanted with a marker.
|
|||||
|
|||||
|
Designed by Karen Mortensen
|
|||||
| Products used for this Project;
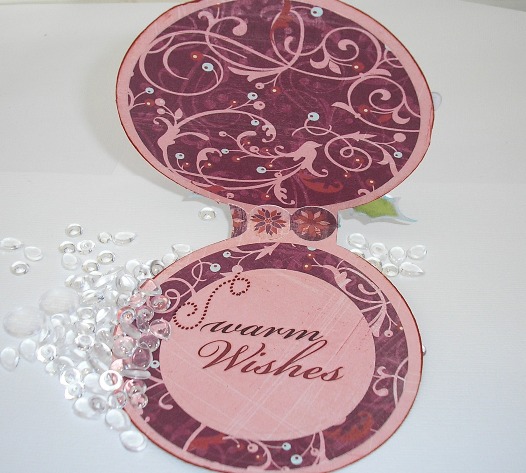
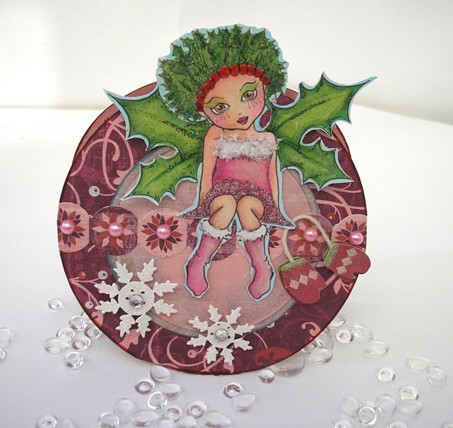
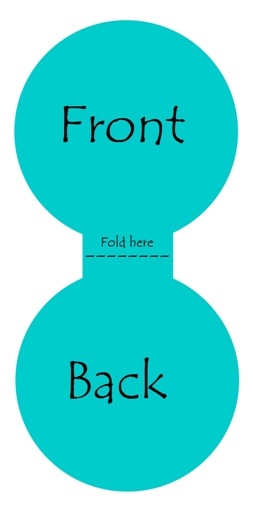
Instructions Shaped cards are fun to make and receive. Take a piece of Basic Grey Eskimo Kisses Starry Night and cut a round card measuring 4.5" in height when folded. Use the basic shape below (which is not to scale but only a guide), your whole shape needs to be 9" tall to fold into a 4.5" tall card:
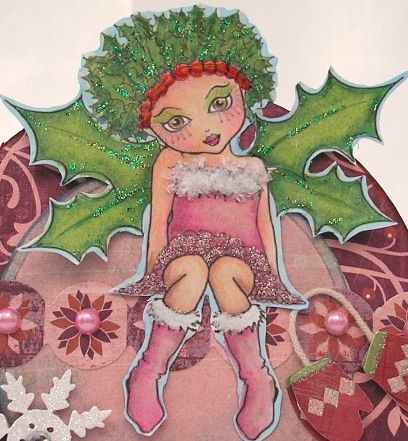
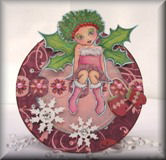
I like to shave off just the very edge of the bottom so that the card stands securely. Ink edges with red distress ink. Cut a 3" circle and glue it to the front of the card, reverse side up. Cut two 3.75" circles and glue them to the inside of the card (see pictures for guidance). Cut another 2.5" circle and glue it on the top of one of the circles inside. Add a rub-on sentiment "Warm Wishes" (Imaginisce Polar Expressions). I also added a few segments from one of the Eskimo Kisses element border stickers to the fold inside the card. Stick a Eskimo Kisses Element Border Sticker to the middle of the card front, this is where the pixie will sit later.. Stamp and colour in the Delectable Holly Pixie stamp. Add Green Stickles to the hair and wings. Add Cotton candy Stickles to the front of the dress. Add Glossy Accents to the Holly Berries and a little on her lips. Add Flowersoft Polar White to the white trimming on her dress and boots. Cut Holly Pixie out and stick her to front of the card sitting on the border. Add pink pearls to the border. If you haven't got any pink pearls then just colour some white pearls with a suitable marker pen. Finally add Mittens from the Eskimo Kisses "Pops" packet and two K&Co Swell Noel Snowflakes.
|
|
|||||
|
Designed by Karen Mortensen
|
|||||
| Products used for this Project:
Special Tools used:
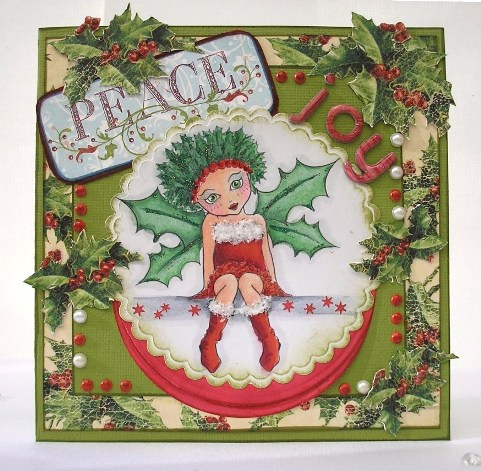
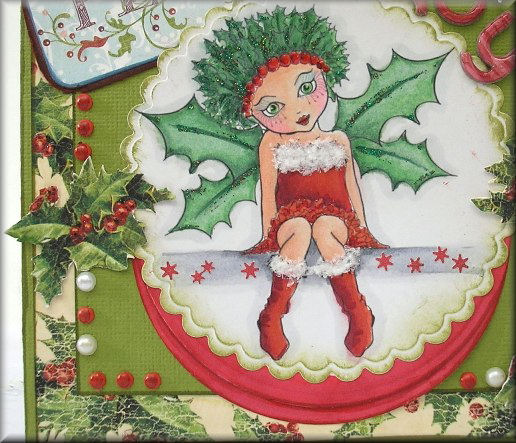
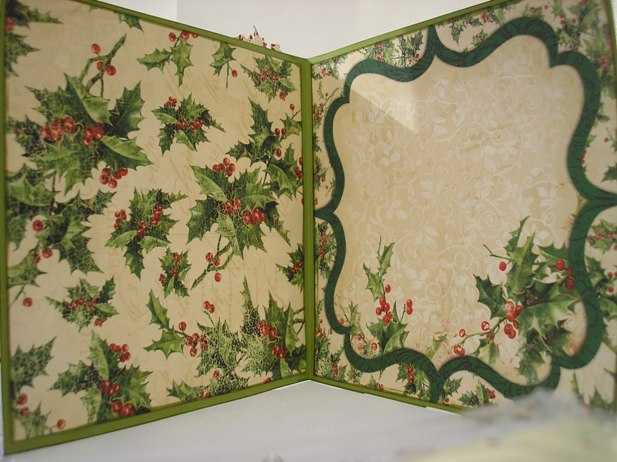
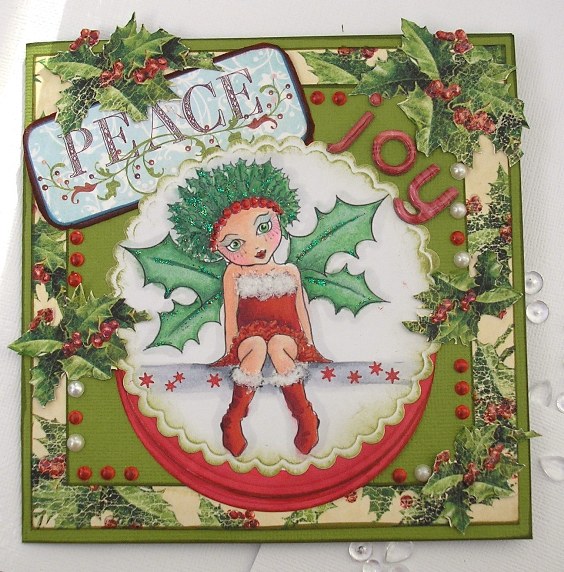
Instructions Cut a card using plain green cardstock into a card sized 6" x 6" (12" x 6" folded). Ink all edges with green distress ink. Take a piece of Bo Bunny St Nick Holly paper and cut two squares marginally smaller than the card itself to leave a margin when stuck on. Ink edges with green ink. Stick on the front of the card and save the other for later (it is going inside the card) Cut a square from the green cardstock measuring 4.75" x 4.75". Ink edges with green ink and stick to the middle of the card. Stamp and colour in Holly Pixie. Add Green stickles to her hair and wings and Flowersoft Polar White to the white trimming on her dress and boots. Add Glossy accent to her lips and the Holly berries. Using your marker pens colour in a ledge for her to sit on. I added some red stars I had leftover from using my Martha Stewart Stars border punch to my little ledge. Cut her out in a scalloped circle. I used a round Nestabilities die and embossed. Ink edges with green ink. Cut a large red circle and ink edges with red ink. Cut it in half and layer it below the image as shown in the pictures. Stick onto front of card. Leave the top of the pixie a little unstuck. Cut out the "Peace" sentiment from the St Nick Cut-Out sheet and mat it on green and red cardstock. Round corners.. Tuck it behind the Pixie centrepiece then stick that down. Cut our some of the holly sprigs from the paper. Add them to the front of the card as shown in the pictures. Add glossy accent on all the berries. Add a border of small red brads and pearls all around the green piece of cardstock. Add the letters "JOY" using Basic Grey Eskimo Kisses Chipboard Alphabet letters. I put them on with Glossy Accent to give a firm hold. Add Glossy Accent to the top of them also for a lovely shine. Inside the card: Glue the square you cut earlier to the inside left of the card. Cut out one of the quarters from the other side of the St Nick Cut-Out paper and ink edges with green distress ink. Glue onto the right hand side.
|
|||||
|
|||||
|
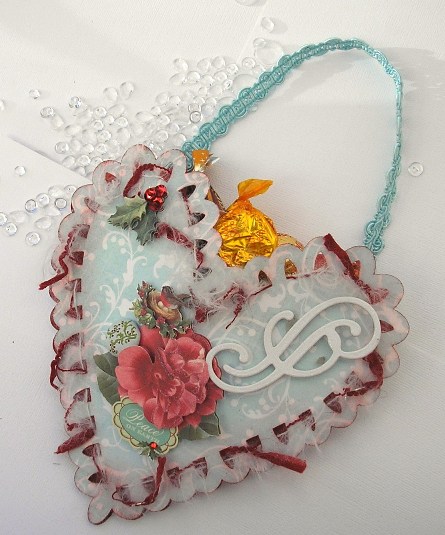
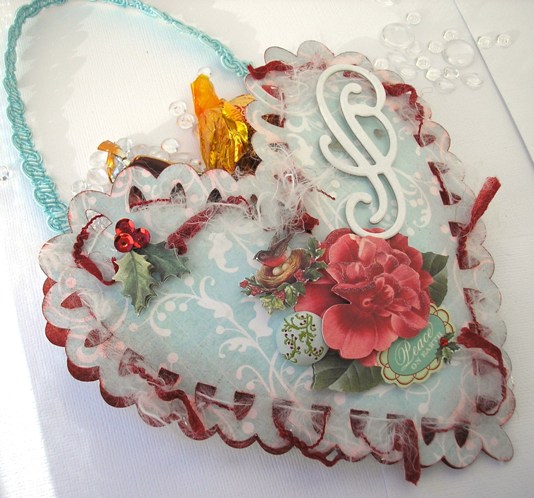
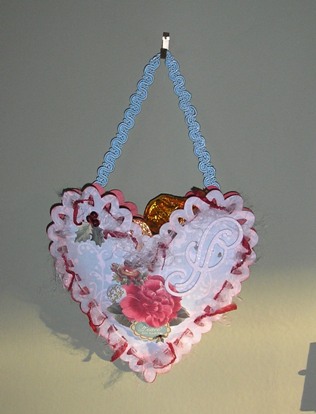
Designed by Karen Mortensen
|
|||||
| Products used for this Project:
Instructions
This really makes a lovely decoration and sure to delight everyone filled with chocolates!
I cut this heart on my Silhouette but you can easily draw and cut out a heart shape then just punch all around the edges of the top heart in any shape you like. A small snowflake punch would be nice. Cut two 7" hearts - one in Basic Grey Eskimo Kisses "Rooftop" paper and one in plain red paper. Punch around the edge if necessary.
Ink edges in red Distress ink.
Weave fibre through the holes. I used Basic Grey Blitzen fibre.
Attach ribbon to hang the heart up with.
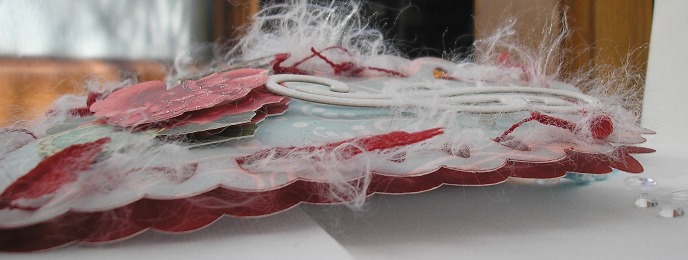
Starting from the tip of the heart line the edges just inside the cut-outs almost all the way up with 2mm foam tape and build up layers to make a space. You can build it up at the top to make it wider if you like. Stick the top heart on top.
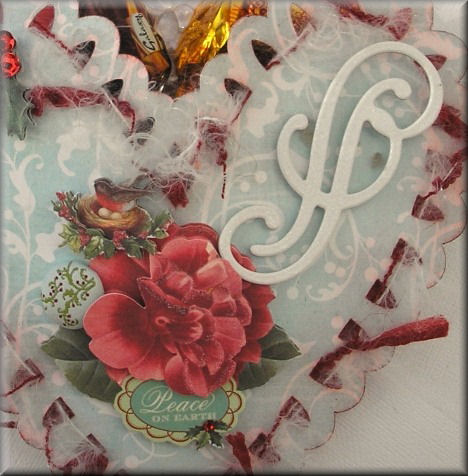
Add K&Company Evergreen embellishments (various Grand adhesions and Chipboard) and a Basic Grey Eskimo Kisses Fabric Brad.
Fill with chocolates.
|
|||||
|
|
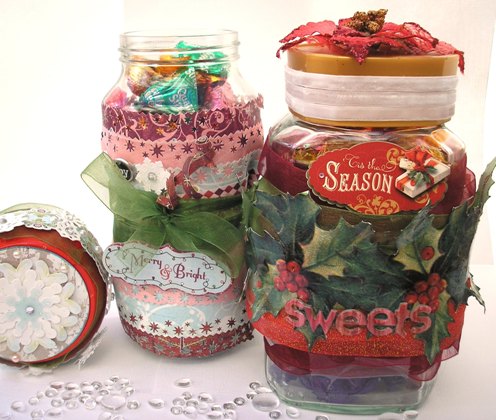
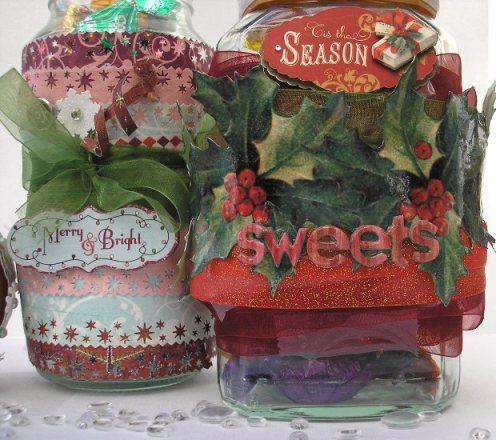
Designed by Karen Mortensen
|
|||||
|
Products used for this project:
Special Tools:
Project Guide
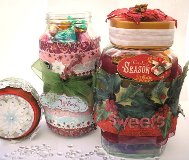
Why bring out a rather unattractive tin of Quality Street this Christmas when you can easily alter a large coffee jar and make plain old Quality Street seem like the most luxurious treats? These also make lovely gifts for teachers and relatives.
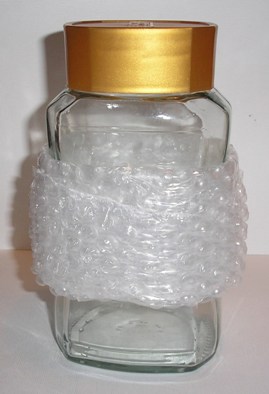
I used large jars here (I drink a lot of coffee!!) and both had an undulating shape which wasn't the easiest thing to cover. With the left-hand jar I layered papers and then using ribbon I pulled them in to show the shape of the jar. With the second jar I filled the space with bubblewrap then covered with sheer red and green ribbon.
The Ivy was cut out from one of the papers in the K&Co Evergreen Speciality pad and covered in Glossy Accent to make it quite sturdy. Eskimo Kisses Chipboard Alpha spells "Sweets" and they too are covered in Glossy Accent. I used a variation of Basic Grey Eskimo Kisses and K&CO Evergreen products for these two jars.
|
|||||
|
|
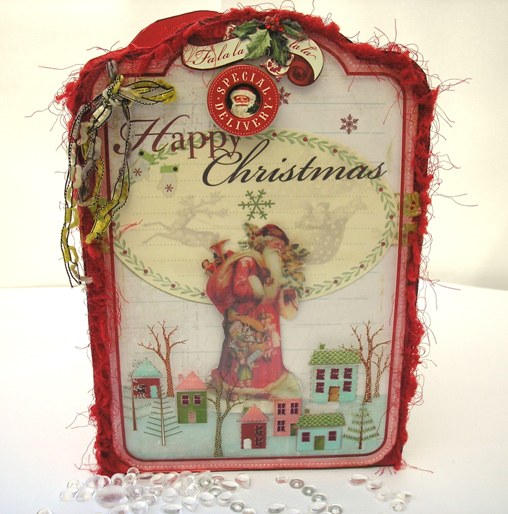
Designed by Karen Mortensen
|
| Products used for this project:
Yet another Basic Grey Eskimo Kisses "Take Note" and this time I made it the basis for the whole card.
Glue the largest Basic Grey Eskimo Kisses Take Note (without the overlay) to enough red card stock for a front and back. Cut around it to form a card. Ink edges with red ink..
Punch a hole and attach a large vintage gold eyelet to the top left-hand corner (I used my Crop-a-dile for this). Thread through some gold fibre.
Decorate the front, I used the following:
Add the Take Note overlay.
Add red fibre all around the edges plus inside the spine of the card.
Add an Evergreen Special Delivery Grand Adhesion and Evergreen Chipboard Fa la la la la on top of the overlay.
|
|
|||||
|
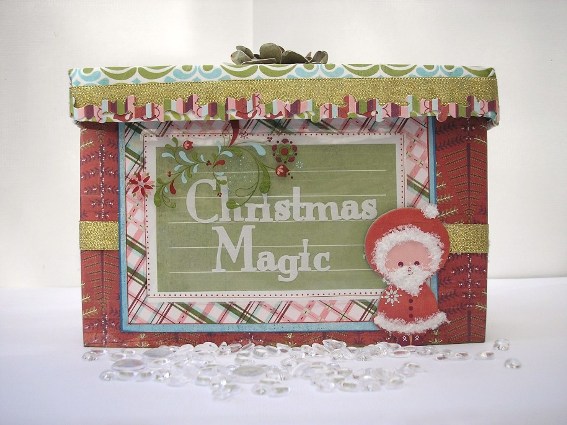
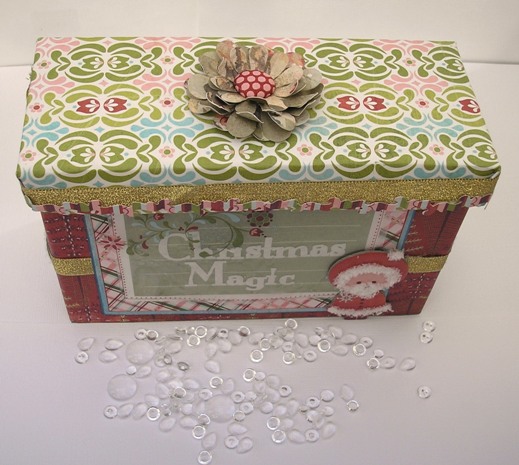
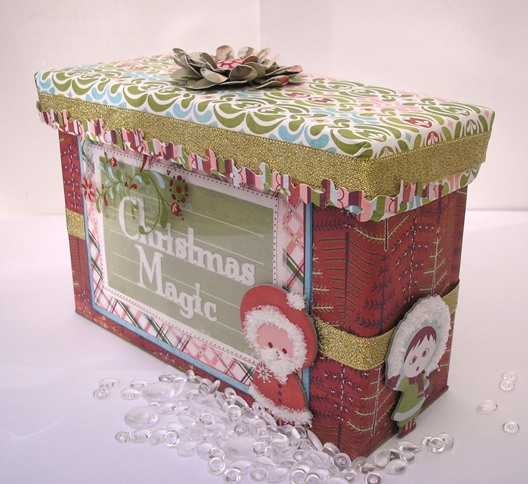
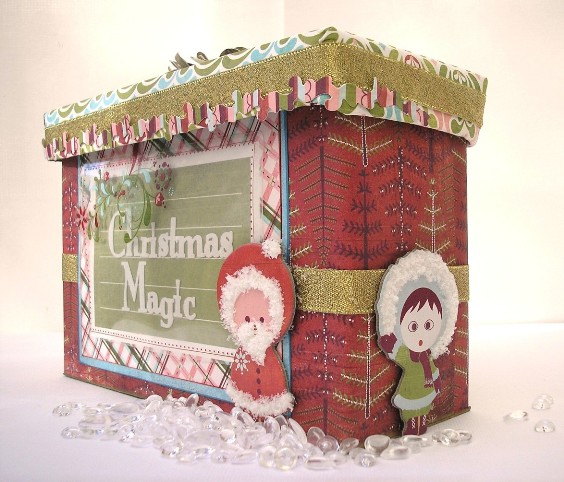
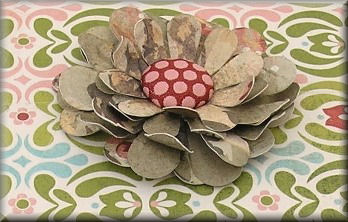
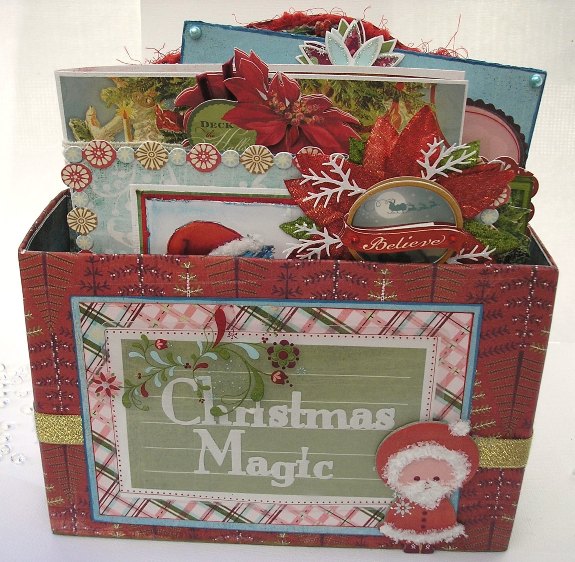
Designed by Karen Mortensen
Products used for this project:
Flower made from Basic Grey Wassail paper Instruction
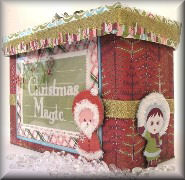
I am really using up all those empty kitchen containers today and here is another - using a large cornflakes box. My box is approx 19cm wide.
Cut down the cereal box to size: 15cm tall
Cover the box in Basic Grey Eskimo Kisses Snow Cap paper
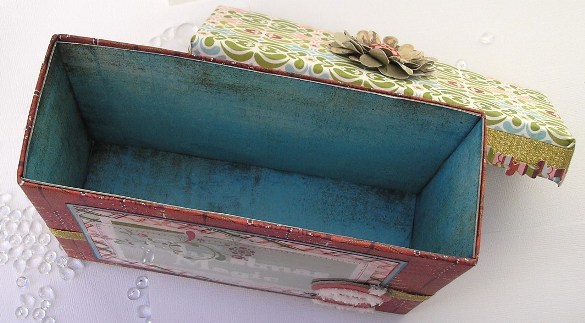
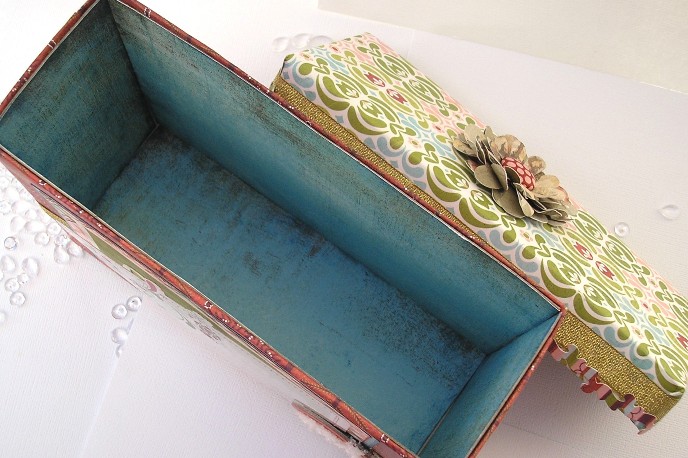
Measure the inside and cut pieces of cardboard to fit. Cover them with Basic Grey Blitzen Polar Blue paper and use them to line the inside of the box. This makes it lovely and sturdy. Glue them to the bottom and sides.
Glue a length of ribbon around the middle of the box.
Mat one of the Basic Grey Take Note's on a piece of blue cardstock. Ink edges with Blue ink. Add a sentiment, such as "Christmas Magic". Stick to the centre of the box. Stick on the Take Note Overlay.
Decorate three Eskimo Kisses ChipSticker figures with Polar White and stick them on the box - one either end and Santa himself by the sentiment.
Measure the bottom of the box and cut out another piece of cardboard to fit. Cover it with Snow Cap paper then stick it to the bottom of the box (see below).
Make a lid from the cardboard and cover it with Snow Cap paper - this time use the reverse side of the paper. Again cut pieces of extra cardboard and cover with Blitzen paper to line to lid. Add a metallic gold ribbon around the edge and an Eskimo Kisses Border from the Element stickers.
Make a flower (see here on how to do that) and stick it to the top of the lid..
Now fill it with all your favourite things.
|
|
All projects copyright ® Charmed Cards & Crafts. All rights reserved.