|
This class is copyrighted and may not be reproduced on any other website.
|


|
Class Supply list:
Step 1 Cut your white card to 21x15 cm.
Step 2
Score the card down the middle (measure 10,5cm from each side).
Step 3 Fold card. Work out the centre point of the card and draw a 3,5cm line down the centre from the top.
Step 4 Cut down your line (make sure you do NOT cut the BACK of the card!!) and fold the edges outwards to make the “collar of the shirt”.
Step 5 Take your black card and cut two strips measuring 15x4 cm.
Step 6 Measure 3 cm down the long side of each piece and draw a diagonal line across to the other top corner (see photo for help. I have used a white pen so it would show up well in the photo).
Step 7 Cut off the corner pieces.
Step 8 Use double-sided tape (you can use another glue of your choice but I find that things like Herma don’t hold very well for cards) and attach the black pieces to the card. See photo for placement.
Step 9
Now let’s make the little pocket. Cut a 2x2 cm piece from black card and angle the bottom corners a bit (if you want).
Step 10 Time to make the tie. Don’t get put off by how “complicated” it looks. We’re taking it one step at a time which makes this really easy. This is the type of sketch you will come up with in the end (see below). I find it’s easy if you draw this on a scrap piece of white card which you can use as your template for cutting your patterned paper. By the way, my lines ARE straight, but I often had to angle the camera so they don’t look straight just to get the camera to focus properly on the very white paper.
Step 11
So grab yourself a piece of scrap white card and a pencil. I’ll be here holding your hand and talk you through this, so no need to “worry”. Start with drawing two vertical lines which are 2,1 cm apart. Easy? Yes! It won’t really get much harder than that.
Step 12 Draw two lines across this (horizontal), 9cm apart. And then you draw one more line 1cm below the top line. Your piece should now look like this:
Step 13 Draw a line 1,2cm above the bottom line.
Step 14 Find the middle (from top to bottom) and draw a line. (This is between your two vertical starting lines).
Step 15 Now go to your very bottom line, find where the middle line crosses this and draw a diagonal line upwards and outwards to where the second line cross. See photo below – makes it so much easier than describing it in words.
Step 16 Now go to the 2nd line from the top. Measure 3mm (millimetres) out from the centre on each side and draw diagonal lines down to meet the top of the lines you just drew in point no 15.
Step 17 Go back to your 3mm markers and draw diagonally up and out to meet the top corners. (Again, see photo to make it so much easier).
Step 18 Now we have almost finished it. The final thing you need to do is to go where the 2nd line from the top meets the centre line and measure 4mm up. Then go to the top line and measure 4mm in from each outer side. Draw diagonal lines up and out to these points from the marker you made on the centre line. See photo.
Step 19 You have your tie template done! Now cut it out.
Step 20 Use your template to cut a tie from your chosen patterned paper. Also cut a little piece (pointed, like I did, if you like) to go inside the pocket you created earlier.
Step 21 Now you can chalk the edges of the tie and your little piece of patterned paper if you like. I find this adds a lot of dimension to the card so I would recommend doing this. Finally attach to the card. Depending on how accurate you have been, and how you have folded the “shirt collar”, you might find that you need to trim of a little sliver of the inside “v”-shape on the top of the tie to make it “sit nice” under the collar. Test by holding in place before you glue it to the card. I have used a 3D glue dot to attach the pocket as I think it looks a bit more “natural” if the pocket is a little further out – but again this is optional.
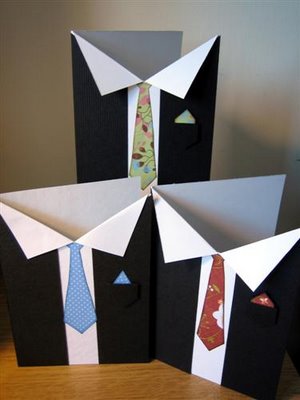
Step 22 And you’re finished! Now you can experiment with the design, make different ties…narrower or fatter, different types of jackets, different coloured shirts etc. Have fun and play!
|
.JPG)
.JPG)
.jpg)
.jpg)
.jpg)
.jpg)
.jpg)
.jpg)
.jpg)
.jpg)
.jpg)
.jpg)
.jpg)
.jpg)
.jpg)
.jpg)
.jpg)
.jpg)
.jpg)
.jpg)
.jpg)
.jpg)