|
|
|
|
|

Christmas Projects
|
All projects on this page have been designed and created by Design Team member Karen Leahy. |
 |
|
|
|
|
|
 |
 |
 |
|
|
|
|
 |
|
 |
 |
 |
|
 |
 |
 |
|
 |
 |
||
|
|
|||
|
Designed by Karen Leahy |
|
|
|
|
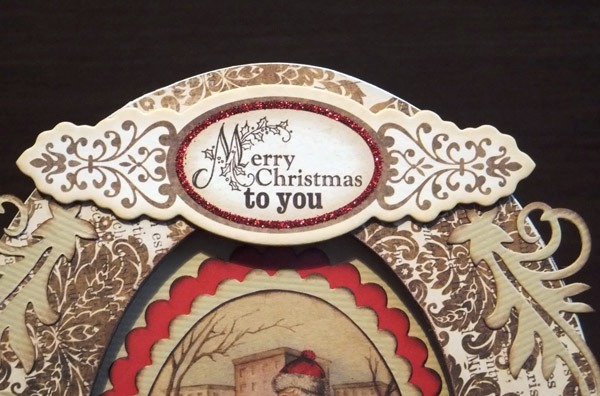
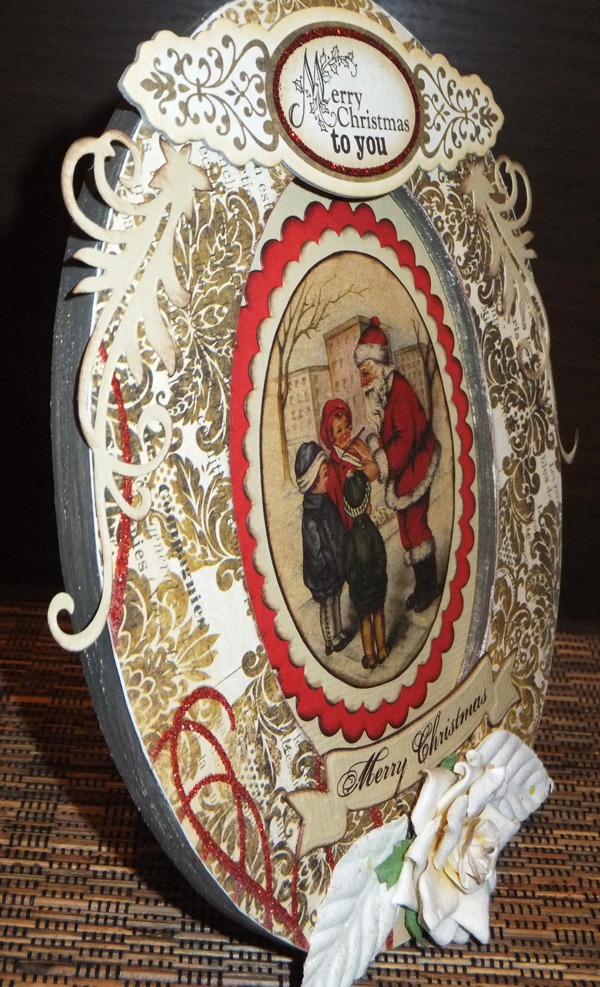
Designed by Karen Leahy |
|
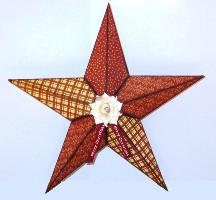
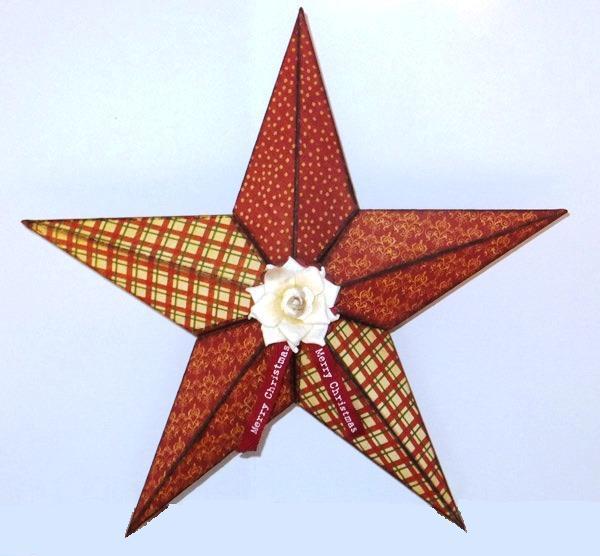
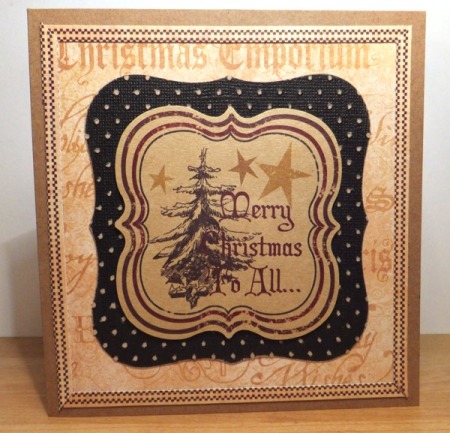
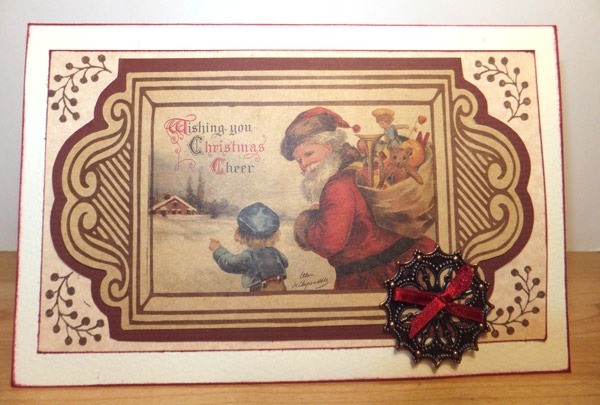
Products used: Reverse side of Graphic 45 Christmas Emporium papers "Toyland" and "All I want for Christmas"
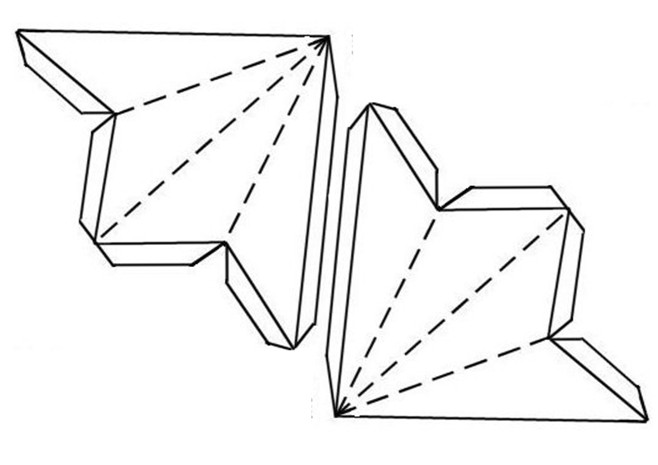
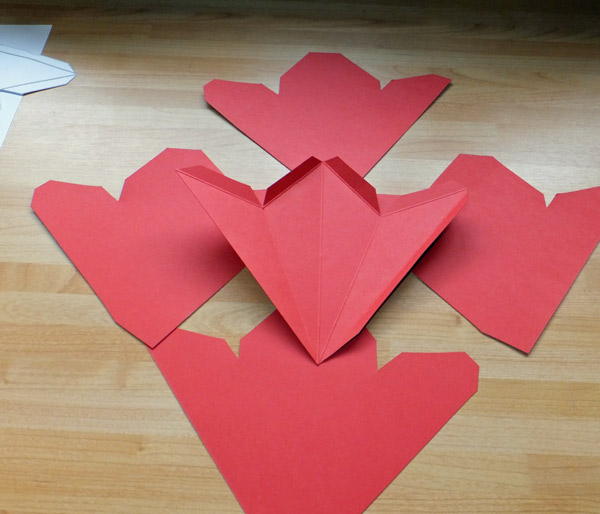
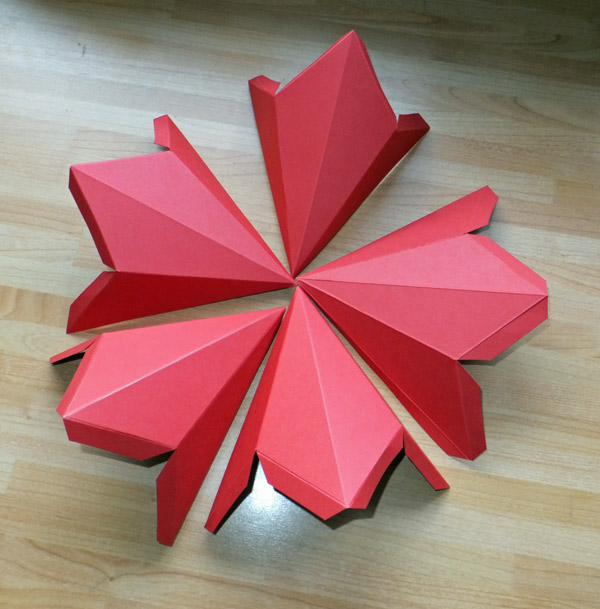
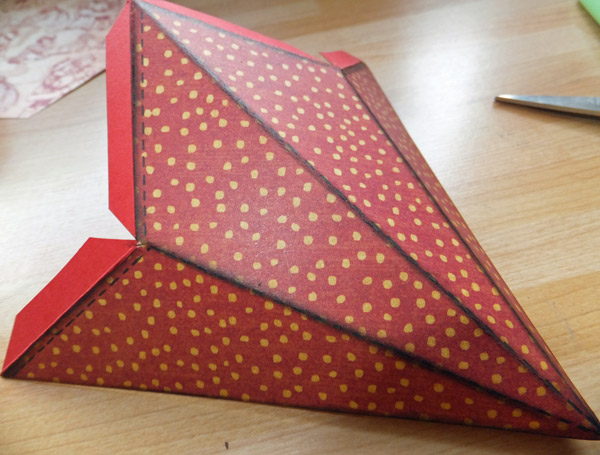
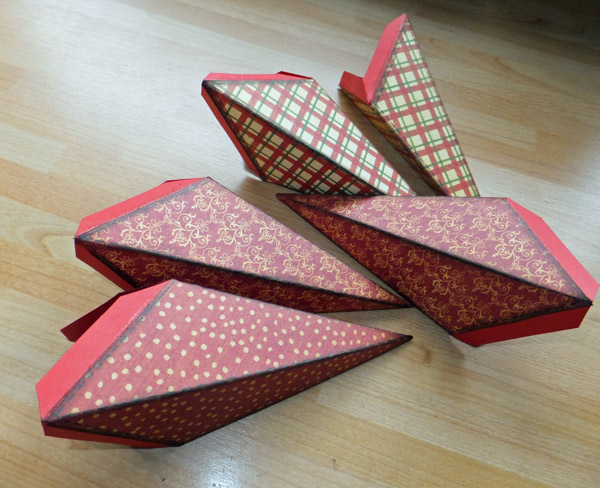
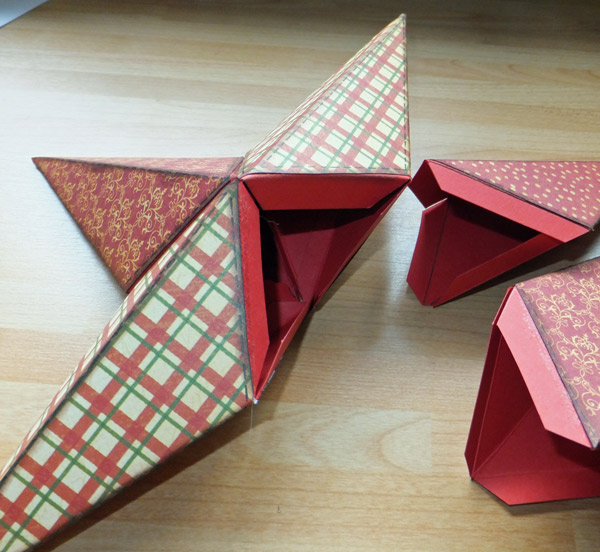
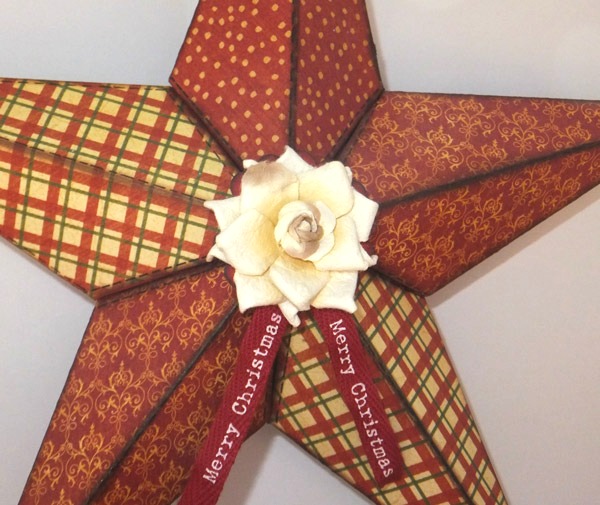
I forget where I first saw these stars but there are lots of sites which have them and explain how to make them. I think I found it several years ago when searching for crafts to make with the children, though the assembly of this is perhaps a little fiddly for little fingers. First I used the template to cut out five identical shapes from A4 cardstock. You could make it out of just thick paper, but using a cardstock base means it is a bit more substantial and lasts a bit better. You can make the star any size you want to, just change the size of the templates you use. I would warn you not to go too small though as it gets a little fiddly.
Once you have cut out the five shapes and have covered them with patterned paper you can decorate them if you wish.
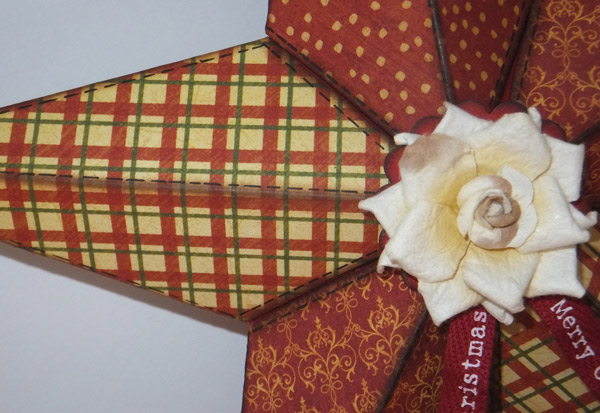
I inked all of my edges as I was going for a vintage look, and I also drew faux stitching down all of the fold lines and joints.
You need to make sure you bend all the folds and score lines in. Then you are ready to assemble. Fold the flap on piece 1 under and using very strong glue or double sided tape glue piece 2 to the little flap. Repeat this 5 times, and then make sure all the FLAPS are pulled out. It then gets a little fiddly. Glue the star together using double sided tape on the flaps making sure that the centre seam from the join from side A and B is to the rear of the star. It is much easier to glue two of the shapes together, then another two together and then join these two pairs together, before adding in the last remaining ''point'', it is a little difficult at this stage but it works eventually.
I then decorated it with some ribbon and a Prima Eminence flower.
|
|
|
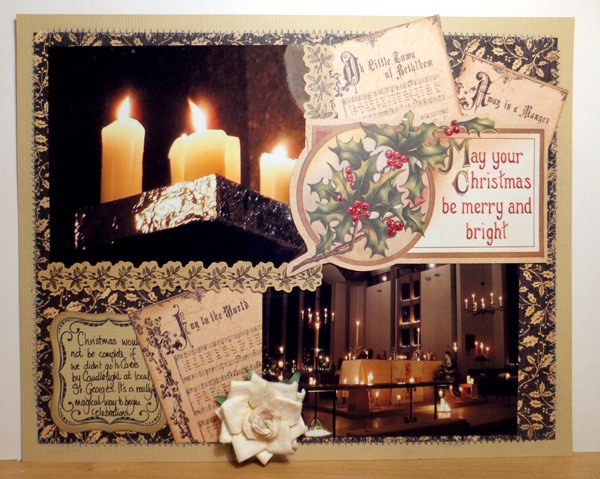
"Carols by Candlelight" Scrapbook Layout Designed by Karen Leahy |
|
|
|
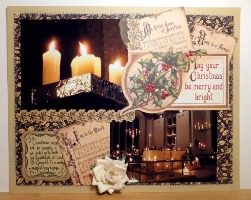
| Products used: Quick Guide Carols by Candlelight by Karen Leahy
I loved the papers that were Kraft and black colours, which seems and unlikely Christmas combination but which really work well. Christmas is so often about lights shining in the dark and these colours were perfect for photos taken in church on Christmas Eve, I used both sides of the Graphic 45 A Christmas Carol paper, using a large mat of the holly design, stitched in place, for the background and cutting out selected sections showing some of the carols we sang that evening. I added a Prima flower, a Fancy Pants St Nick embellishment, and one of the Bo Bunny tags to make the title. I added red stickles to the holly berries and stamped a coordinating journaling block to finish the page.
|
|
|
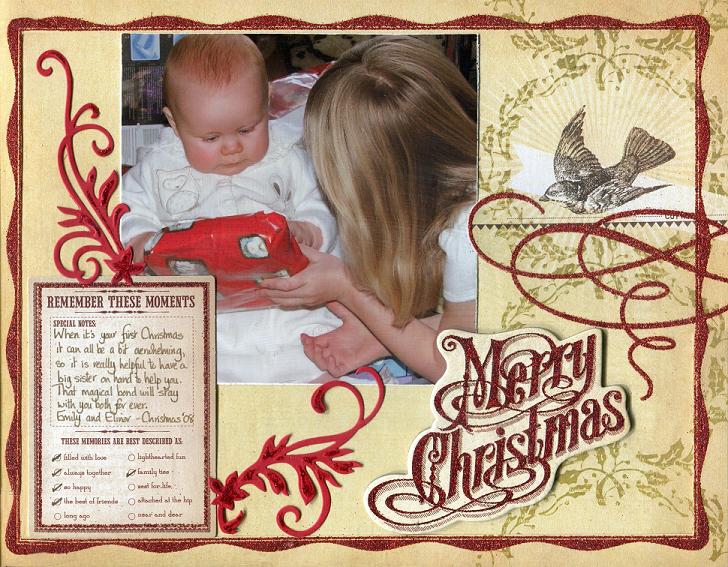
Designed by Karen Leahy
|
Click on picture to enlarge
Products used: My Minds Eye Lost & Found Christmas Paper and Die-Cuts
Quick Guide
Christmas is all about giving and sharing and love and this picture just seemed to sum it all up. Emily had waited for a baby sister for so long and so Elinor’s first Christmas was so special. How better to enjoy a first Christmas than with a big sister helping you. I cut down a piece of the My Mind’s Eye Lost and Found Paper (Peace) and by carefully marching the border made it into a 8.5” x 11” background. The paper is a dream to work with if you want to use it as a different size as the glittered border makes the perfect cutting place to resize the paper.
I added one of the glittered chipboard die cuts as the title for the page and also used one of the die cuts for the journaling block. Adding a couple of die cut swirls which I glittered in places tied the page together.
|
|
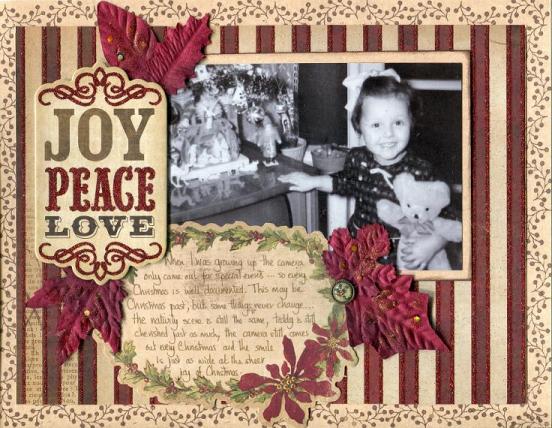
| "Christmas Past - Joy and Peace" Layout Designed by Karen Leahy |
Click on picture to enlarge
|
| Products used: My Minds Eye Lost & Found Christmas Paper and Die-Cuts Bo Bunny Father Christmas Noteworthy Die-Cuts Bo Bunny Father Christmas Epoxy Brads Quick Guide
I used a piece of the My Mind’s Eye Lost and Found paper as the background to the page. I mounted this onto a piece of cream cardstock and stamped a border round the edge to tone down the brightness of the border. The highly glittered paper was a mix of cream, burgundy and red that seemed to have a real heritage feel to it as well as working for modern pages and cards. I used one of the Bo Bunny Noteworthy journaling spots which tied the colours together and added some of the glittered Prima leaves which accentuated the burgundy in the papers and the tag. I fixed two of the leaves with a decorative Bo Bunny epoxy brad that drew the green back in to the page as a whole.
|
|
|
Designed by Karen Leahy |
Click on picture to enlarge
Products used: My Minds Eye Lost & Found Christmas Paper and Die-Cuts Prima Flowers Fancy Pants St Nick Embellishment Pack CARDS (Naughty or Nice?)
Quick Guide
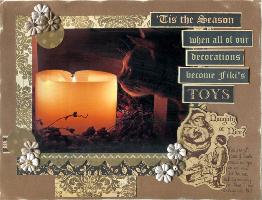
I love the photo of our cat Fiki gazing at the Christmas candle (just before trying to eat the twigs around its base) and again wanted to use the blacks and creams to highlight the light element of Christmas. The page was made with small scraps of different papers, perfect for using up those last pieces you don’t want to throw away. I cut part of the title from the flip side of the paper, picking out the words "Tis the season" and "toys" and then made strips that tied in with them to form the rest of the title. I added one of the MME chipboard strips as a border and a Fancy Pants Santa die-cut.
|
|
|
|
|
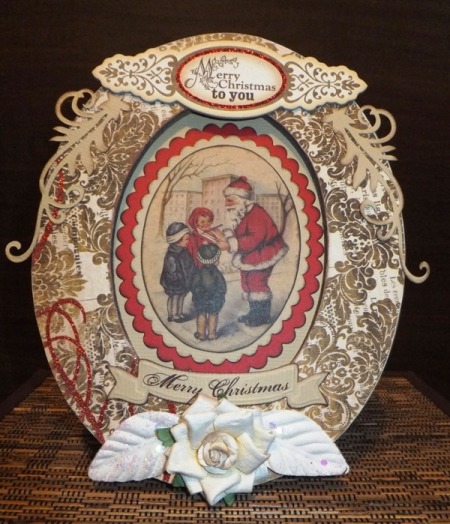
Designed by Karen Leahy |
Click on picture to enlarge
Products used: My Minds Eye Lost & Found Christmas Paper and Die-Cuts Bo Bunny Father Christmas Brads Graphic 45 Christmas Emporium "Special Delivery" (TAG) Quick Guide
This is another of those pages where I wanted to cut the 12 x 12 sheet down to work with a smaller size, and again the fact there was a glittered border all round the edge made this really easy to do. I loved the fact that the paper had a natural title built right in so no need to add a title separately. I cut round the holly on the paper so that I could slip the photo underneath it and make the edges softer. The photo was mounted on a mat of contrasting paper from the same range. The second title – oh yes the page has two, was made from one of the die cuts in the collection, mounted onto several circular mounts in the cream and red. The tag was perfect to add that little bit of journaling and it is fixed with one of the heritage styled brads.
|
|
|
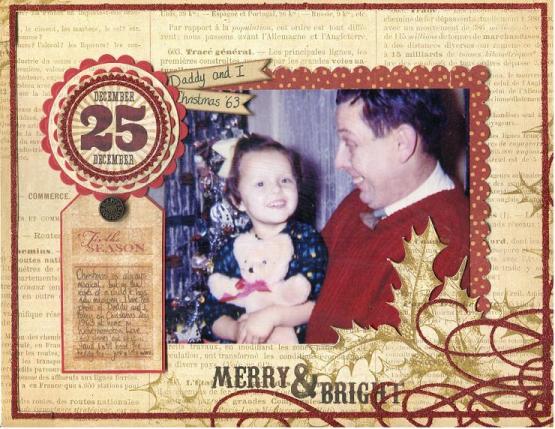
Designed by Karen Leahy |
Click on picture to enlarge
|
| Products used: My Minds Eye Lost & Found Christmas Paper and Die-Cuts Bo Bunny Father Christmas Trinket Prima Splendor Leaves Maple
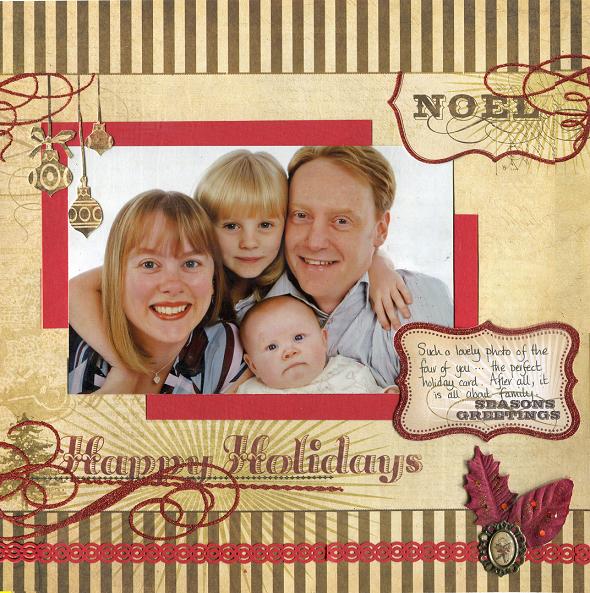
I had wanted to scrap this picture as a Christmas page for a long time. They had had the portraits done as Christmas presents, all framed, and so making it into a holiday page was perfect. The paper seemed to lend itself to making the whole thing look like a holiday card. I cut round the baubles, which was fiddly but well worth doing, so that they could overlap the frame and photo and tie it all in together. I find with beautiful papers like this you don’t want to hide any of the elements so cutting round them and overlapping means you can use more of the page but still see the elements.
|
|
|
Designed by Karen Leahy |
|
| Products used: My Minds Eye Lost & Found Christmas Paper and Die-Cuts Fancy Pants St Nick Embellishment Pack CARDS Bo Bunny Father Christmas Epoxy Brad and Noteworthy Die-cuts
Quick Guide The picture of Nigel all dressed up to play Santa was too good an opportunity. The photo mount is stamped all round and then the photo and the mount are tucked under the Santa who was cut out all round the left hand side so he would overlap the photo. The naughty and nice list – just begging to be on a Santa page – was cut from another sheet of paper and the tag, also featuring Santa, made the perfect journaling place. The title was cut in part from burgundy cardstock, also used for the mount and the flourishes, and then the remainder was stamped and inked. The final little Santa comes in the form of a brad anchoring the naughty and nice list to the page.
|
|
|
Designed by Karen Leahy |
|
| Products used: My Minds Eye Lost & Found Christmas Paper Boughs Fancy Pants St Nick Embellishment Pack CARDS Quick Guide
The beautiful image from the Fancy Pants Embellishment pack was crying out to be used as a centrepiece for a card. I used a cream mat cut with decorative scissors and mounted it onto one of the heritage papers after inking the edges. The little date die cut (also from the Fancy Pants Embellishment pack) was similarly mounted and then added on foam squares. A simple cream bow completed the card.
|
|
|
Designed by Karen Leahy |
|
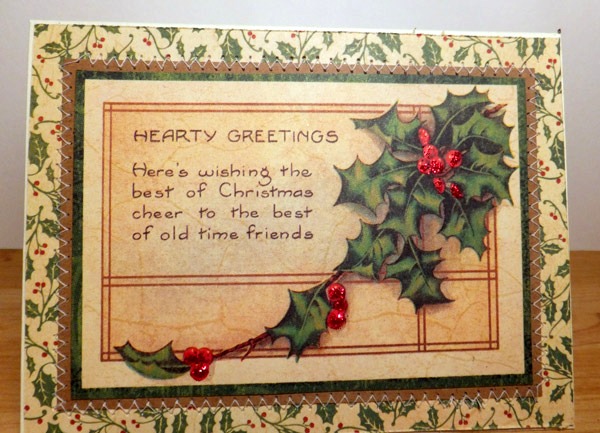
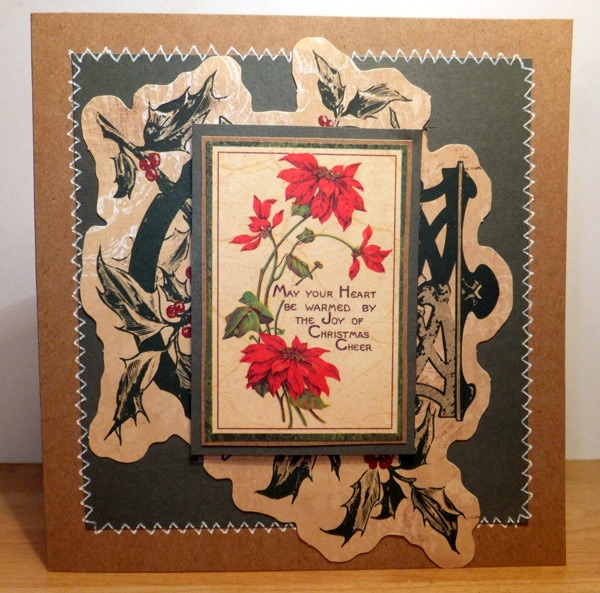
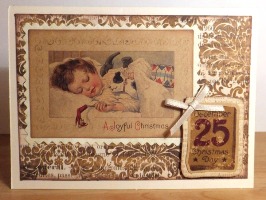
| Products used: Background Holly paper is reverse side Graphic 45 Christmas Emporium "Special Delivery" Centrepiece cut from Graphic 45 Christmas Emporium "Santa Express" Red Stickles Quick Guide
The holly tag was mounted onto green card and then onto craft card before being stitched to the small printed holly paper. To lift the card I used red stickles on the holly berries to make them shine.
|
|
|
Designed by Karen Leahy |
Products used: My Minds Eye Lost & Found Christmas Paper Fancy Pants St Nick Embellishment Pack CARDS
The papers in the range all coordinate so well and so mixing the striped and patterned paper was easy. I also cut some thin strips from the striped paper to frame the vintage Santa image., which came from Fancy Pants St Nick Embellishment pack.
|
|
|
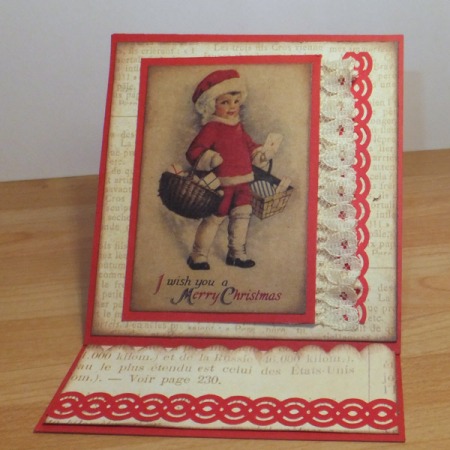
Designed by Karen Leahy |
Products used: My Minds Eye Lost & Found Christmas Paper Fancy Pants St Nick Embellishment Pack CARDS
Quick Guide
This easel card is a real tribute to the Victorian cards of the past as it combines not only the vintage image but also the pleated lace along the edge. Click here to find instructions on how to make an Easel card. I used a strip of red cardstock, cut with a fancy punch, to highlight the lace a little as it blended in too much to the printed patterned paper I used for the background.
|
|
|
Designed by Karen Leahy |
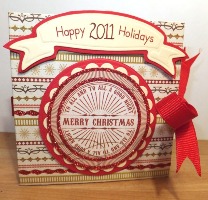
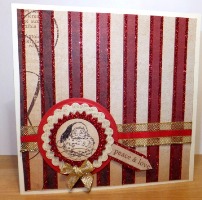
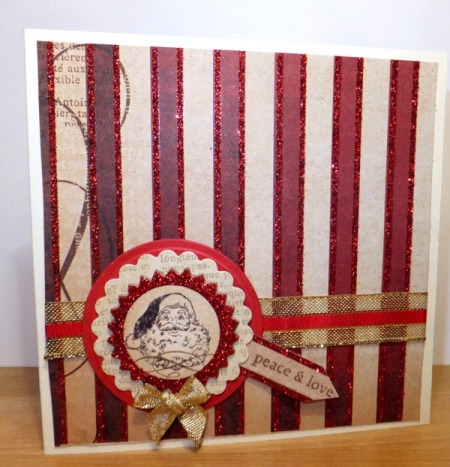 Products used: My Minds Eye Lost & Found Christmas Paper Fancy Pants St Nick Embellishment Pack CARDS Quick Guide The heavily glittered papers are so rich and festive they need little additions to help make a pretty card, and in double quick time too. All I added to the paper base was some coordinating glittered ribbon and one of the die cuts mounted on cream and red circles. A little red ribbon tied in the larger gold ribbon strip and I used a strip of the paper to stamp the sentiment on.
|
|
|
Designed by Karen Leahy |
Click on main picture to enlarge
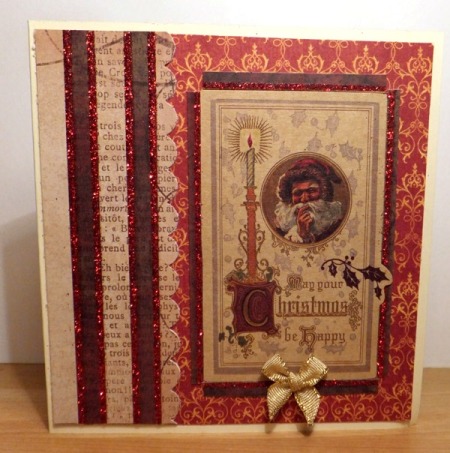
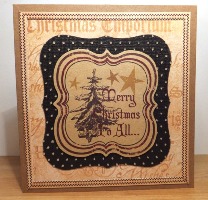
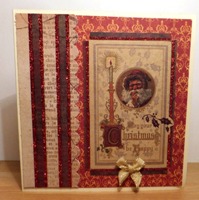
Products used: Fancy Pants St Nick Embellishment Pack CARDS Quick Guide I love the way the range ties in the craft and uses the very dark brown and black as well and so I wanted to echo these colours in a card. I used a piece of the script paper and edged it with strips cut from the stripe. The mat was made from cardstock embossed and sanded to tie the colours together and then the vintage centrepiece was used as the sentiment in the centre.
|
|
|
Designed by Karen Leahy |
|
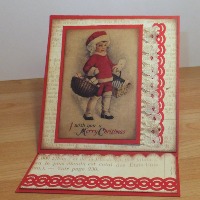
 Products used: Fancy Pants St Nick Embellishment Pack CARDS Bo Bunny Father Christmas (Trinket) Quick Guide Again a vintage tag made for a very quick and simple card. I mounted it onto the burgundy cardstock and then onto cream, stamping round the edges of the mount in brown to tie the colours together. The lovely Bo Bunny Father Christmas Metal Trinket with a ribbon centre added dimension to the card.
|
|
|
Designed by Karen Leahy |
Products used: Bo Bunny Father Christmas Noteworthy Graphic 45 Christmas Emporium "Santa Express" (Centre image) The centre tag was mounted on craft and then on green cardstock and was then placed on foam pads in the centre of the Bo Bunny tag. This was then mounted onto green cardstock and I drew stitches round the mount.
|
|
|
Designed by Karen Leahy |
Products used: My Minds Eye Lost & Found Christmas Paper and Die-Cuts
Quick Guide
Again the dramatic paper made the perfect backdrop for the die cut sentiment, needing little other than a bow and jewel to finish the card off.
|
|
|
Designed by Karen Leahy |
 Products used: My Minds Eye Lost & Found Christmas Paper and Die-Cuts Cards don’t have to be complicated to make a statement and this one exemplifies that. Using a strip of glittered paper to act as the anchor for the sentiment, I simply mounted the sentiment on cardstock and then adhered it with foam pads to the card.
|
|
|
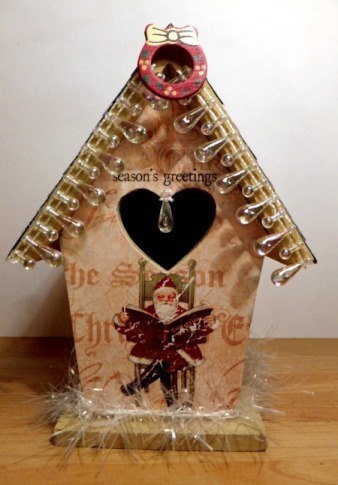
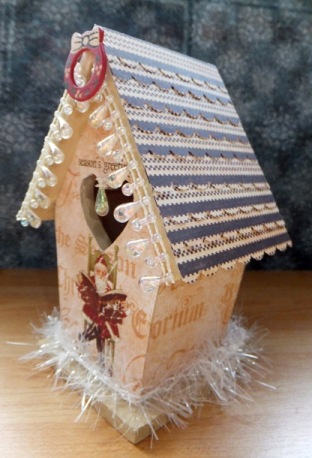
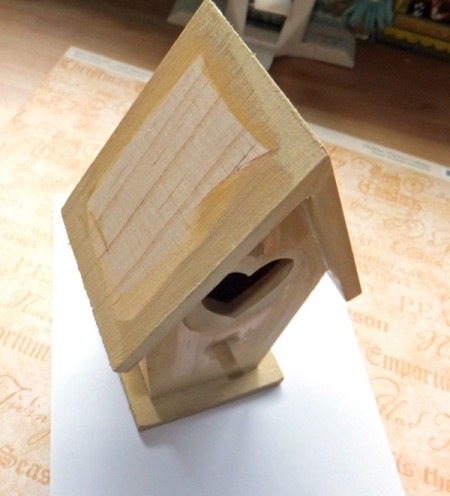
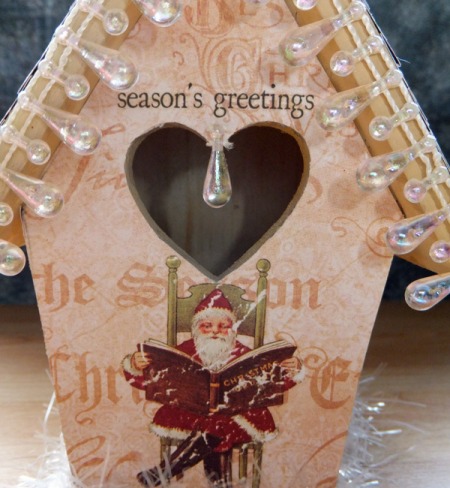
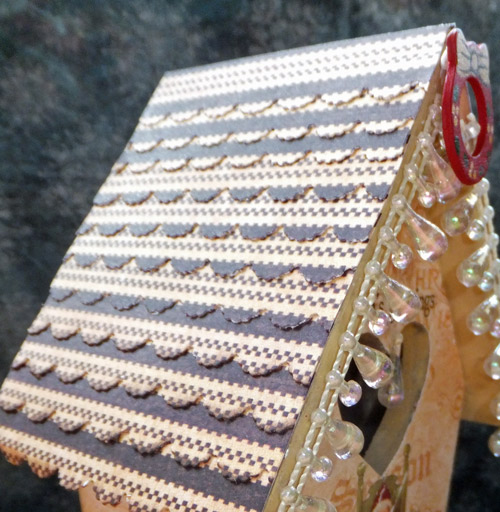
Designed by Karen Leahy |
Products used: Graphic 45 Christmas Emporium Paper "Happy Holidays" Roof is reverse side of Graphic 45 Christmas Emporium Paper Joyous Noel Bo Bunny Father Christmas Rub-Ons Designers own Bird House, Beads and Trim Quick Guide I had this little bird house for ages and thought it would be fun to make it a little Santa house.
First I painted the edges of the house in shades of cream to coordinate with the papers I was going to use. I then made templates for the sides, front and back using old printed paper, making sure they fit well and then cut them out of the patterned paper. I decided not to have it as a bird house so removed the ‘perch’ before adding the papers. I sanded the edges of the papers which I think always makes a better join. I used Bo Bunny Father Christmas rub-ons for the Seasons Greetings at the top above the heart and also for Santa Himself.
The faux snow round the bottom was an old hair scrunchie I dismantled and the icicles hanging down were a string of bead embellishments. The roof was made cutting scalloped strips from one of the patterned paper and then overlapping them.
|
|
All projects copyright ® Charmed Cards & Crafts. All rights reserved.