|
|
|
|
|

Swell Noel Circle/Decoration Book
Class created and designed by Kathy Black
|
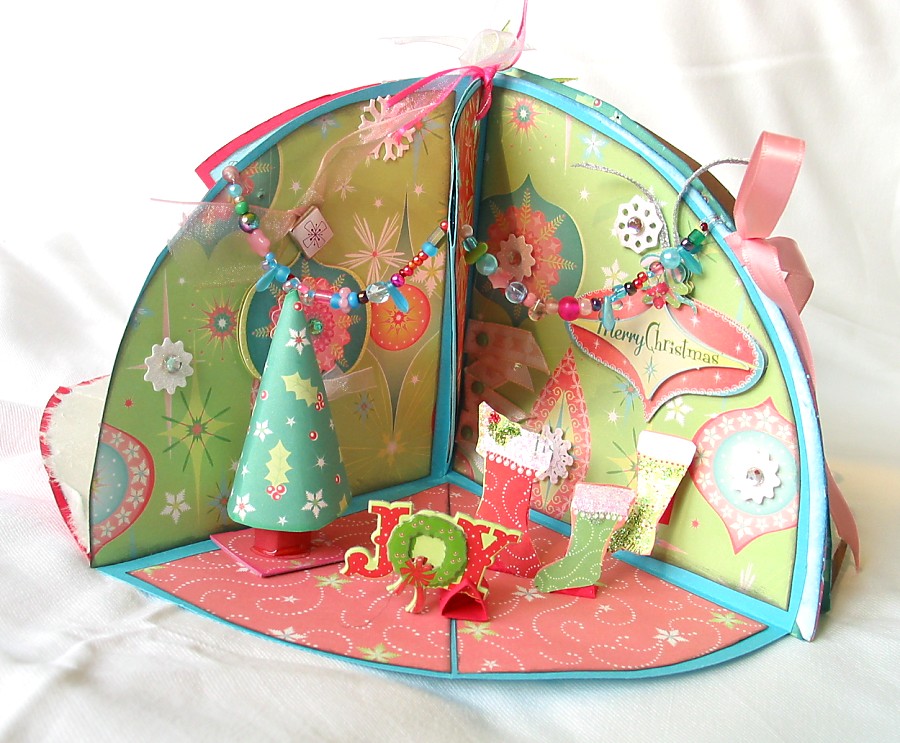
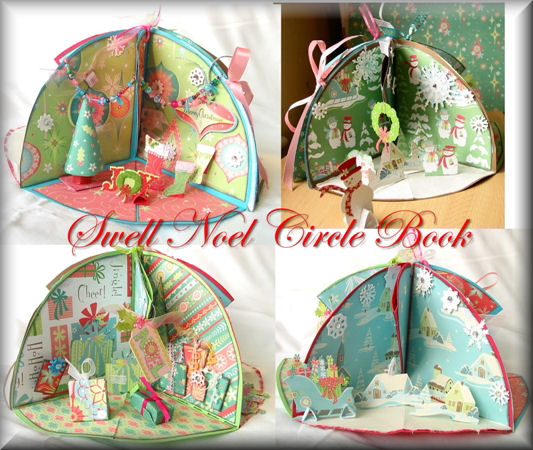
This wonderful Christmas project has been created and designed by guest designer Kathy Black for Charmed Cards & Crafts. Kathy used the K&Company Swell Noel Collection for this project. The circle book doubles as a fantastic Christmas decoration to treasure for many years to come. |
|
You will need:
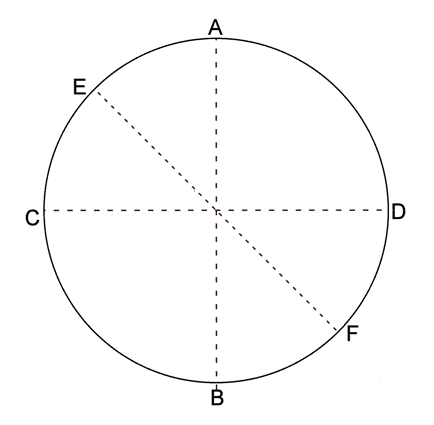
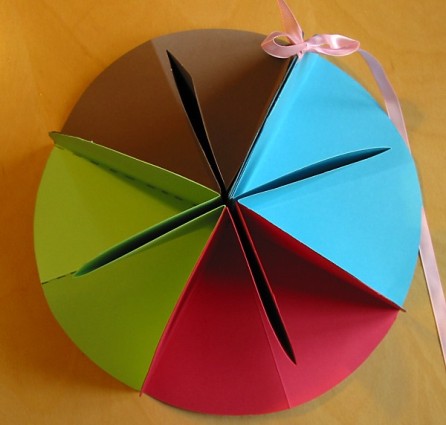
Notes: You can make this book using thick double-sided papers if you like, but I like the stability you get having the Bazzill to work on You can also add more “pages” but this particular book is intended to be left standing up as a Christmas decoration, so the 4 tableau areas work well for this project Step-by-Step Instructions Step 1 Cut the biggest circle you can from each of the sheets of card. I used a dinner plate as a template. Step 2 See diagram below for this step. Take the first circle and fold it in half along the line AB, make a crease with a bone folder. Open up and fold in half again along line CD, Open up, turn the circle over and make the third and final fold along line EF – AB & CD will be “mountain” folds and EF a “valley” fold.
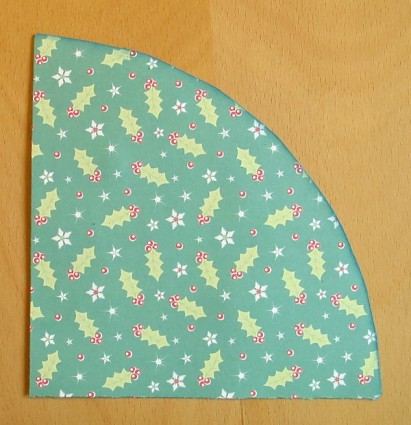
Step 3 Take hold of the corners of line CD and fold and squeeze towards the centre so that point E and point F come together in the middle. Step 4 Repeat with the other three circles Step 5 Use one of these folded circles as a template to make 2 cover pieces for your book, I used chipboard, but just some thicker card would be fine. Step 6 Choose one of your patterned papers and use the chipboard covers as a template to cut one piece for each of the covers. My tip here is to choose a design that doesn’t have a “right-way-up” – much less confusing than one that you need to work out which way up it will be! Step 7 Adhere one piece of paper to each cover piece and ink all of the edges
Now to assemble the book
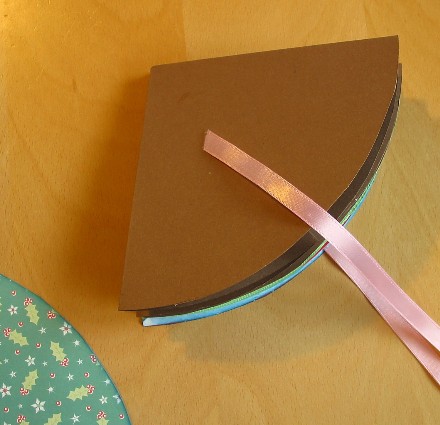
Step 8 Find the halfway point on the curved edge of the “wrong” side one of the cover pieces and make a mark Step 9 Cut two pieces of ribbon about 25cms long. Glue one end of the first length of ribbon onto the “wrong” side of the cover in line with the mark you made. This end will be hidden inside the book, so make it nice and long so that it stays securely in place. Step 10 Take one of the folded circles and apply glue all over the top quadrant, then carefully place over the “wrong side of the cover piece, matching the edges and enclosing the stuck down end of the ribbon Step 11 Take another folded circle and glue this in place on top of the first, make sure you match up all the edges accurately Step 12 Repeat with the third and fourth folded circles. Your pile of folded circles should now look like this:
Step 13 Stick the other piece of ribbon in place on the top quadrant so that it matches the position of the first one.
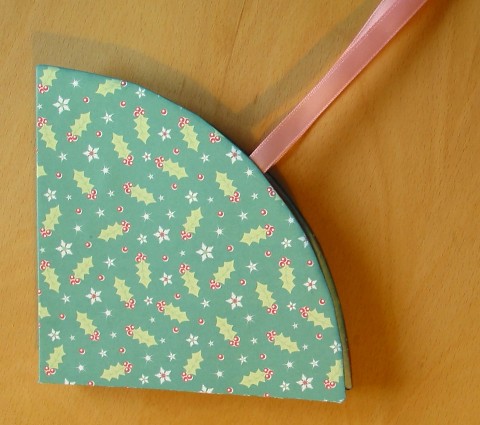
Then glue the 2nd cover piece over the top to make a nice fat sandwich. This is the basic book completed. It will look like this:
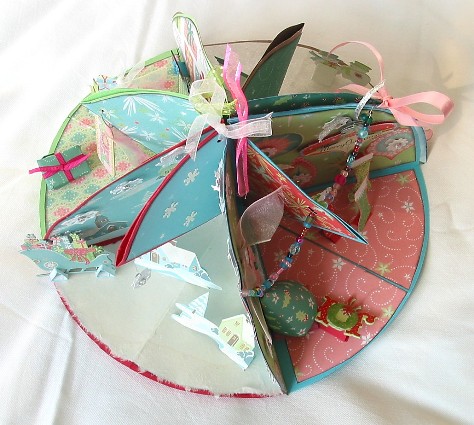
Now, if you set one straight edge on the table and take hold of a curved edge in each hand and pull them round so that the covers are back to back you’ll be able to tie the ribbon ends into a bow and your open book will, just like magic, look like this
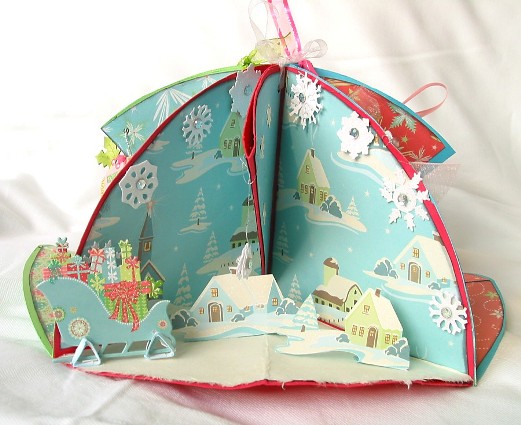
Clever, eh? That’s your basic circle book all ready to be decorated in whatever way you choose, but I’m just going to tell you a bit about how I went on to finish mine using the wonderful K&Co Swell Noel goodies that Karen sent for me to play with! I decided that they were way too nice to make into something to give away, so I’ve made my book into something I can display every Christmas.
As all the sections of the book are the same 2 basic shapes I started by making a pattern for each of them. Using a piece of scrap paper, cut a circle of the same diameter as your card pages. Fold the circle in half and draw a line about 0.5cms inside the curved edge, cut along the new curved lines and discard the off-cuts Cut the circle into sections so that you end up with 1 x ½ circle 1 x ¼ circle 2 x 1/8 circles Now you’ll have a selection of templates for cutting your patterned paper pieces
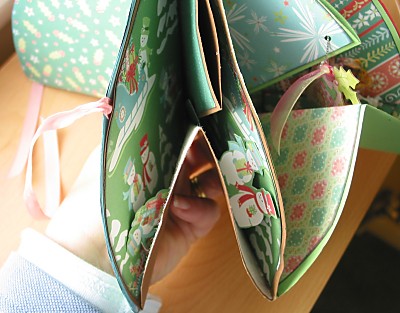
I thought the four sections I got when I tied the book open looked a bit like mini stage sets, so decided to treat each one in that way. However, you could choose to use the book in a more conventional way and add photos, poems, memories etc to the pages. It would make a beautiful Christmas Memories book,
I’m just going to share a few ideas and techniques I used to decorate my book which I hope will be useful to you
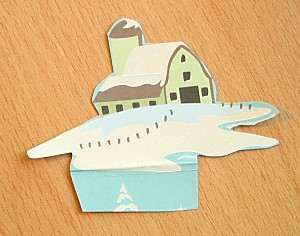
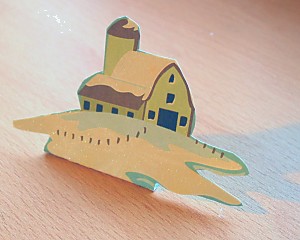
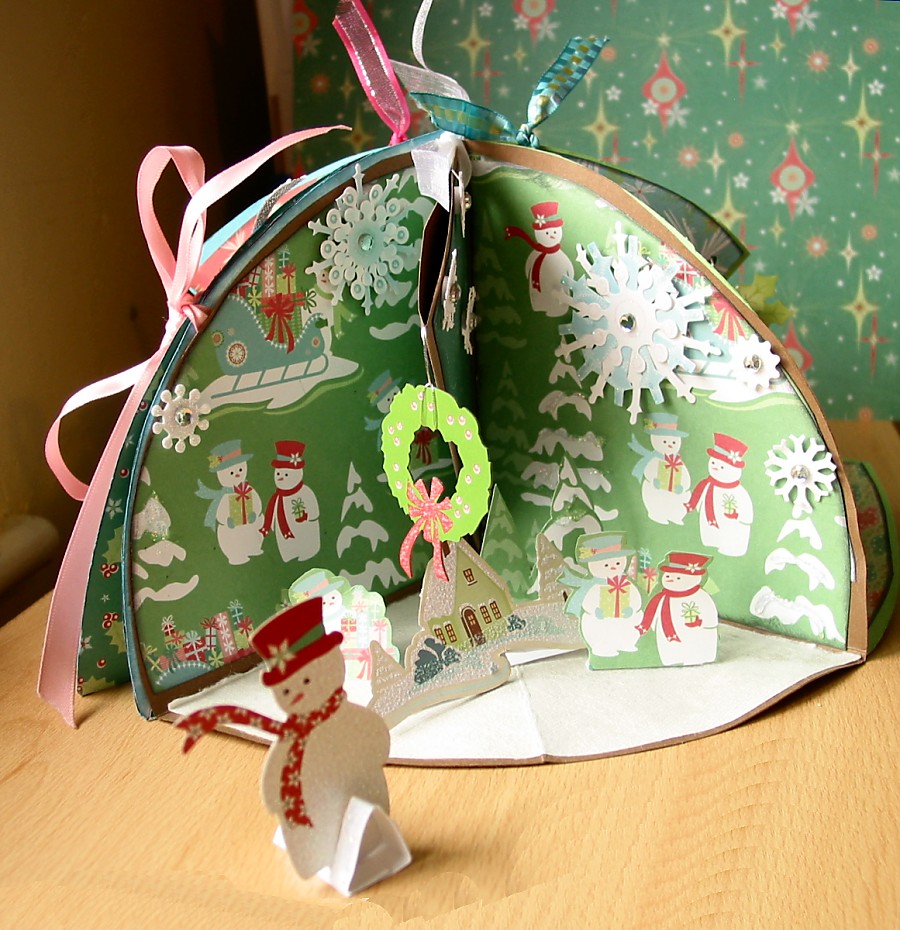
The snowy village tableau I used the beautiful embossed paper with pictures of houses and churches etc.
Click image to enlarge 1. Cut a semi circle shape from patterned paper using the scrap-paper template. Make sure it will be the right way up when stuck into the book! 2. Cut in half and adhere of the upright pages of the book 3. Cut 2 x1/8 circle shapes from the top part of the paper with a Father Christmas, sleigh and reindeer flying over a village, this part of the paper is just pale blue with little stars – stick these pieces to the small “slice of cake” shaped section. 4. For the base of this section I used some white handmade paper 5. Cut some motifs from the first paper, but leave about a 1.5cm border at the bottom of each motif.
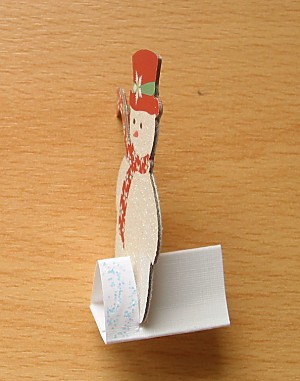
6. Make a fold at the bottom of the little picture so that it can stand up on the little folded piece.
7. Glue in position on the base of your book – take care not to stick over where the page will fold, check also that when you fold the pages up your pop up motifs will be able to lie flat. To do this, just hold them in the place you want them to go and gently fold the pages up to check their positions. It’s difficult to explain in writing, but easy to see when you actually do it. 8. I’ve added some extra free-standing pieces to the “floor” of the page using some gorgeous pieces of double-sided chipboard icons that match the papers – they come in a box that will be wonderful for altering when it’s empty! I made little stands for these by cutting strips of card, folding to form triangular prism shapes, and then cutting a slit for the chipboard pieces to fit into. 9. Around the curve of the circle I’ve used some of the beautiful glittery multi-layered snowflakes – I love these, there were masses in the box and various different sizes too, so useful for lots of projects. 10. I’ve used a couple of the snowflakes stuck back to back and suspended on silver thread from the 1/8 circle shaped section
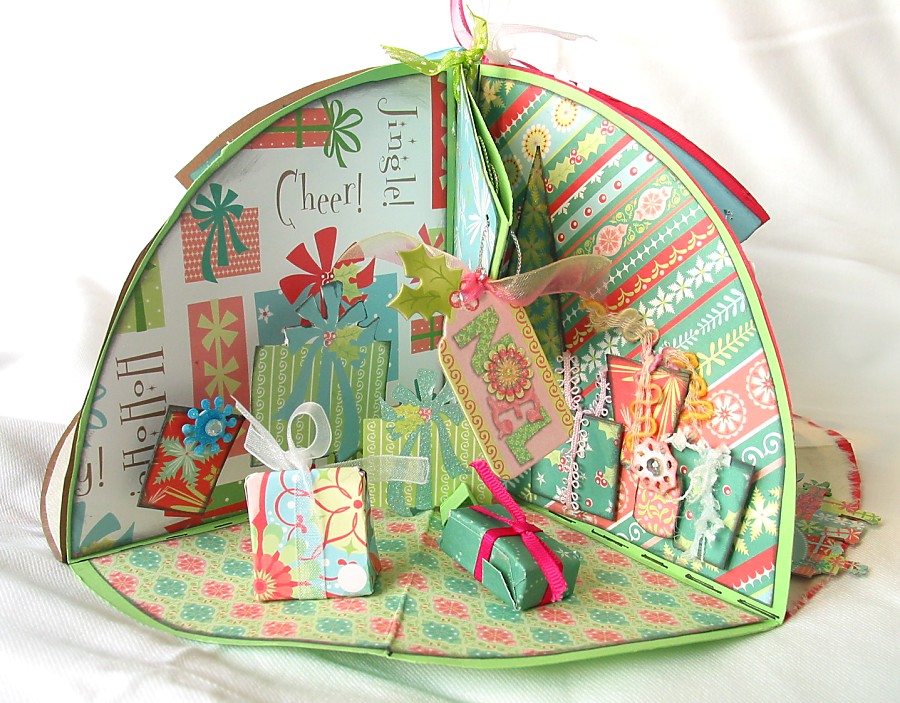
The Baubles and Stockings Page
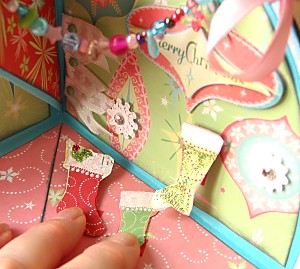
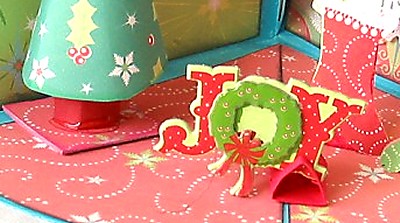
Click image to enlarge 1. I’ve used the Baubles paper for the backdrop, the reverse of the embossed trees paper for the “floor” and the reverse of the border stripes paper for the central section 2. I made a hole through the small section in the middle, then used a fine needle and thread to attach a row of small beads from one side to the other, passing through the hole in the centre section and knotting through needle holes at either end. 3. The backdrop is decorated with some of the glittery Grand Adhesions Bauble Stickers, I’ve added some ribbon and a brad from the Dovecraft Funky Brad set 4. To add more dimension to the background paper I’ve used more of those pretty snowflakes in the centres of some of the baubles. 5. The tree is free-standing, made with quarter-circle of the Holly paper curled into a cone shape. The base is a scrap of red card made into a cylinder and glued inside the cone. For stability I covered a square of chipboard with the same paper used on the floor then glued the trunk of the tree onto it 6. The stockings were made in a similar way to the little houses above, but this time I cut out the whole stocking and attached a piece of folded card to the reverse to make the stand. You need to check that the stockings will not be damaged when the book is folded
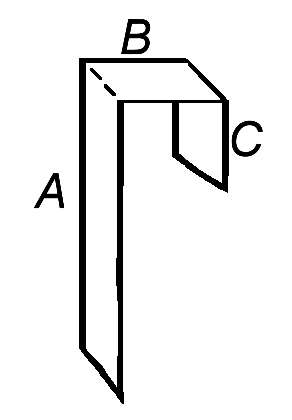
7. You can attach stand-out pieces to the backdrop using the same folded strips of card technique: this time you need to allow about 1.5 cms for making two folds - the main length of the card strip (A) is attached to the stocking, then, leaving the centre folded section (B) free adhere the end folded section (C) to the wall.
8. The “Joy” is a chipboard sticker and is free-standing. To make it stand up make a triangular prism shape (like a Toblerone), cut a little slit to allow the chipboard piece to sit in. You may find it better to use two of these for each chipboard freestanding element.
The Gifts page I’ve used different papers for each of the ¼ circle sections, and another for the little section in the middle.
Click image to enlarge
1. Make some tiny parcels from scrap card, or if you’re lucky you might find some tiny ready-made boxes to use. Cover with papers from the collection, tie narrow ribbon around them and use as freestanding decorations for this section 2. Use the triangular prism method to make stands for the chipboard parcels in the “Chip Box” 3. stick scraps of paper onto card, cut into parcel shapes, add some ribbon and fix to the backdrop with foam tape 4. Cut out gift shapes from the Gifts paper and attach to the walls using the tab method described above 5. Cut out one of the trees from the Embossed Trees paper, stick first to a scrap of card, then to the backdrop 6. Add some ribbon to the Noel tag from the “Chip Box” and hang this from the little central section with silver thread
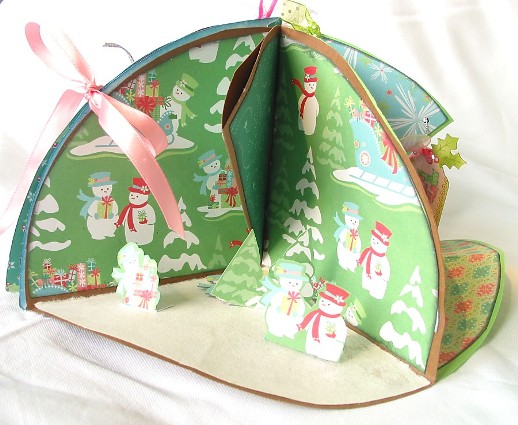
Snowman Scene Use the Snowmen paper for the backdrop, white handmade paper for the floor and the swirly green reverse of the snowman paper for the centre section.
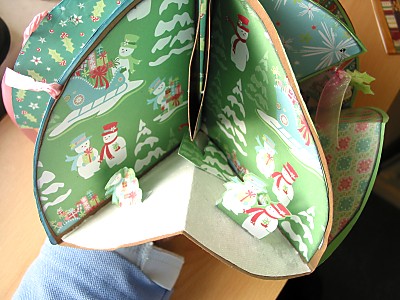
Click image to enlarge 1. Cut out snowmen and tree motifs from the paper, leaving the space at the bottom of each to use as the tab. Stick down taking care to make sure the pages will still fold properly. Hopefully these three pictures will help illustrate how the pieces lie when the book is being folded
3. Add a snowman from the chip box to the tableau – use the “toblerone” method!
4. Add more of those gorgeous glittery snowflakes, and maybe some glitter to the snowy bits of the trees and snowmen on the background paper.
To Finish: You can make holes near the centre folds of the small inner pages of the book and tie ribbon through them. This helps keep the book stable, and easier to open/close
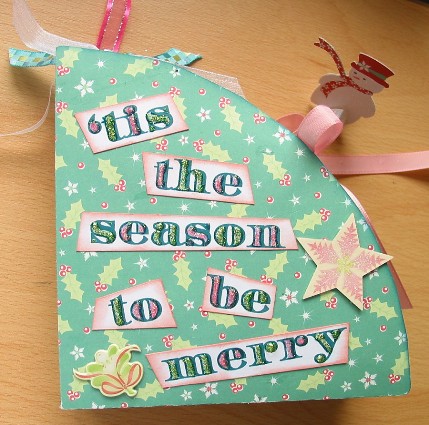
Decorate the covers of the book – but keep them fairly flat if you’re going to display this book open, because bumpy covers won’t allow the book to tie open nicely.
I hope you are inspired to have a go at making one of these books, they are great fun and offer lots of scope for letting your creativity run wild!
|
We hope you enjoyed Kathy's wonderful class.
All projects copyright ® Charmed Cards & Crafts. All rights reserved.