|
|
|
[Home] [Shop] [Bo Bunny] [Project Ideas] [Forum] |
|
Bo Bunny Beautiful Dreamer Card Ideas
By Karen Mortensen
 |
 |
 |
 |
 |
 |
 |
|
 |
|
 |
|
 |
 |
||

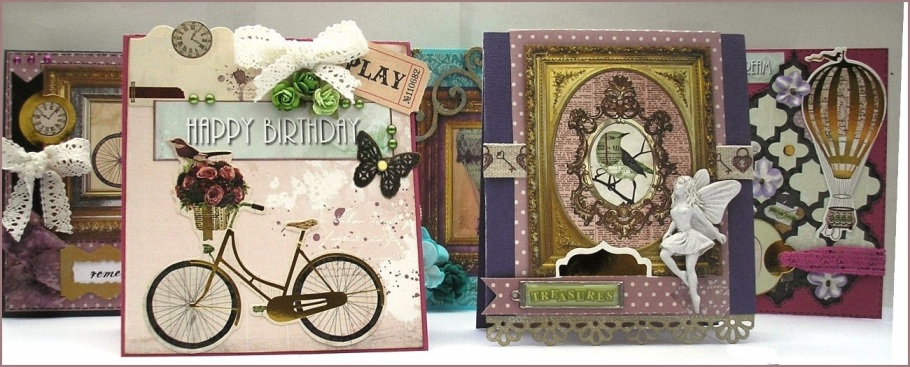
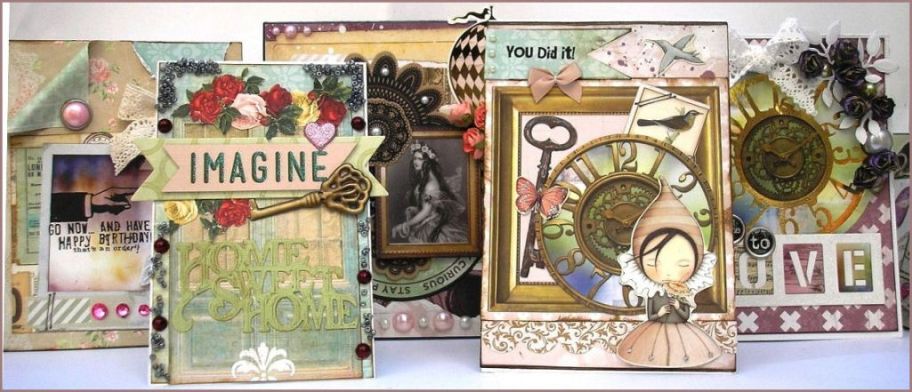
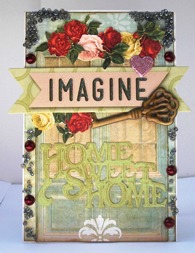
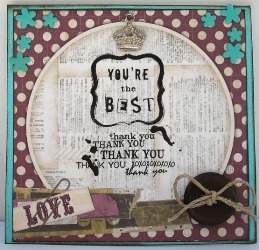
| Introduction: Bo Bunny's collections are designed to help you complete coordinated projects, to that end their collections comprises a selection of beautiful papers and embellishments, including papers with cut-out panels that I have used extensively on my cards here. The panels allow you to create super quick and beautiful cards, and I wanted to show you how versatile they are.
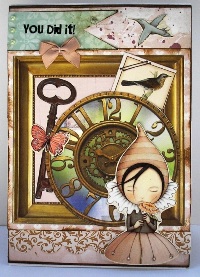
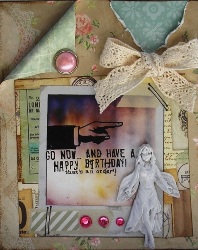
 I combined the Beautiful Dreamer products with a few Santoro Mirabelle stickers: the little girl, the bird and the butterfly. The banner at the top I just cut from a scrap piece of Soiree paper that I used on another card. Nothing is ever wasted when I create LOL Although there is a large clock in the Noteworthy pack I had already used that but thankfully there was another clock on one of the papers so I cut that out and used it here instead. The frame is one of the cut outs and it has a key on there, I used Glossy Accents on the key for a 3D effect. The little Bird cut-out is from one of the papers too. So here is a super quick guide to making this card: Cut a piece of 13.5" x 4" plain cardstock into a card size 5.75" x 4" with the fold at the top. Cut two pieces of Bo Bunny Beautiful Dreamer Paper Imagine into size 5.65 x4". Ink with brown Distress Ink then glue one panel to the front of the card, and another to the inside of a card. We are using the reverse side of the paper here. Cut out the relevant panel from the Bo Bunny Beautiful Dreamer "Live Life" paper. Ink the edges and stick to the middle of the front of the card. Gloss the picture of the key on the panel using Glossy Accents and leave to dry. Cut out clock from Bo Bunny Beautiful Dreamer Paper Imagine paper and stick onto panel. Cut out the bird stamp from the same paper. Using a piece of scrap paper that will coordinate cut a little banner for the top, ink edges and stick on. Add a sentiment, either by writing directly on the banner or using a rub-on etc., add three pearls to the side. Add a Santoro Mirabelle Girl sticker to the front and from the same sticker sheet a pink butterfly and a blue bird. (see picture below)
Products Used:
Bo Bunny Beautiful Dreamer Paper Imagine (background
paper, reverse side also used for cut-outs, see below
Bo Bunny Beautiful Dreamer Paper Imagine
(clock and bird stamp under the clock)
Bo
Bunny Beautiful Dreamer "Live Life" paper.
Card size: 5.2" x 3.5". In this card I combined a few Bo Bunny
collections, and used the door from a paper from Bo Bunny The
Avenues, the flowers are fussy cut from a Bo Bunny Juliet paper,
background paper is Soiree. Banner with sentiment is from the
Beautiful Dreamer Noteworthy pack.
Quick Guide: Cut a piece of 10.4" x 3.4" plain white card into a card size 5.2" x 3.4" with the fold at the top. Cut two pieces of Bo Bunny Soiree Paper Linens (reverse side used) into size 5.1" x 3.2", ink edges with brown distress ink then glue one onto the front of the card and the other to the inside of the card. Cut a door panel from Bo Bunny The Avenues Paper, ink edges and stick to the front. Add some Glossy accents to two top corners and here and there on the edges and sprinkle with glass beads, press them down (see picture below) Cut out several roses from the Bo Bunny Juliet paper Soulmates and stick on the top of the door. Add pearls, a heart brad, a key and a sentiment. I used a die-cut for my sentiment here.  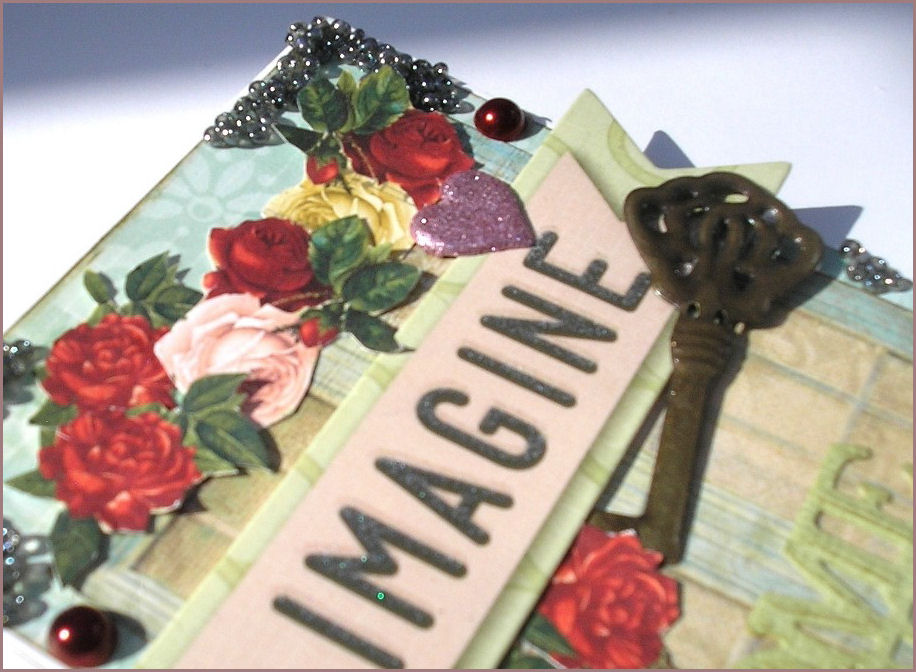
Products Used:
Bo Bunny Beautiful Dreamer Noteworthy Die-Cuts
(Imagine Banner)
Bo Bunny Soiree Paper Linens (reverse side
used)
Bo Bunny The Avenues Paper (door)
Bo Bunny Juliet paper Soulmates (fussy cut
roses)
Prima Glass Beads added with
Glossy Accents
Spellbinders Home Sweet Home die (currently out of stock)
 Card measures 5.8" x 4.7". Here I combined collections and used the beautiful Soiree paper from Bo Bunny with one of the Beautiful Dreamer cut-out papers. The background paper is of course double-sided the reverse of the paper is what you see on the bent back corner and the tear in the paper. Quick Guide: Fold a piece of white card into size 5.8" x 4.7" Cut a piece of Bo Bunny Soiree Paper Linens on the edge of the paper to get the doily design. Ink edges heavily. Fold one of the corners and attach a large brad (see picture. Hold against card and cut a piece of the same paper a little larger than your folded corner. Ink edges then glue the little corner piece down onto the card itself. Tear the Soiree piece of paper and roll the edges a little to show the white edge. Again hold it up to the card and cut a piece of the soiree paper large enough to sit behind the torn out piece. Use the reverse side of the Soiree paper and glue it behind the tear. Stick this front panel to the front of the card. Cut the relevant cut-out from the Bo Bunny Beautiful Dreamer Paper Life Life. Ink edges then stick to front (see picture for guidance) Finish with a lace bow and a few gem stones. I added a Prima Fairy. Cut another piece of the Soiree paper and use the reverse to
decorate the inside
Products Used:
Bo Bunny Soiree Paper Linens
Bo
Bunny Beautiful Dreamer Paper Life Life (cut-out)
Prima Resin (currently sold out)

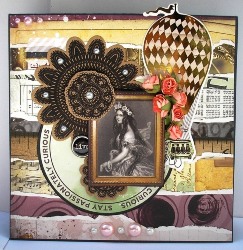
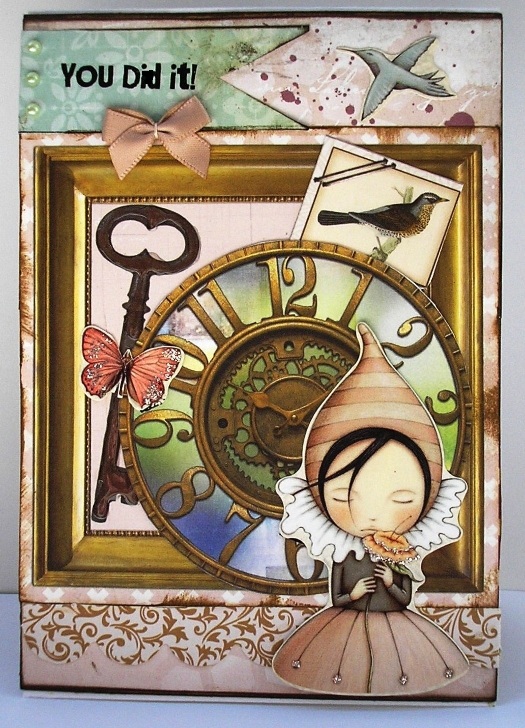
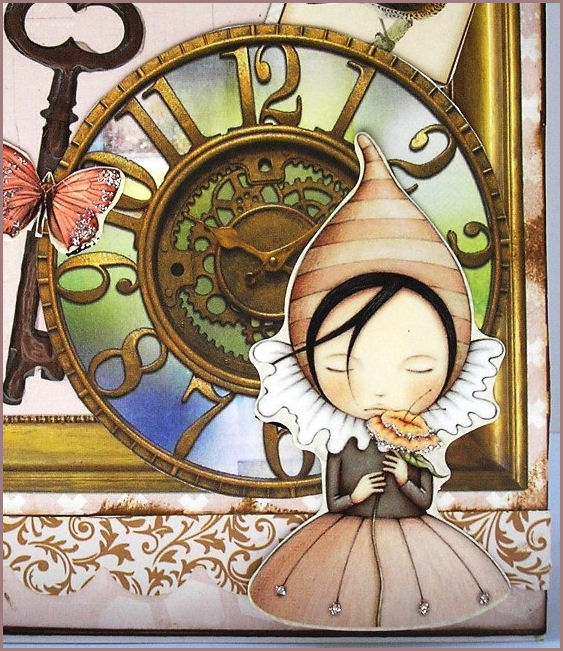
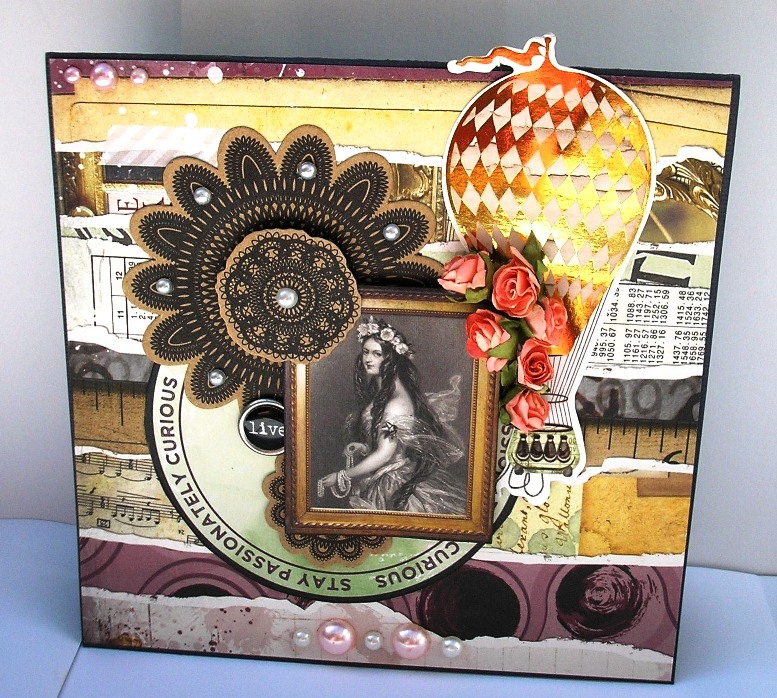
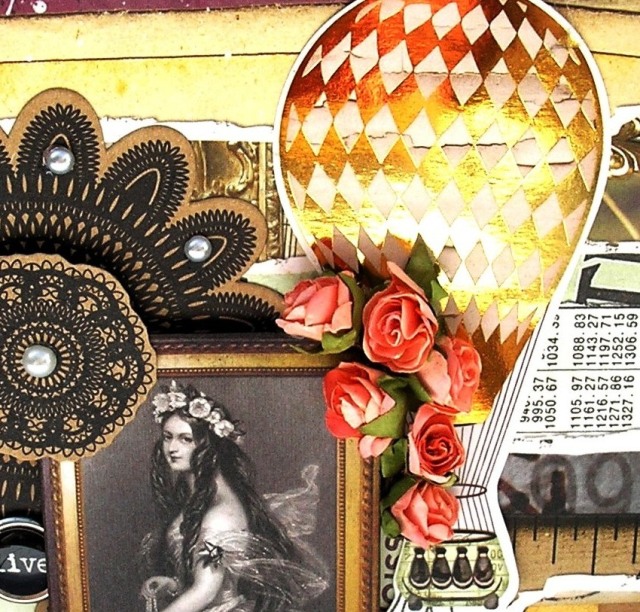 Here is a quick guide: Cut a piece of black cardstock into a card size 6" x 6". Cut a piece of Bo Bunny Beautiful Dreamer Paper Mirage slightly smaller than the front of the card and stick to the front of the card. Assemble the middle:
Add a few pearls at the bottom of the card and top left. I used a light green cardstock for the inside of this card to complement the front.
Products Used:
Bo Bunny Beautiful Dreamer Noteworthy Die-Cuts
Bo Bunny Beautiful Dreamer Paper Mirage
Bo
Bunny Beautiful Dreamer Paper Imagine (lady in
frame)
Bo
Bunny Beautiful Dreamer Paper Life Life (Green
circle with sentiment)
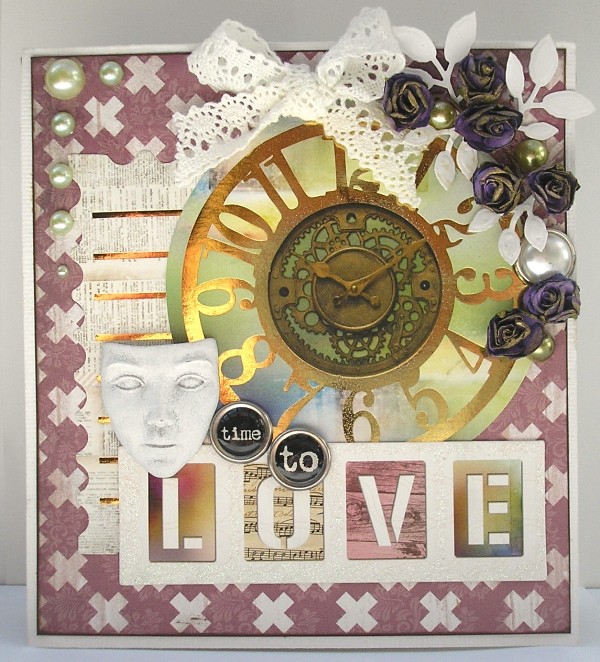
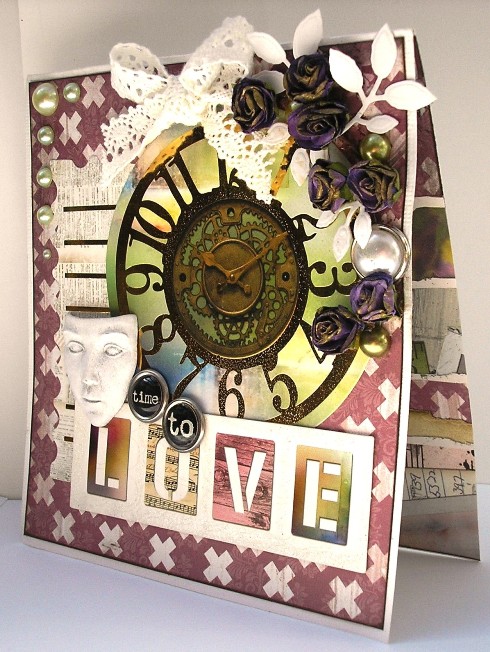 Quick Guide: Cut a piece of white card into a card size 5.75" x 5.2". Cut two pieces from the Bo Bunny Beautiful Dreamer Paper Mirage slightly smaller than the front of the card. Ink edges with distress ink then stick the reverse side of the paper to the front and the other side to the inside of the card. Add the journaling die cut to the front as shown then the clock die-cut and finally the "Love" pice - all three are from the Noteworthy pack. Add pearls to the corner and embellish as you like. I added a
lace bow tot the top, some purple roses -I rubbed a little
metallic ink on the roses just to lift them - a Prima resin mask an
Imaginisce brad and more pearls. The leaves I cut with a die.
Products Used:
Bo Bunny Beautiful Dreamer Noteworthy Die-Cuts
Bo Bunny Beautiful Dreamer Paper Mirage (reverse side
used on front but I used the front page inside the card as well
as you can see in the pictures.)
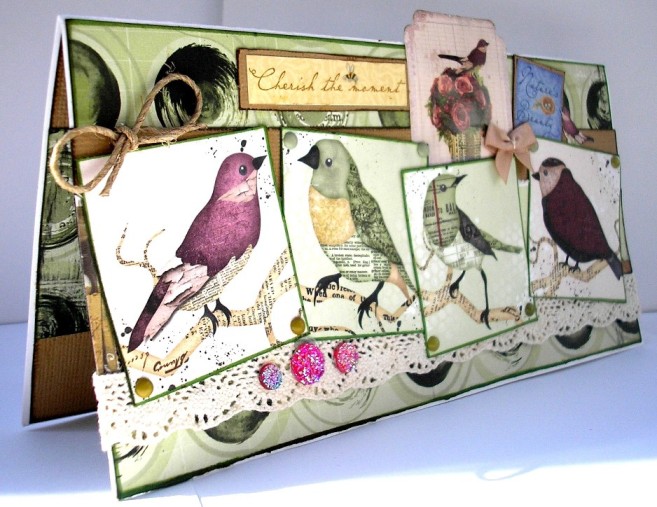
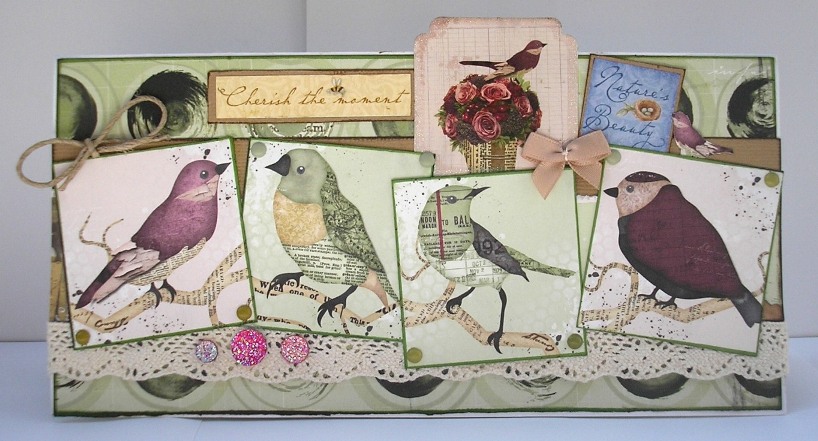 This is a larger card, measuring 8" x 4". I created a beautiful middle section then proceed to cover it all with the four birds LOL The birds are from one of the sheets. The flowers with the bird on top is a noteworthy from the collection and I cut the little bird out from one of the sheets too.

Products Used:
Bo Bunny Beautiful Dreamer paper "Memories" for
backgorund paper.
Bo Bunny Beautiful Dreamer Noteworthy Die-Cuts
Bo Bunny Beautiful Dreamer Paper "Live Life" (birds)
Small Basic Grey Brads used on corners on cut-outs
Prima sugar dots (sorry sold out at the mo)
 This is a small card just to show that you can literally put a card together in minutes. The card measures just over 4" square. I just took a piece of plain cardstock, inked the edges with brown distress ink - cut out one of the squares from the paper, used a couple of rub-ons for the sentiment, inked the cut-out and stuck it to the card. Adding a few brads and a button completed the card in minutes. Easy peasy. 
Products Used:
Bo Bunny Beautiful Dreamer Paper "Live Life"
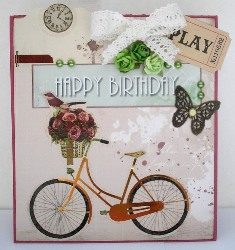
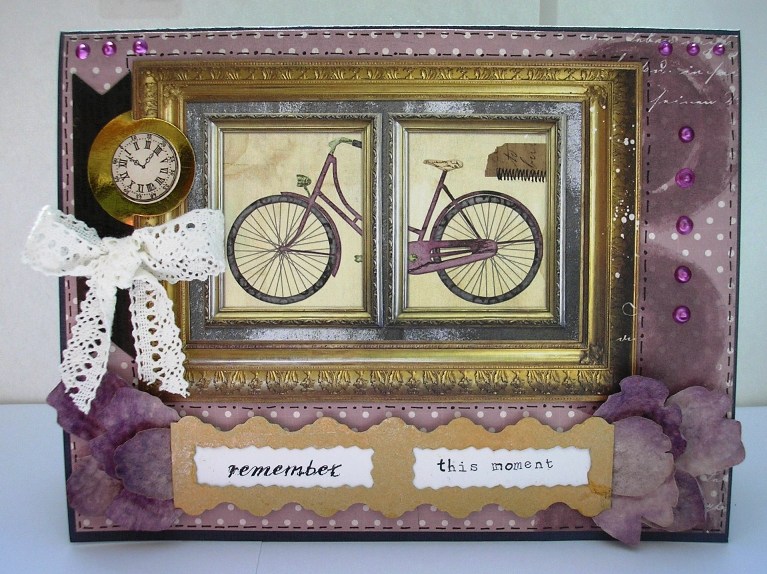
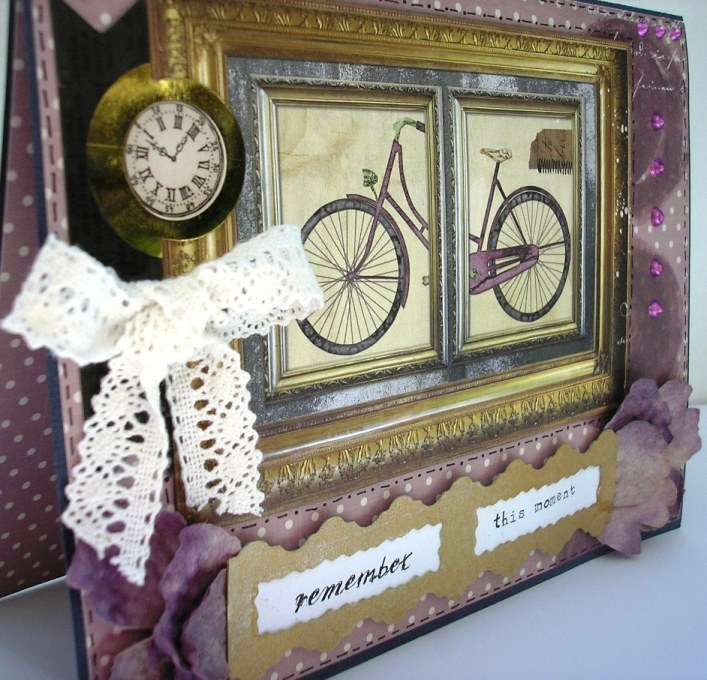
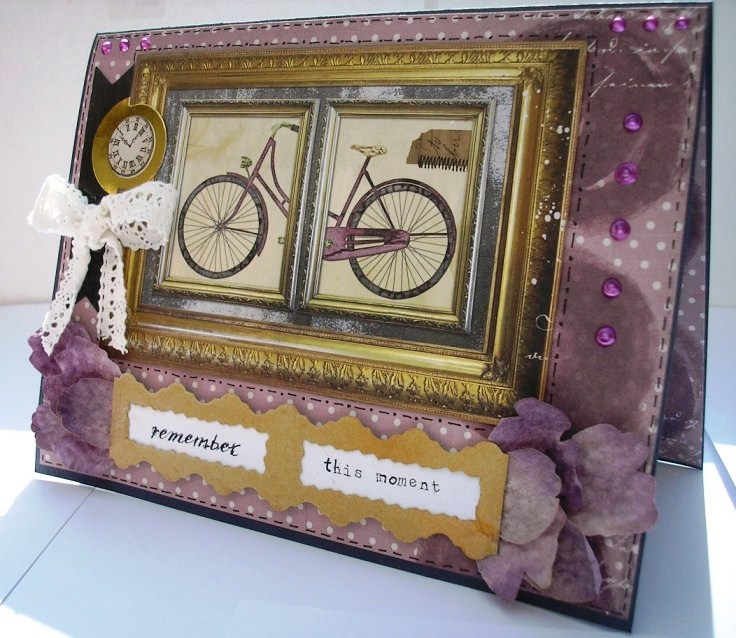
The gold details is amazing on these Noteworthy Die-Cuts, You
can see it better if the card is quite darkly lit:
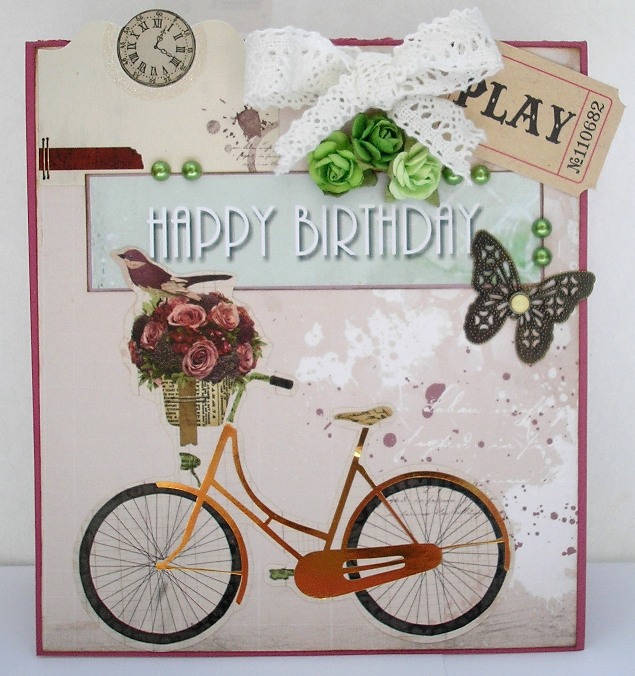
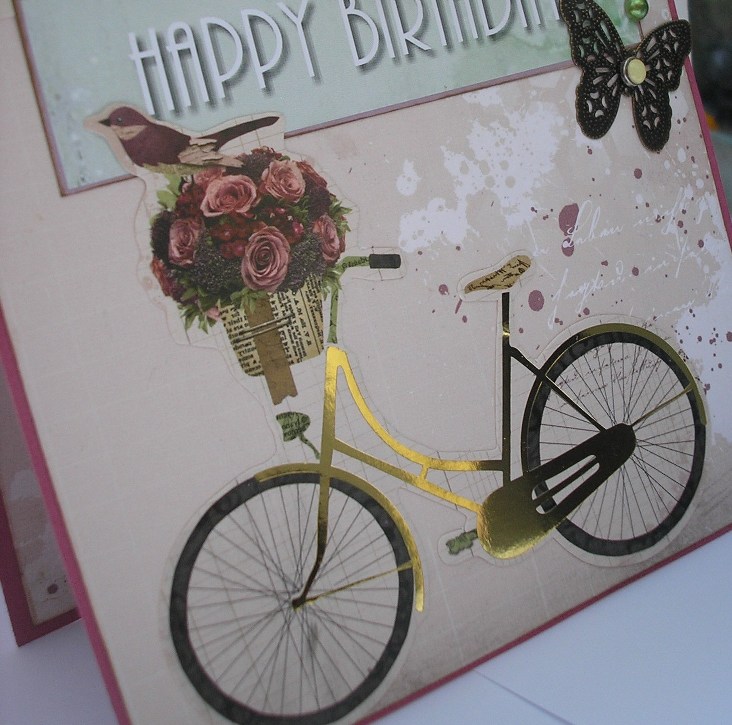
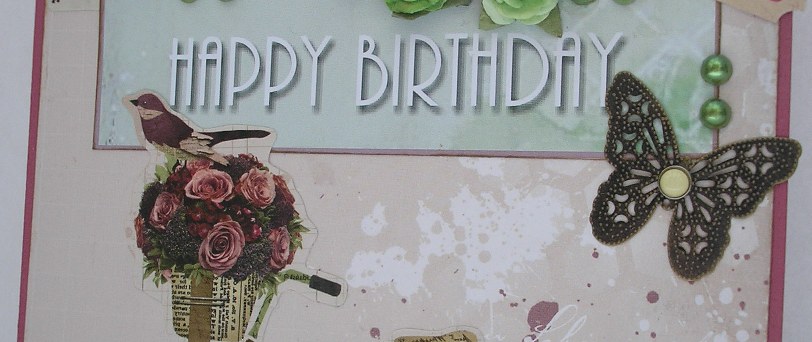
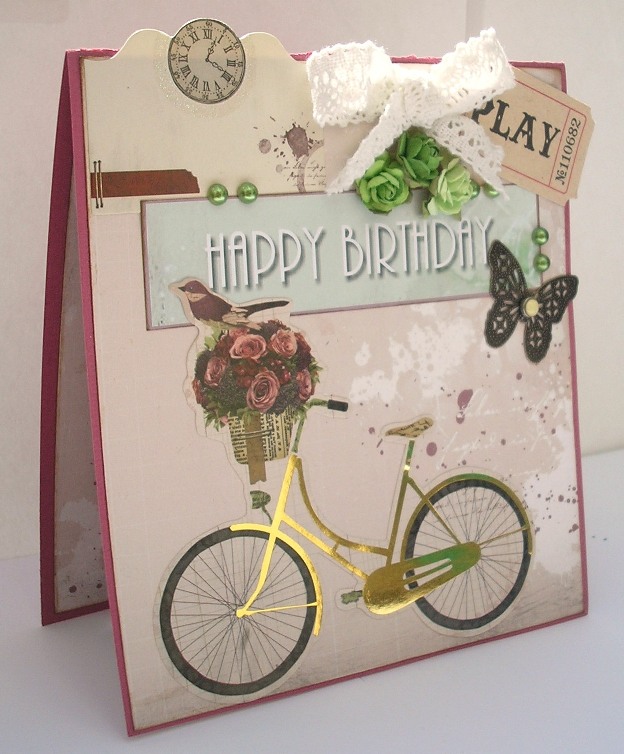
 Opulently golden shimmer.  Quick guide: Cut a 12" x 5.5" dusky pink piece of cardstock into a card size 6" x 5.5". Cut two pieces of Bo Bunny Beautiful Dreamer Paper Imagine (reverse side used here) slightly smaller than the card to show a margin as shown, ink edges then stick one to the front of the card, and one to the inside - I always decorate the inside too, it makes a huge difference to the look and feel of the card. Add the clock die-cut from the Noteworthy pack. Print out the "Happy Birthday" sign that I am givng you below at the size you want. Mine is 11cm x 3cm. You can insert the image into a Word document and resize it and print it from there. Stick onto front of card. Add the beautiful golden bicycle noteworthy die-cut, then the other embellishments as shown.
Products Used:
Bo Bunny Beautiful Dreamer Noteworthy Die-Cuts
Bo Bunny Beautiful Dreamer Paper Imagine (reverse
side used here)
"Happy Birthday sign I made on the computer -
Click here to get it (Copyright Charmed Cards & Crafts)
Basic Grey Brad used on butterfly
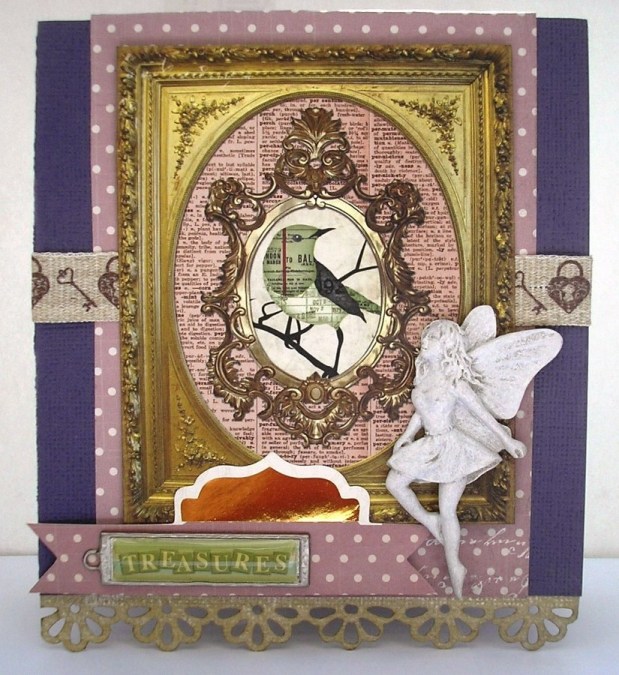
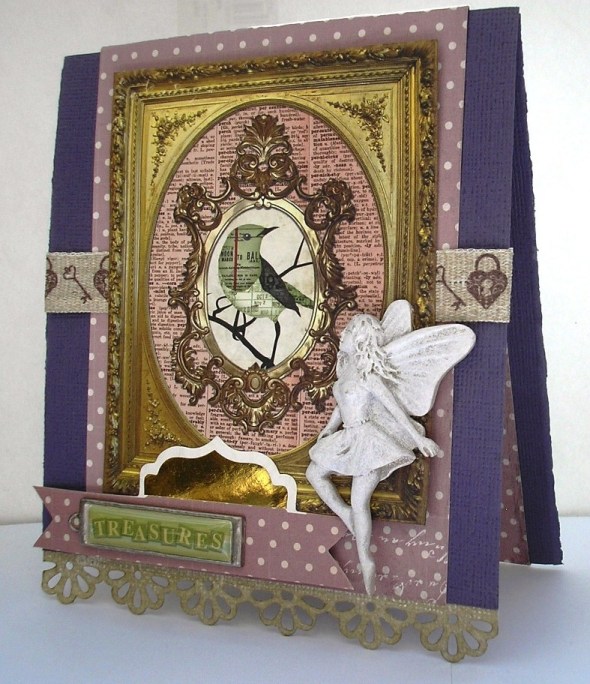
Quick guide: Cut a 12" x 5.2" piece of contrasting cardstock and fold into a card size 6" x 5". Using a border punch cut the bottom of the card into a fancy edge. Cut a piece of Bo Bunny Beautiful Dreamer Paper "So Lovely" into 4.2" wide and the height from the cut edge to the top of the card and stick it on (use reverse side). Cut a similar piece for the inside size 4.2" x 6". Add a ribbon to the middle then the beautiful frame
cut out from
Bo Bunny Beautiful Dreamer Paper "Daydream".
Add the coordinating banner die-cut from the Noteworthy pack and
tuck another little die-cut behind it. Add a resin fairy and a
sentiment.
Products Used:
Bo Bunny Beautiful Dreamer Noteworthy Die-Cuts
Bo Bunny Beautiful Dreamer Paper "Daydream"
Ribbon
Prima Resin Fairy (Out of stock)
"Treasures" metal sign by K&Co

Products used:
Bo Bunny Beautiful Dreamer Noteworthy Die-Cuts
Petals (own stash)
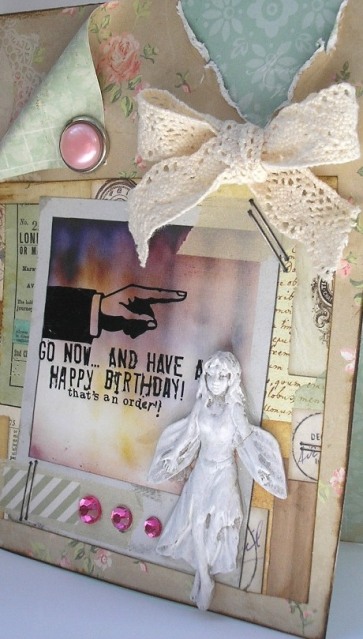
The frame cut-out is just beautiful. The clock is on the black
banner and can be found in the Noteworthy pack.
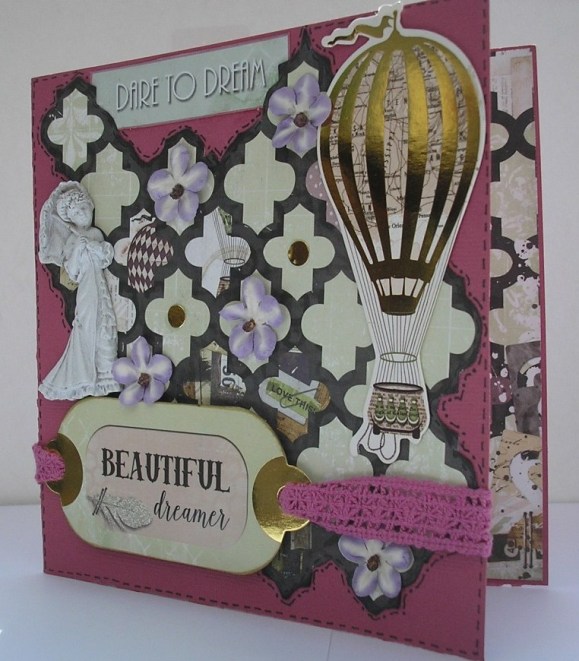
I cut out part of the Bo Bunny paper "Memories" for my next card,
then traced around the cut paper with a faux stitch:
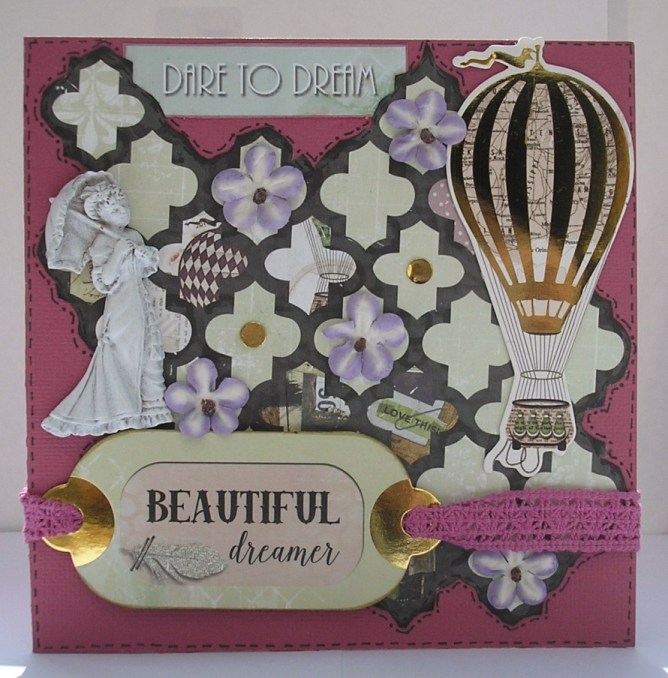
Beautiful gold detail on the Noteworthy Die-Cuts:
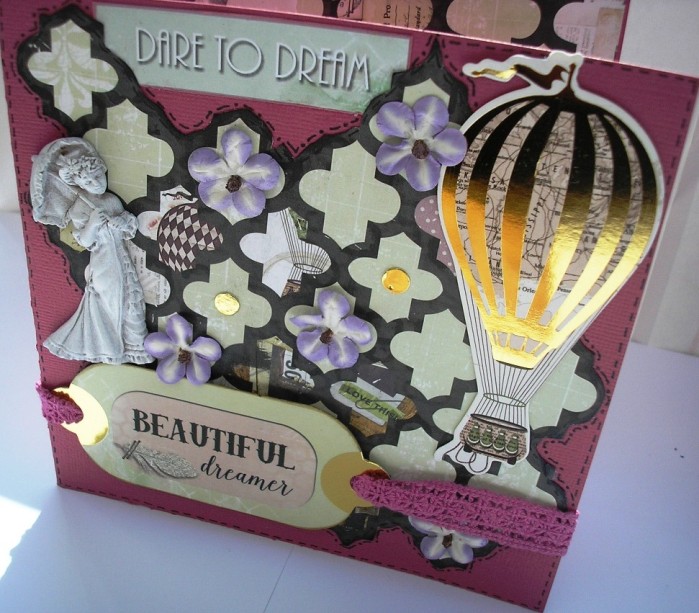 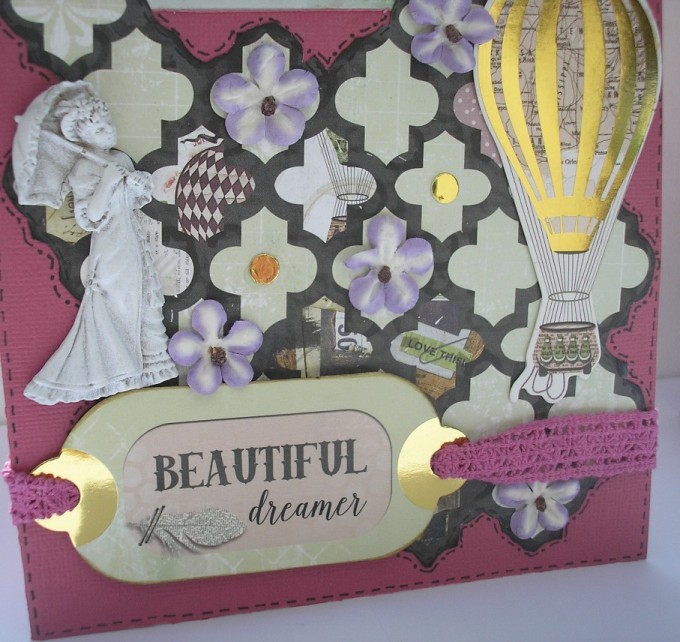
Products Used:
Bo Bunny Beautiful Dreamer Noteworthy Die-Cuts
Bo Bunny Beautiful Dreamer Paper Memories
(reverse side used here)
"Dare to Dream" sign I made on the computer -
Click here to get it (Copyright Charmed Cards & Crafts)
Prima Resin Figure
.
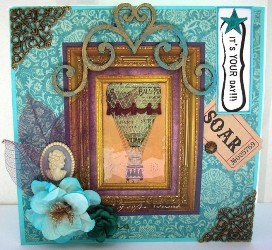
The last card uses paper from Graphic 45 alongside Bo Bunny's
Beautiful Dreamer:
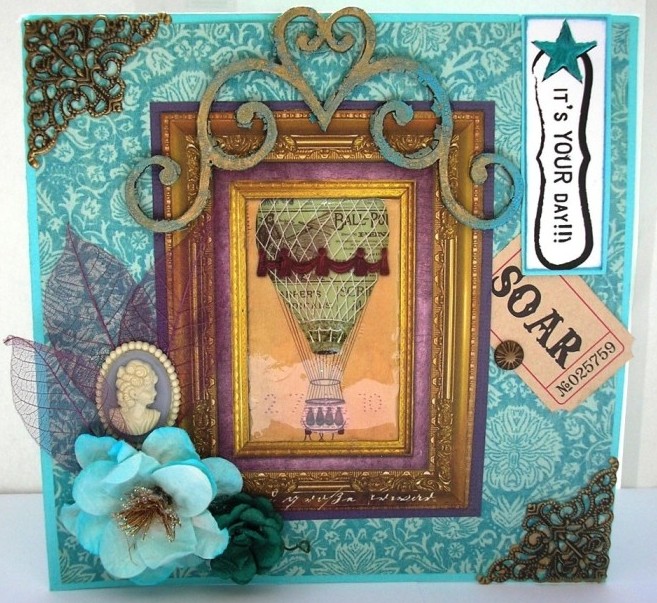
Card size is 6" x 6"
The chipboard I think was an old Kaisercraft one. I painted it
with crackle paint, the sprayed it with Distress Stain
"Tarnished Brass". The sentiment is a Basic Grey Rub-on and I
filled the star from the rub-on with Liquid Pearls.. On the
frame itself I used Glossy Accents all over the balloon picture in the
middle to give an illusions of glass.

Products Used:
Bo Bunny Beautiful Dreamer Paper "Daydream"
Tim Holtz Distress Stain "Tarnished Brass"
|
All projects copyright ®Charmed Cards & Crafts. All rights reserved.


